

Admin
Settings
Site-wide settings.
Settings holds the things that are true of your whole website, rather than of one page: its name, its logo, who may sign in with a passkey.
Most of it was set up when we built your site, and most of it never needs touching again. Two parts are yours: General and Security. An Admin may also want Media usage tracking. This page covers all of them, and says plainly which of the rest to leave alone.
Go to Admin, then Settings. Only an Admin user can open it.
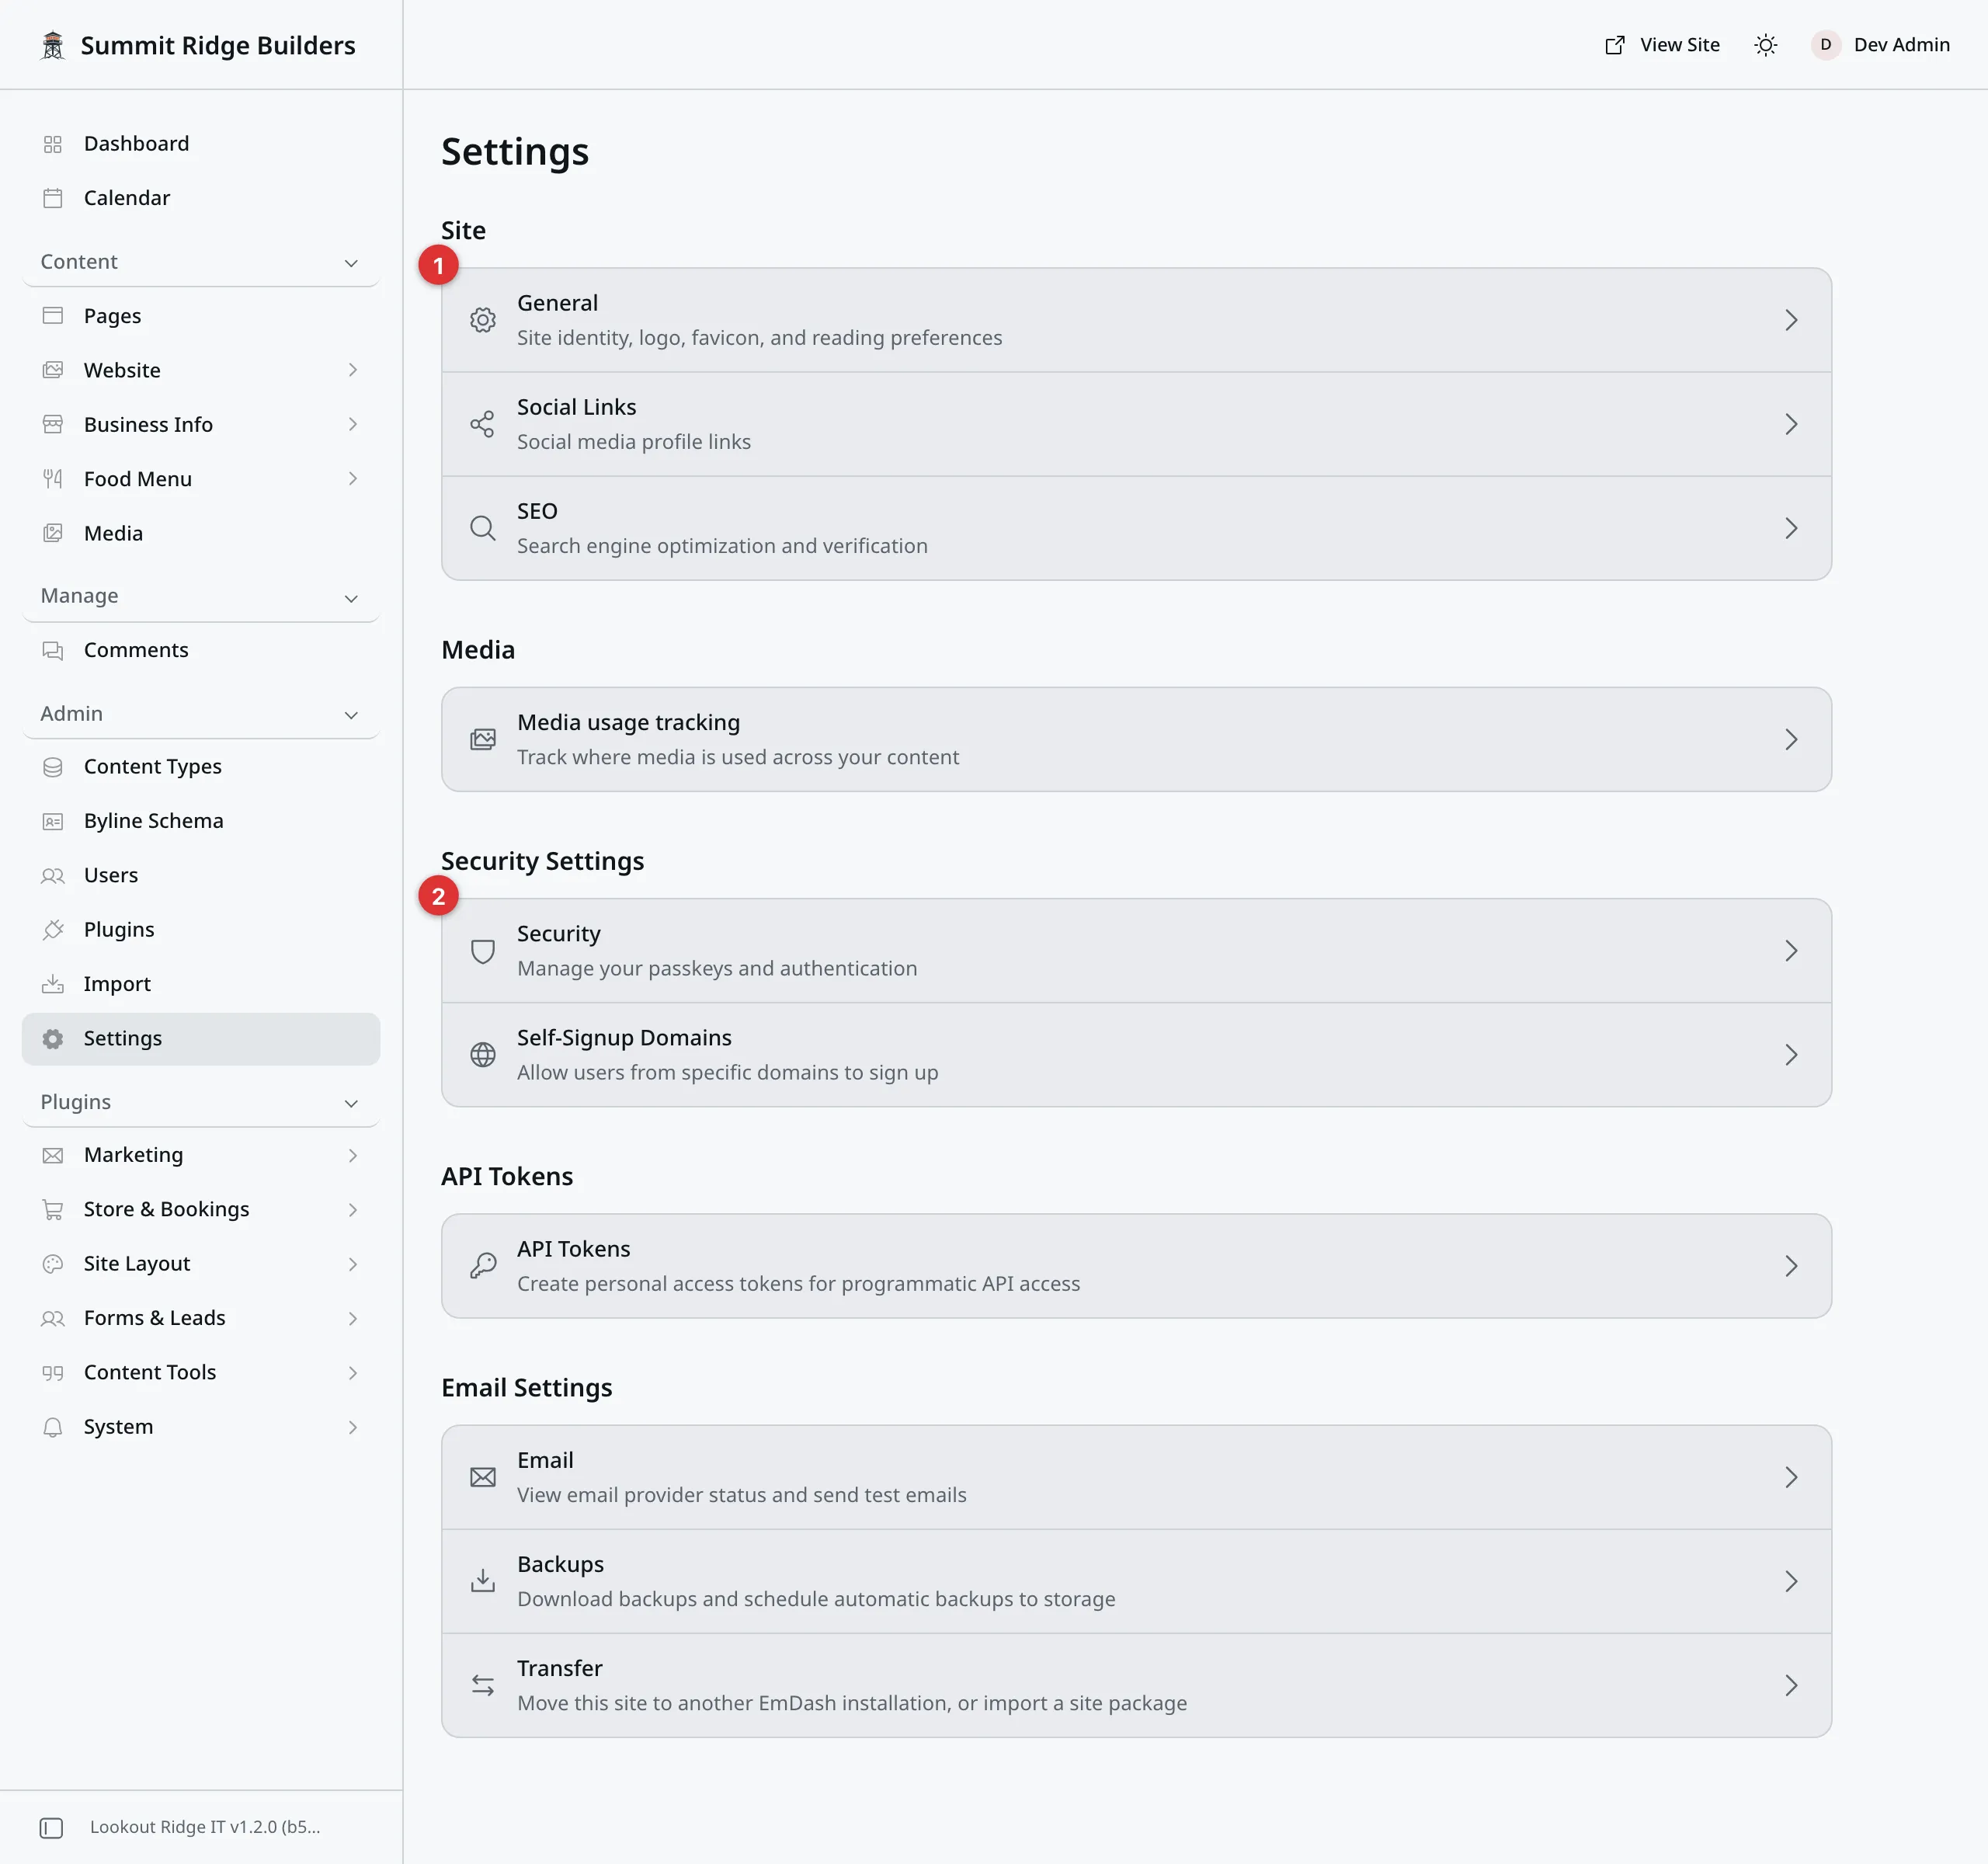
Everything on one screen. The two marked rows are the ones you will use.
1. General. Your business name, tagline and logo.
2. Security. Your own passkeys.
Click any row to open it. The arrow at the top left of the next screen brings you back here.
The admin panel is in English only. There is no language box.
General
This is your website’s name badge. Go to Admin, then Settings, then General.
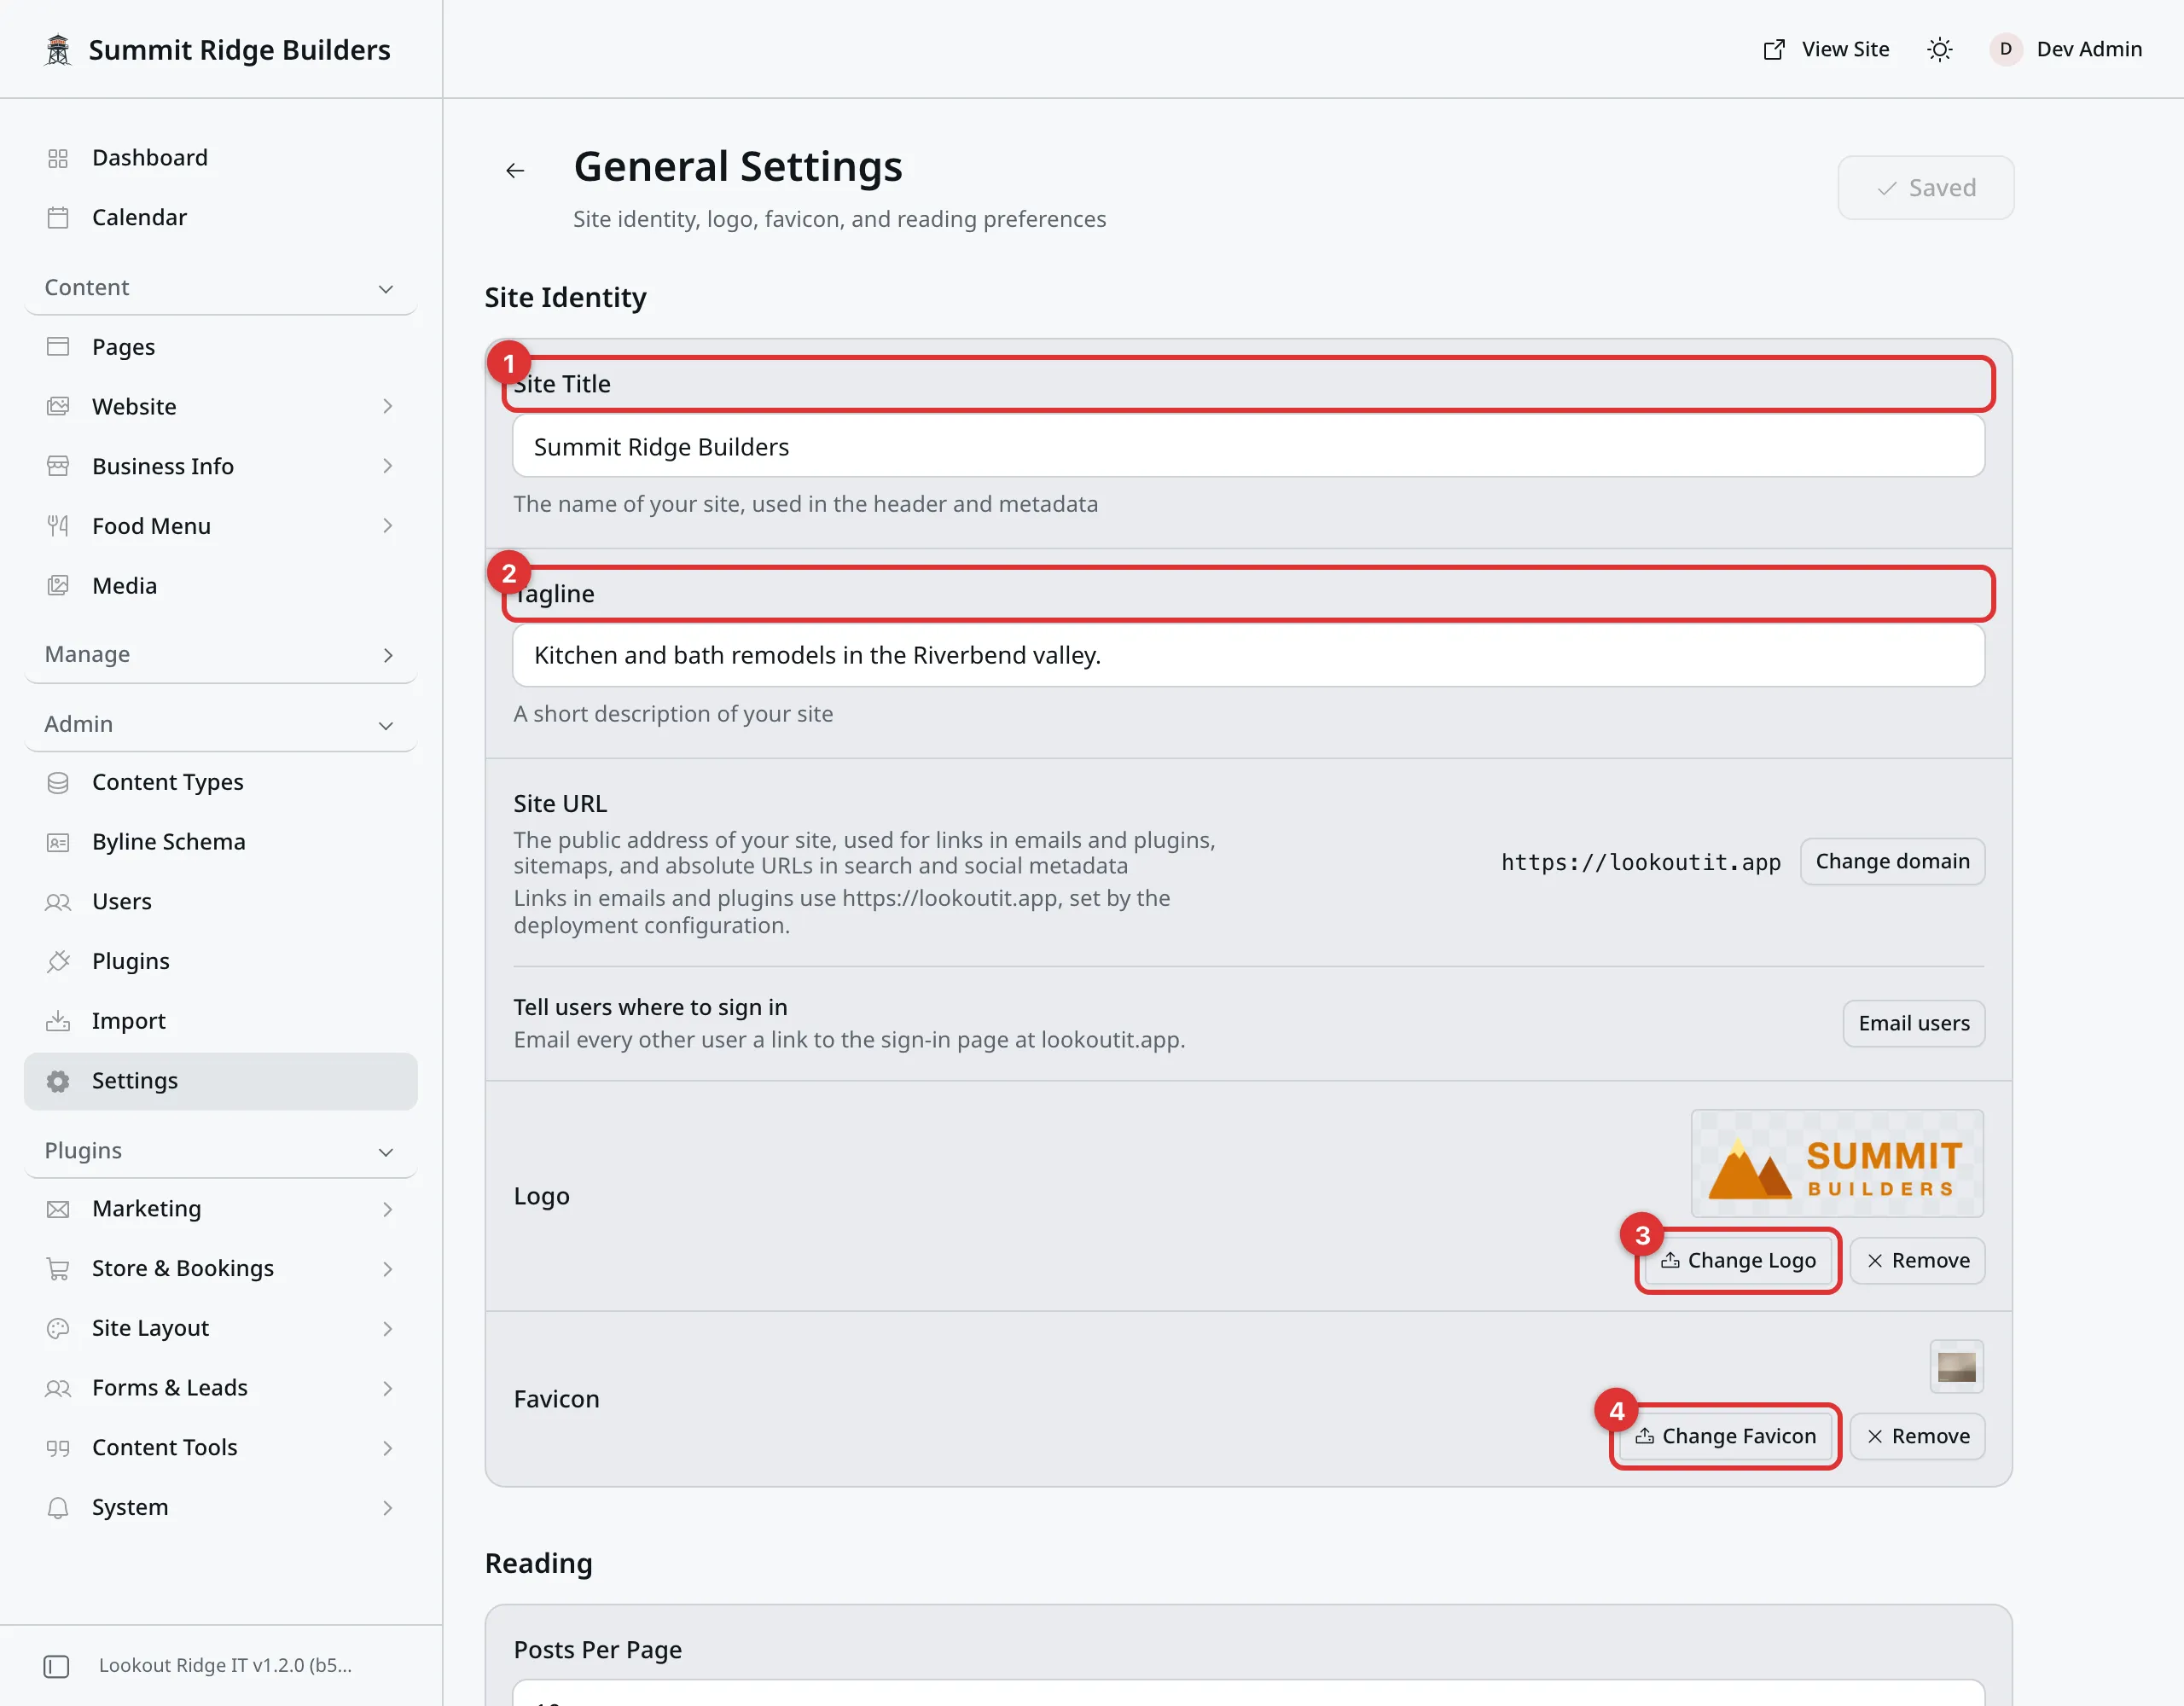
Four boxes matter here. The rest is ours.
1. Site Title. Your business name. It shows at the top left of every page of your website, again at the bottom, and in the browser tab.
2. Tagline. One short line about what you do. It shows in the footer, just under your name. Search engines may show it under your name too, so write it for a stranger.
3. The logo button. Puts a picture where your name is. It reads Select Logo when no logo is set, and Change Logo when one is, as in the picture. More on that below.
4. The favicon button. Sets the tiny picture in the browser tab. It reads Select Favicon when none is set, and Change Favicon when one is. More on that below.
Between them sits Site URL. That is your website’s own address. Your site uses it in the links it puts in emails and hands to Google. You cannot type in it.
Beside it is a Change domain button. It switches your website over to a new domain name, and that is our job. It checks that the new name really opens your website before it changes anything. Your domain name says when we use it, and what you notice afterward.
Under Site URL is Tell users where to sign in, with an Email users button. It emails everyone else who can sign in a link to the sign-in page at your address. Use it right after your domain changes. At any other time it only sends people an email they do not need.
Under all of that is a block headed Reading, holding Posts Per Page, Date Format and Timezone. We set those to suit your site. There is nothing to gain by changing them.
Warning
Your business name is not just a label. It appears in the bar at the top of every page, in your footer, in the browser tab, and in what search engines show about you.
Change it here and all of that changes at once. Anyone searching for the old name may not find you.
Change it for a real reason, such as a rename or a spelling mistake. Never as a test.
Saving here
There is a Save button at the top right. It reads Saved when there is nothing waiting.
Type your change, then click it. That is the whole job. There is no Publish on this screen: your website changes the second you save.
About the logo
A logo replaces your business name, in the bar at the top and in the footer. Both places, always. You cannot have the picture in one and the words in the other.
To set one, click Select Logo and pick a picture from your library. If a logo is already set, the button reads Change Logo instead. Media covers the picker and how to upload.
What makes a logo work here:
- Wide, not square. It sits in a narrow bar. Roughly three times as wide as it is tall is a safe shape.
- A see-through background. A PNG file with no background sits cleanly on your header. A photo with a white box around it looks like a sticker.
- Readable when small. On a phone it is about the size of a thumbnail. If you cannot read it at that size, nor can your customer.
- Not a photo. Photos go on your pages. A logo is a mark.
Once a logo is set, the button changes to Change Logo, with Remove beside it.
To swap the logo, click Change Logo and pick the new picture. To go back to your business name in words, click Remove, then Save. Your website shows the name again on every page.
About the favicon
The favicon is the tiny picture in the browser tab, next to your page title. Phones also use it when someone saves your site to their home screen.
To set one, click Select Favicon and pick a picture from your library. Then click Save.
What makes a favicon work:
- Square. It is shown as a small square, so a wide logo gets squashed.
- Simple. At this size, a letter or a plain mark reads best. Words do not.
- Bold colors. Fine lines and pale shades vanish at this size.
Your own browser may keep showing the old picture for a while after you change it. Your visitors see the new one.
Contact support
Contact us if you do not have a logo file, or only have a photo of your van.
Send us what you have. We will get it into the right shape and put it in for you.
Email support@lookoutridgeit.com. Getting support says what to put in the message.
Social Links
Clicking Social Links here does not open a screen of its own. It opens the Business info tab of the SEO page, where your social profiles really live.
The icons in your footer come from the Social links card on that tab. Social Links explains it.
Contact support
Contact us if a social icon in your footer is missing or points at the wrong account, and the Social links card has not fixed it.
Email support@lookoutridgeit.com. Getting support says what to put in the message.
SEO
SEO is what search engines see. Clicking SEO here opens the Settings tab of the SEO page. That page explains every box: how page titles are put together, the picture shown when a page is shared, the codes that prove the site is yours, and which bots may read your site.
We set this up, and it is working. There is nothing to keep up to date.
Warning
The boxes there hold codes and rules, and a wrong one is not obvious. Get it wrong and your pages can drop out of search results. Nothing tells you that has happened. You would notice weeks later, in your inquiries.
Contact support
Contact us about anything to do with search: not appearing on Google, the wrong words showing under your name, the wrong picture when a page is shared.
Tell us which page and what you searched for. This screen is rarely the answer, but we will check it.
Email support@lookoutridgeit.com. Getting support says what to put in the message.
Media usage tracking
This setting lets your Media library show where each file is used. Once it is on, every file gets a Used in tab that lists the pages and entries that show it. That tells you when a file is safe to delete.
It sits under the Media heading. Go to Admin, then Settings, then Media usage tracking. Only an Admin can turn it on.
Warning
Once tracking is on, it cannot be turned off.
Setting it up scans all your content. Nothing on your website changes, but edits made during the scan may be missed. Finish your edits first, and ask anyone else who edits the site to stop until it is done.
- Click Enable tracking.
- A box asks Turn on media usage tracking? Read the list in it.
- Check the box that says you have done those steps.
- Click Turn on.
- Keep the page open until the status reads Ready.
If the status reads Needs attention, stop. Do not keep clicking Retry setup.
Contact support
Contact us if media usage tracking says Needs attention. Tell us what the screen says, word for word.
Email support@lookoutridgeit.com. Getting support says what to put in the message.
Security
This is where your own passkeys live. A passkey is your phone or your laptop standing in for a password. Signing in explains them.
The screen shows your passkeys only. Nobody else’s.
A passkey only works at the web address where it was made. When your website moves to a new domain name, you add a new one there. Your domain name explains.
Go to Admin, then Settings, then Security.
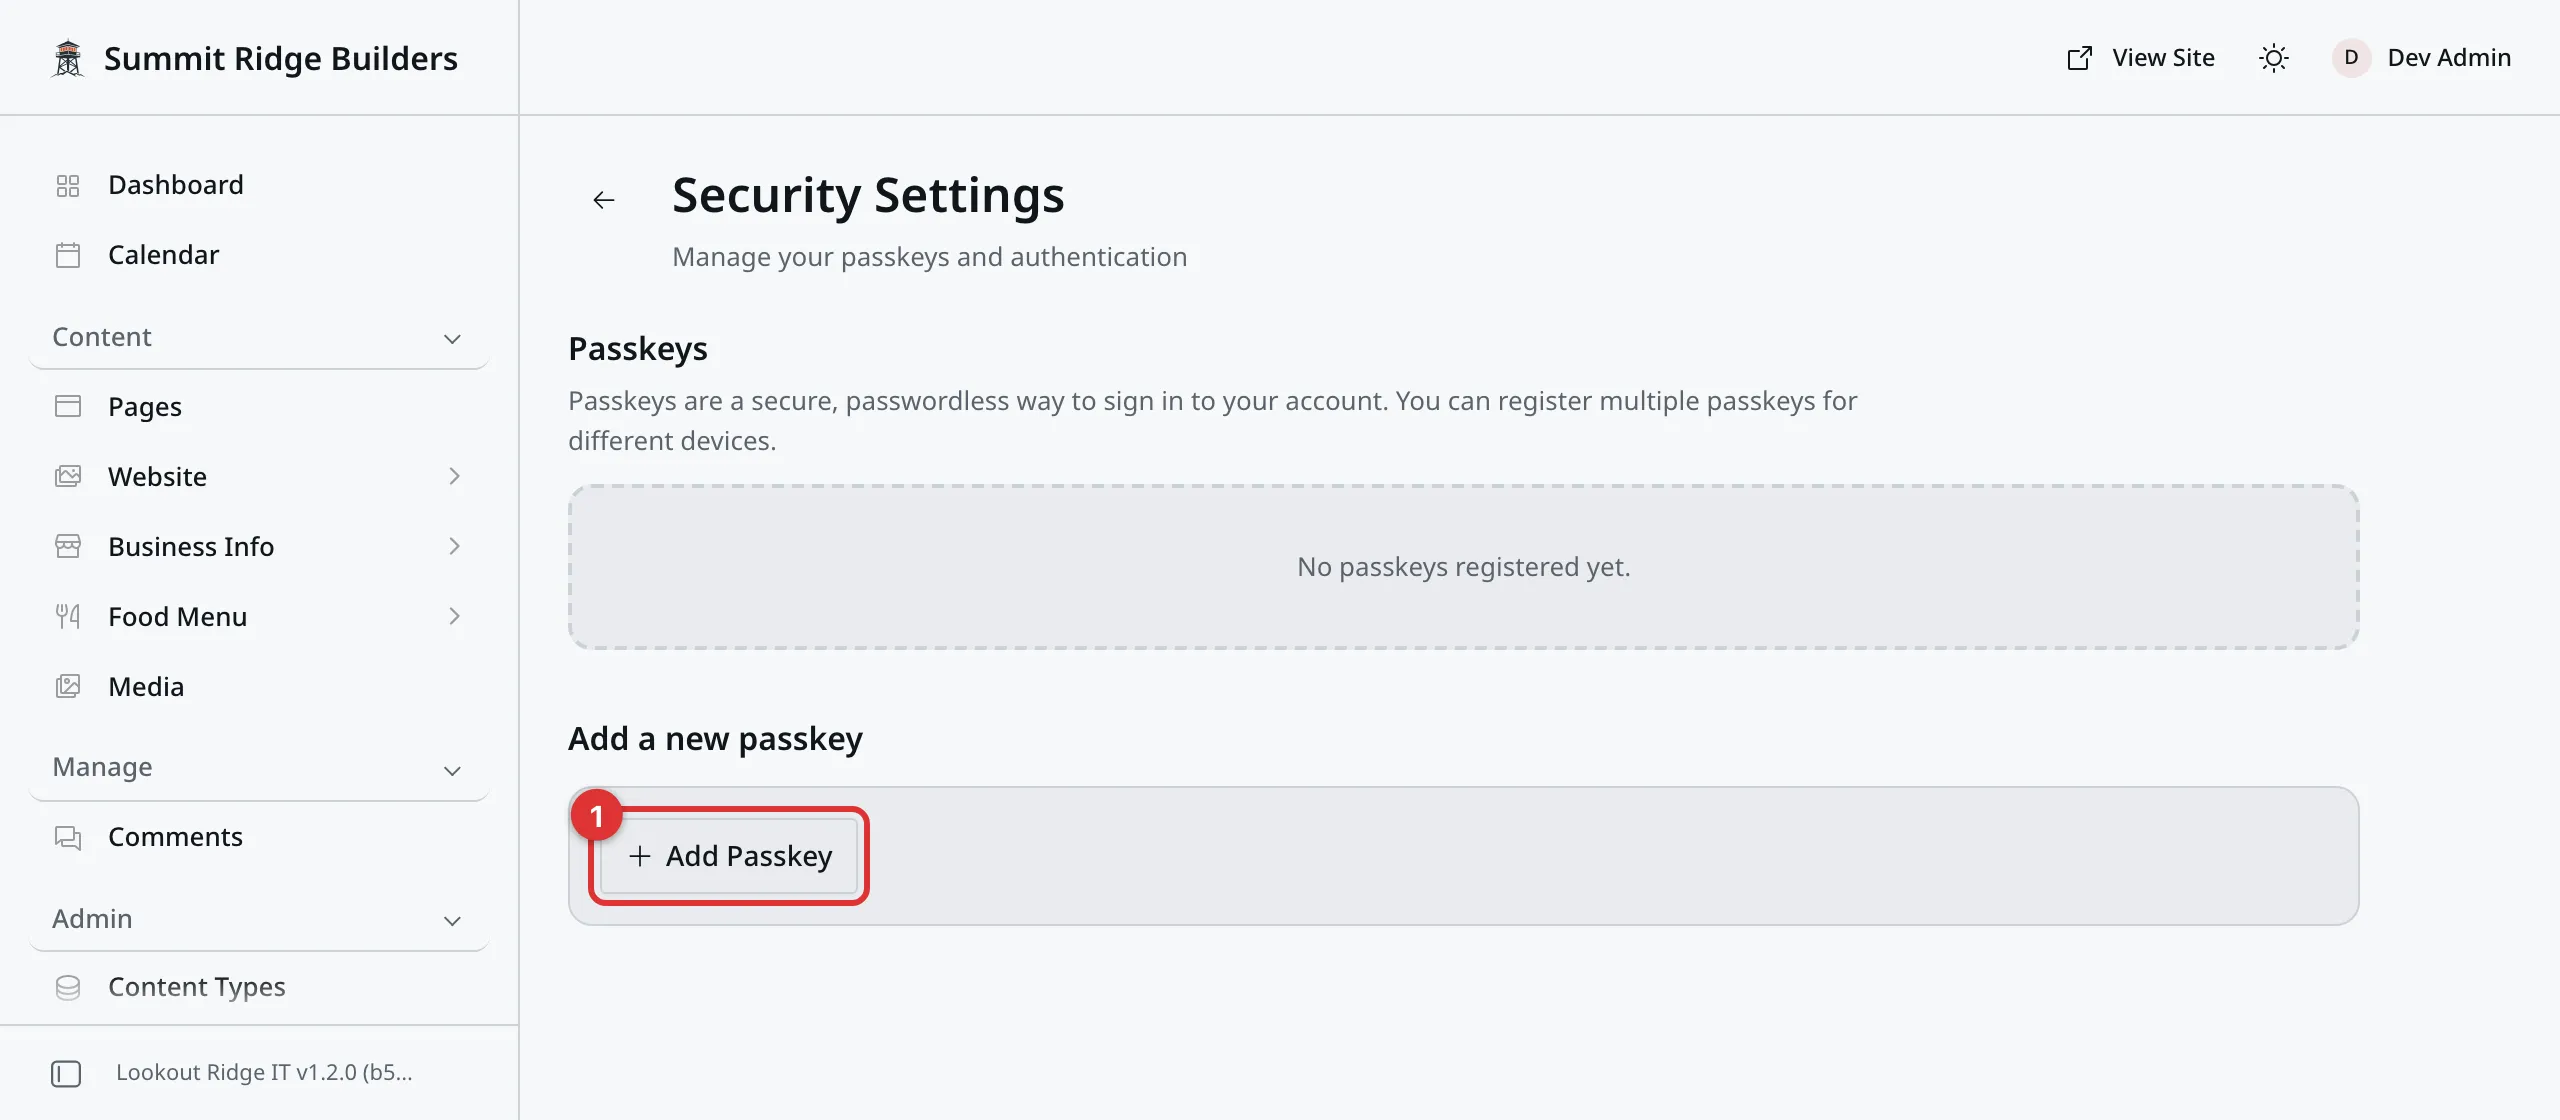
This account has none set up yet. Yours will list one row per device.
1. Add Passkey. Sets this computer up so you can sign in with it.
Each passkey you have gets a row. The row carries the name you gave it, whether it is tied to this one device or shared through your password manager, and when it was last used. Two buttons sit on the row: Rename and Remove.
Adding a passkey on another device
A passkey belongs to the device it was made on. Your work laptop needs its own. So does your phone.
- On that device, open your website and add
/_emdash/adminto the address. - Sign in with an email link. Signing in has the steps.
- Go to Admin, then Settings, then Security.
- Click Add Passkey.
- Give it a name you will recognize later, such as
Office laptop. The name is optional, but an unnamed passkey is no use to you in a year. - Click Register Passkey, then follow what your device asks: your fingerprint, your face, or your PIN.
The new passkey appears in the list. From now on that device signs you in without an email.
Removing a passkey
Do this for a phone you have sold, or a laptop you no longer use.
Warning
Never remove your only passkey.
If it is the last one on the list, taking it off leaves you with no fast way in. The panel warns you that it cannot be undone, and it means it.
Count the rows first. If there is only one, add a passkey on another device before you remove anything.
Click Remove on the row. The panel asks you to confirm and tells you that you will not be able to sign in with that passkey again. Click Remove.
You can always set that device up again later. It is a new passkey, not the old one back.
Contact support
Contact us if you have lost the device your only passkey was on.
Do not start deleting rows to tidy up. Tell us what happened and we will get you back in.
Email support@lookoutridgeit.com. Getting support says what to put in the message.
Self-Signup Domains
This screen can let anybody with an email address at a given company sign themselves up to your admin panel, with no invitation.
It is empty, and it should stay empty. Everyone who works on your site is invited by name on the Users screen.
Warning
Adding a domain here hands out accounts without anybody approving them.
Add a common email provider by mistake and you have opened your admin panel to the world. There is no list of who came in that way and no warning that it has happened.
Contact support
Contact us if you need a group of people to have access, such as a new office team. Inviting them one by one is safer, and we will help you do it.
Email support@lookoutridgeit.com. Getting support says what to put in the message.
API Tokens
A token is a long password that lets another program talk to your website without a person signing in.
Your list starts out empty, and most sites never need a token at all. There is one common reason to make one: an AI assistant that cannot sign in for itself. Your website’s MCP server covers that, and it is the only page here that asks you to make one.
Warning
A token is a key to your website, and this screen shows it once. If somebody else gets a copy, they have the run of your content and nothing on your site looks any different.
Do not make one because a website or an email asked you to.
Contact support
Contact us if a company you work with says they need to connect to your website. Tell us who they are and what they want to do, and we will set it up safely.
Email support@lookoutridgeit.com. Getting support says what to put in the message.
This screen shows whether your website can send email, and offers a test message.
The setup itself lives elsewhere, on the Email Transport screen, and that page explains it.
Warning
Send Test sends a real email to whatever address you type. It is not a pretend one.
Type your own address if you use it at all. Never a customer’s.
Contact support
Contact us if this screen says email is not working, or if the emails about your inquiries have stopped arriving.
Tell us roughly when you last got one. Check your junk folder first.
Email support@lookoutridgeit.com. Getting support says what to put in the message.
Backups
A backup is a copy of your website’s content, kept in case something goes very wrong.
We already keep backups of your site. This screen is a second, self-service copy: a Download backup button, and a daily copy you can switch on.
Downloading a copy for your own records is harmless. Everything else here is ours.
Warning
The buttons on this screen are not a rescue. Nothing here puts a deleted page back, and there is no restore button.
Each stored backup has a Delete button, and a deleted backup is gone for good. Leave the stored list alone.
Putting a site back from a backup is a careful job, and doing it wrong loses the newer work. That part is ours.
Contact support
Contact us the moment something is badly wrong: pages gone, the site showing the wrong thing, an import that went astray.
Tell us what happened and roughly when. The sooner you write, the more we can save. Do not try to fix it from this screen first.
Email support@lookoutridgeit.com. Getting support says what to put in the message.
Transfer
Transfer moves a whole website from one place to another. It sits under the Email Settings heading, below Backups. Only an Admin user sees it.
This screen is ours. You will never need it to run your website.
Warning
The file this screen makes holds every entry on your website, drafts and trash included, with the name and email address of each person who wrote them. Treat it like private records.
Its import side replaces a website’s content with someone else’s, and it cannot be undone. Leave it alone.
Contact support
Contact us if you are thinking of moving your website somewhere else. We will talk you through what moves and what does not.
Email support@lookoutridgeit.com. Getting support says what to put in the message.
Last updated Oct 20, 2026