

Content
Pages
Creating, editing, and publishing pages.
Pages are the screens of your website. Home, Contact, Services: each one is a page, and each one has a row here.
Go to Content, then Pages.
This page is also the guide to the editor itself. Posts, services and the rest use the same editor, so what you learn here works there too.
The list of your pages
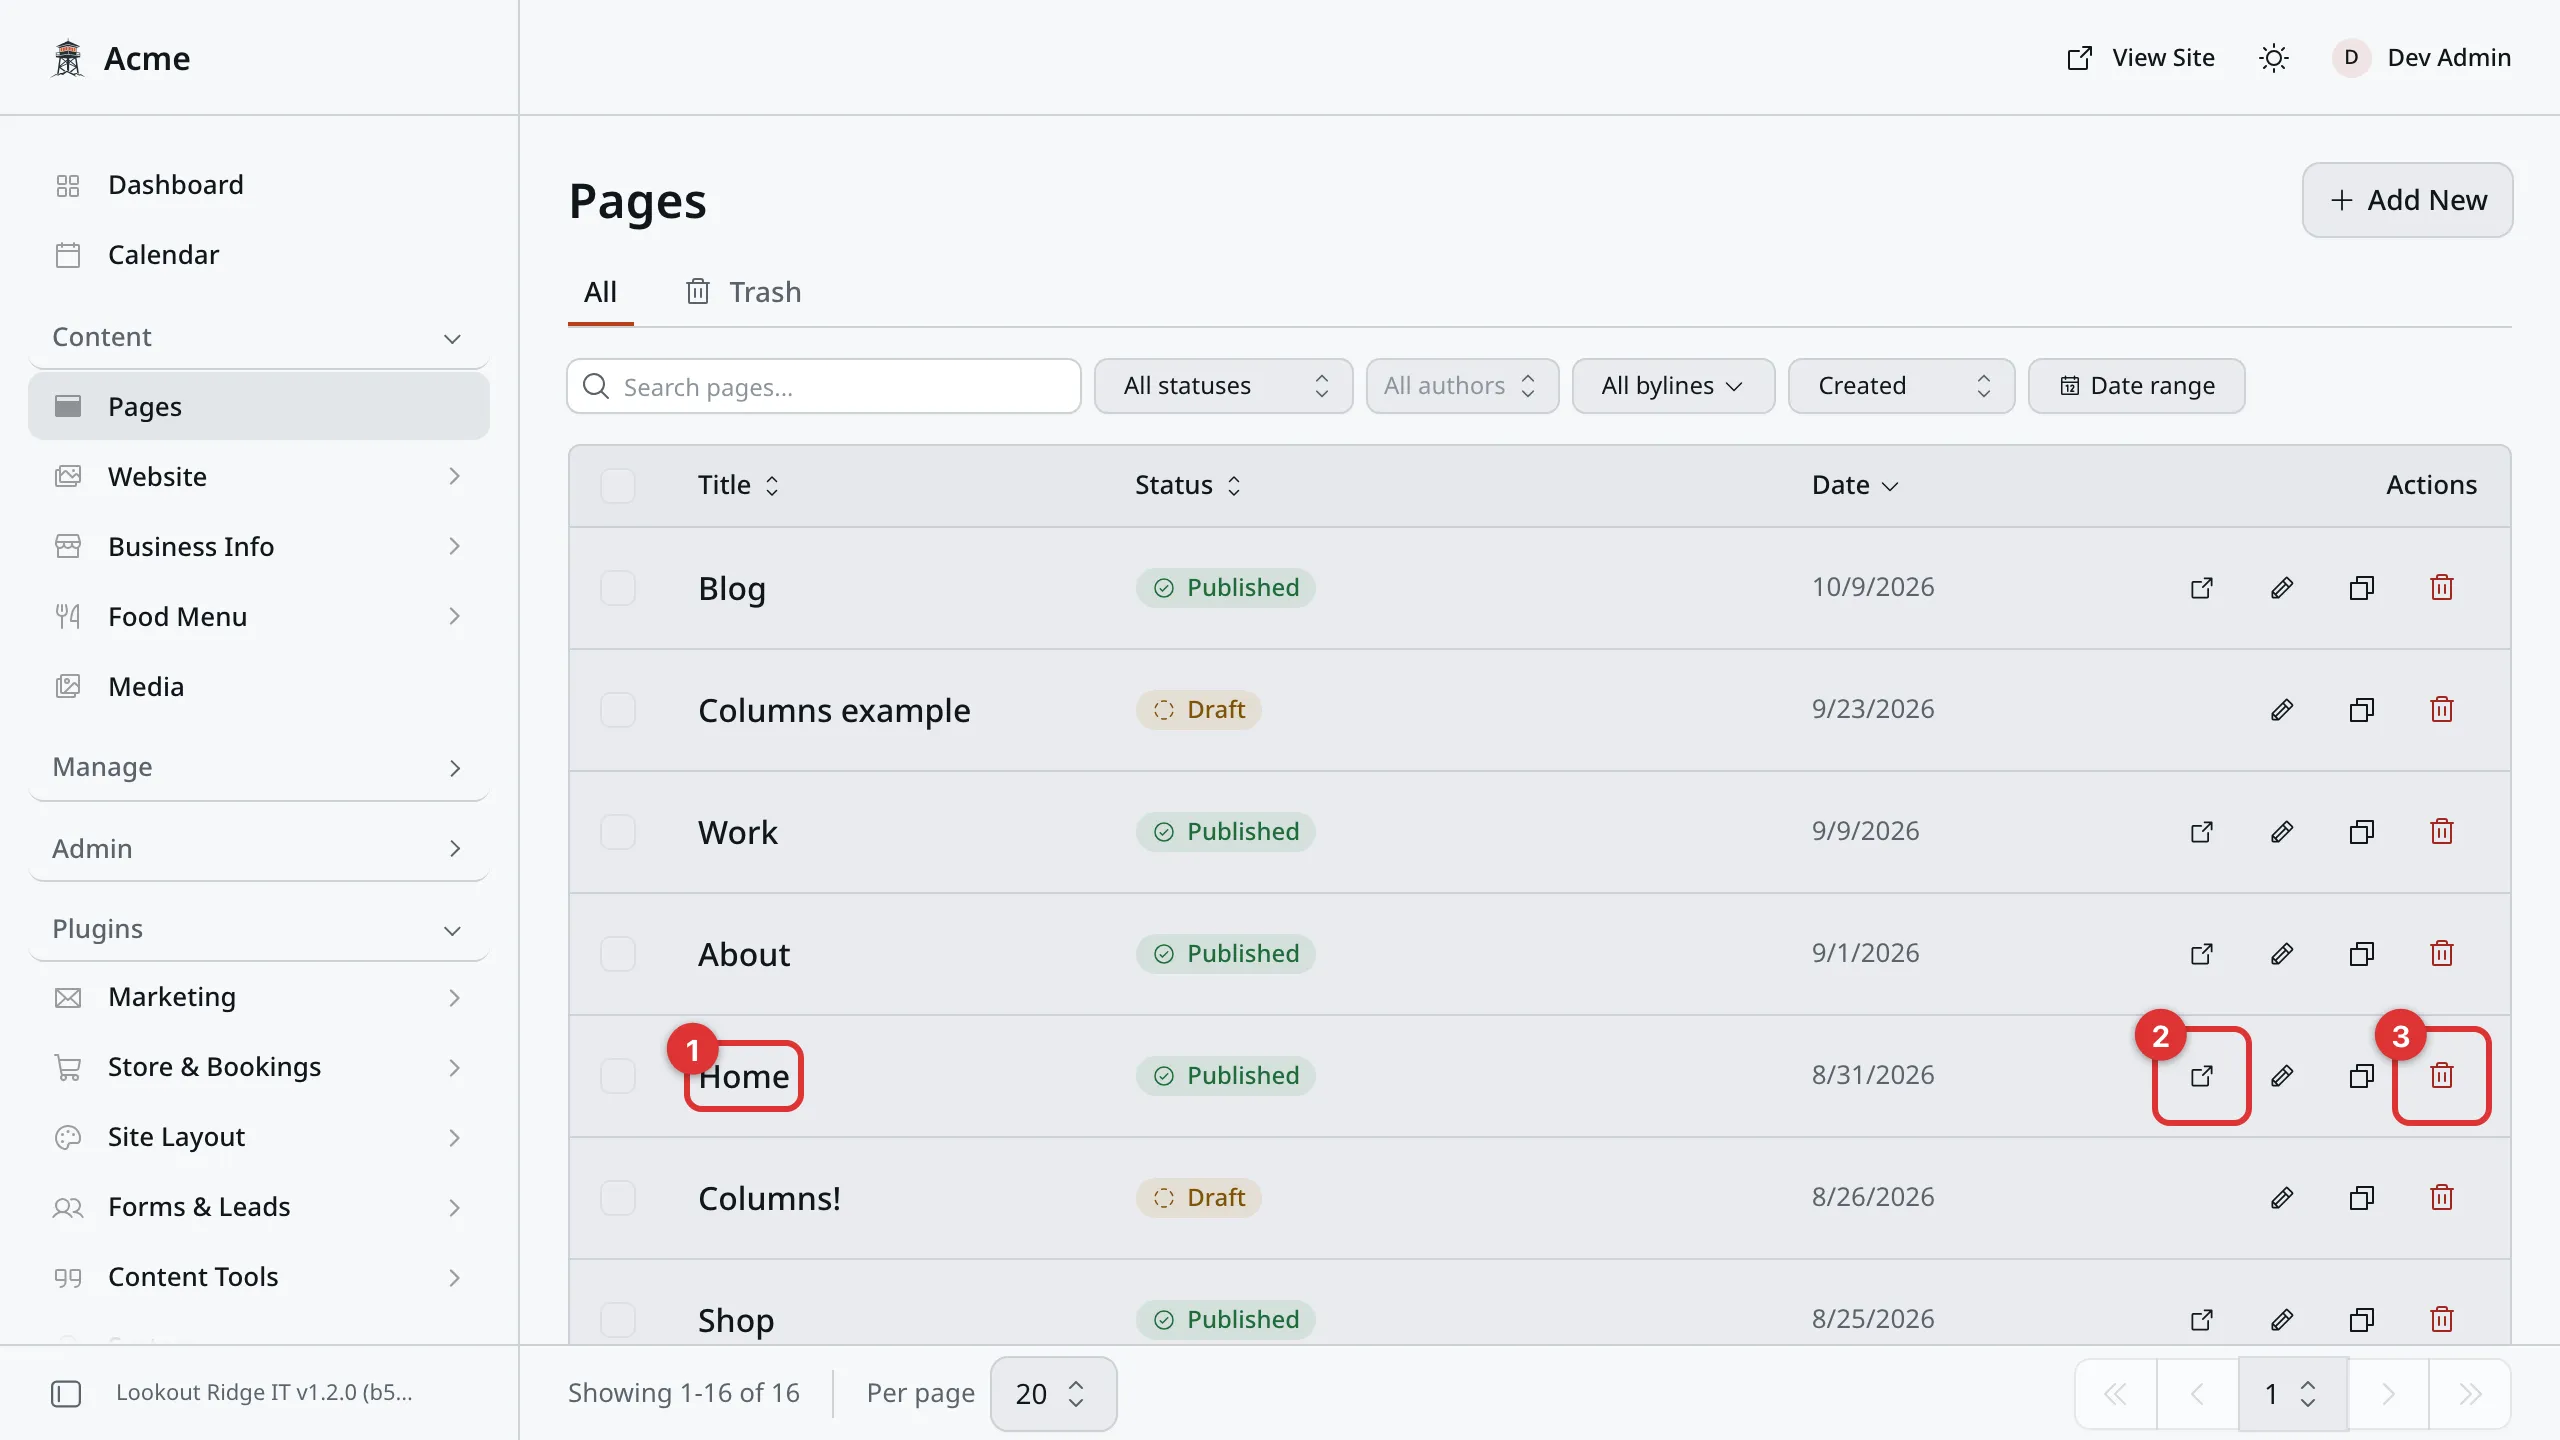
Every row is one page on your website.
1. The title. Click it to open the page and edit it.
2. The view icon. Opens that page on your live site in a new tab.
3. The red trash icon. Sends the page to the Trash. Read the warning below first.
The Status column tells you what the public can see. Published means the page is live. Saving and publishing explains the rest.
The list shows 20 rows at a time. With more than that, page numbers sit at the foot of the list. Click one to see the next rows.
Warning
Your website is built around the pages in this list. It needs them.
Take away the Home page, by using Unpublish Page or the red trash icon, and your front page stops showing your business. Visitors get a short setup message instead. The same goes for Contact, and for every other page that came with your website.
Leave these pages in place. To change a page, edit it. Do not remove it.
A page you added yourself is different. Nothing else leans on it, so you can take it away. See Adding a new page below.
Inside a page
Click a title and the page opens. It fills the whole screen.
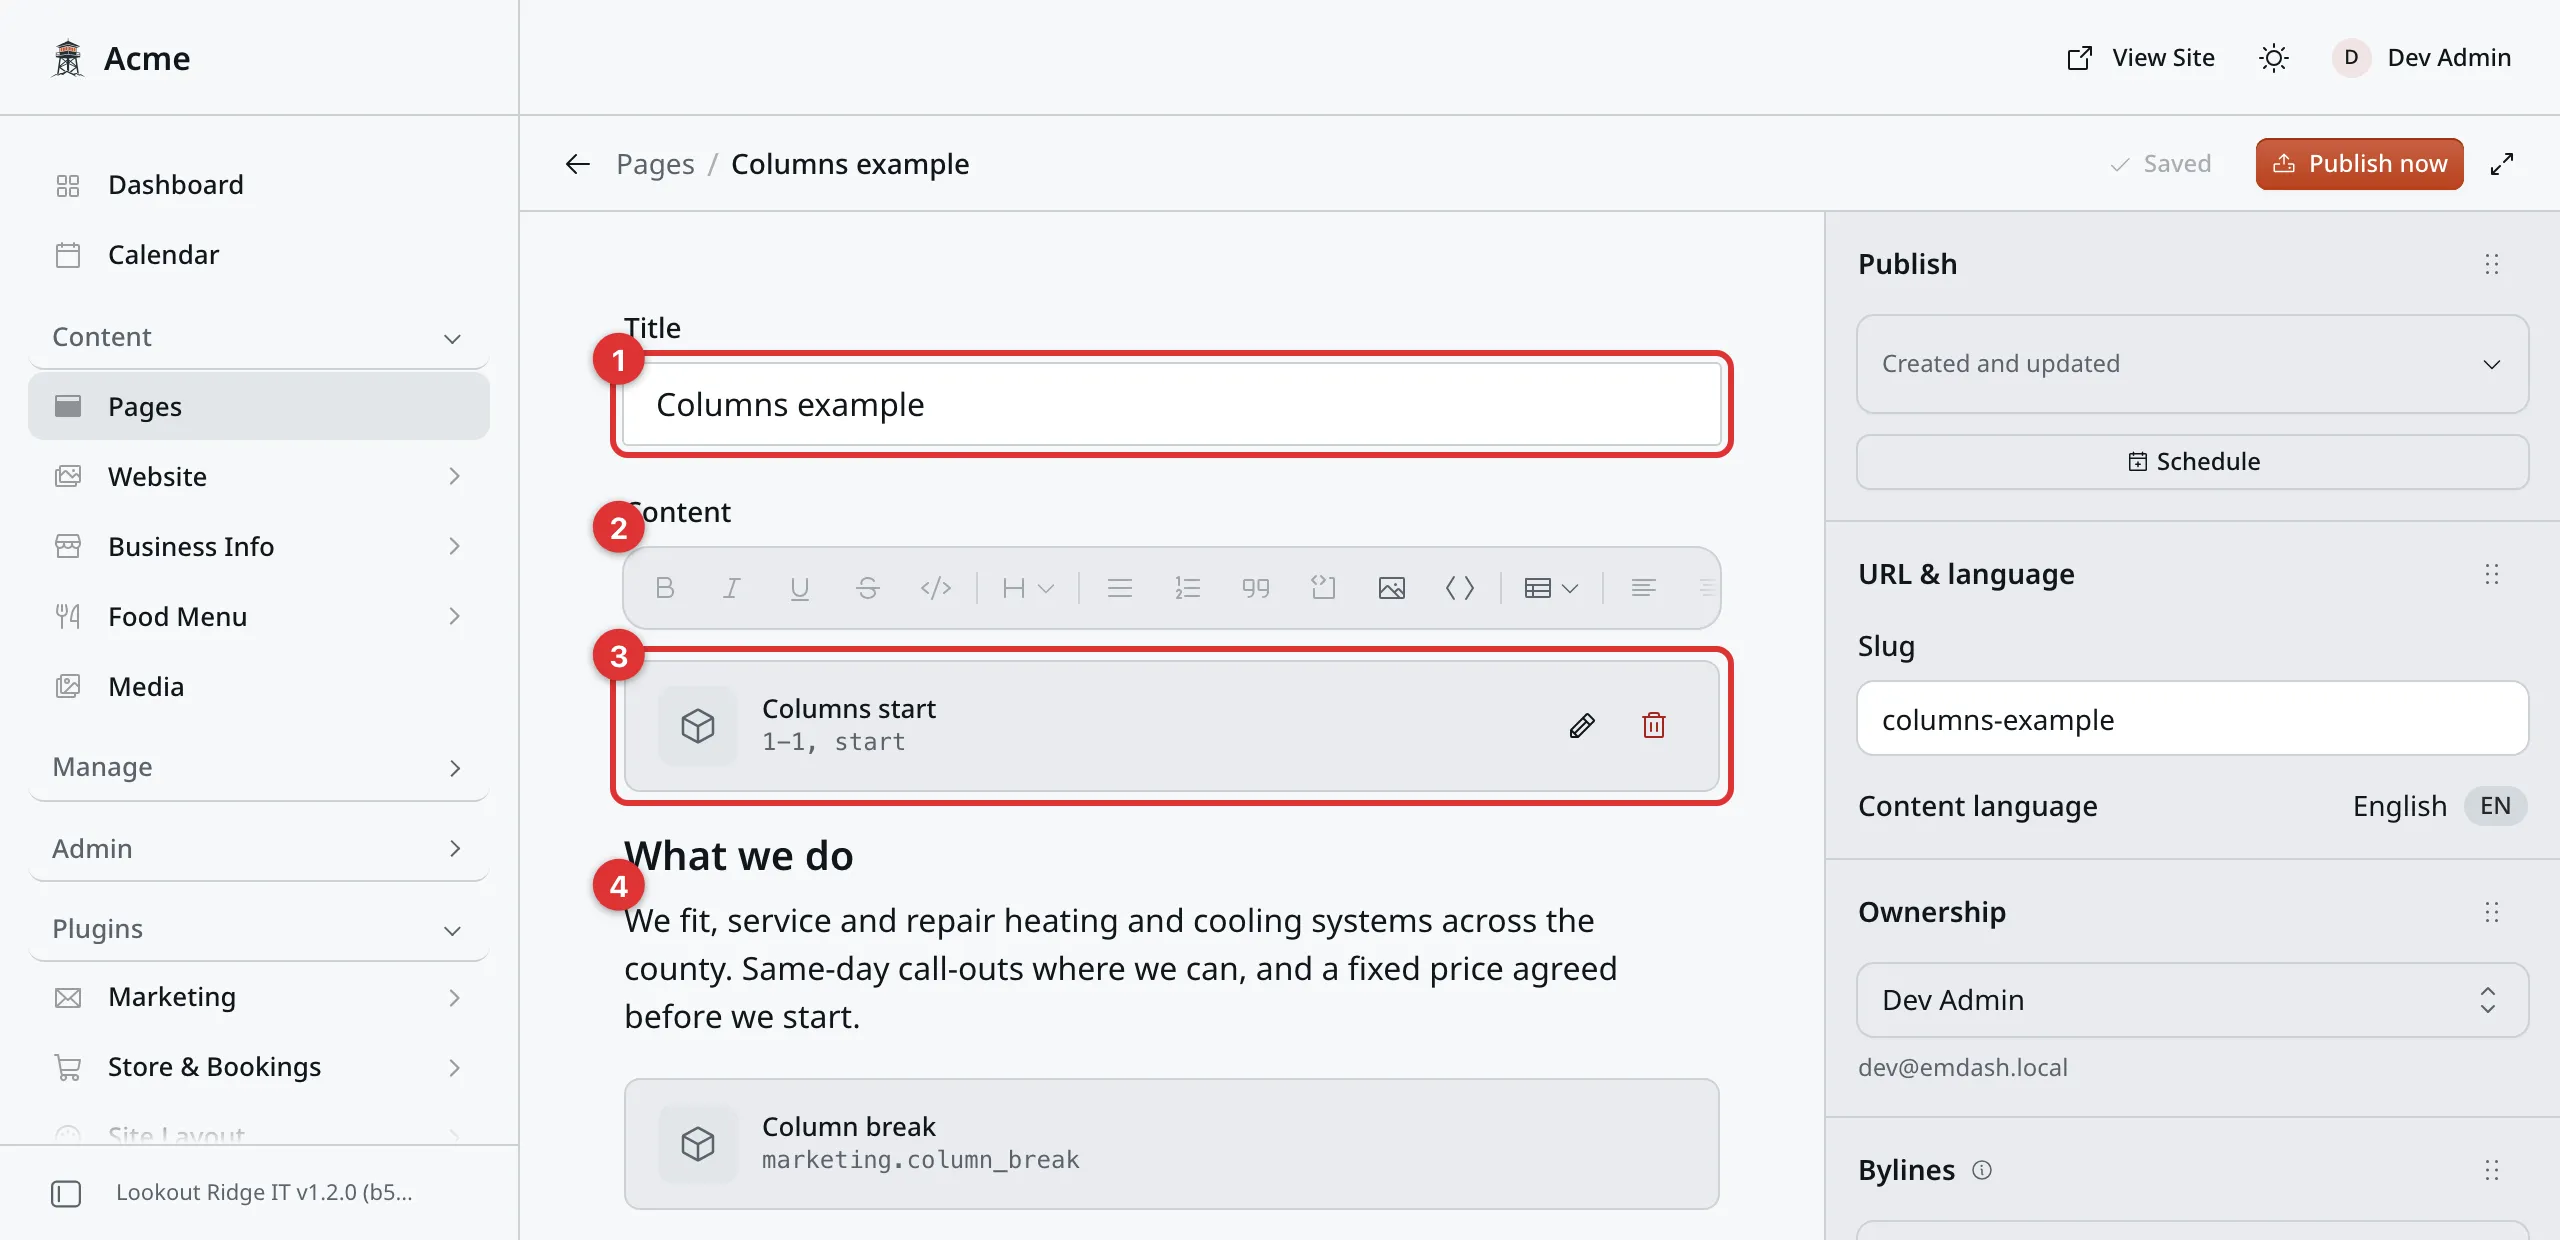
The Content box holds two kinds of thing: blocks, and plain text.
1. Title. The big box at the top. It is the name of the page, and it shows at the top of the browser tab.
2. The buttons. Bold, headings, links and more. They work on text you have selected.
3. A block. A ready made section, shown as a gray card with its name on it. A block builds a whole strip of your page: a big headline, your list of services, your photos. You do not type that layout yourself. You fill in a short form and the block does the rest.
4. Plain text. Words you type yourself, exactly as you type them.
Two more boxes sit around it. Parent page, between the title and the content, sets where the page lives in your web address. Leave it alone on the pages that came with your website. Parent page explains it. Search & social, under the content, sets how the page looks in Google and when it is shared. See What Google shows.
The buttons to save and publish sit in the bar at the top. Saving and publishing explains each one.
The Settings panel runs down the right side. It holds the publishing dates and schedule, the Slug, the SEO boxes and your page’s history. On a wide screen it is always there. On a phone or a narrow window, click Settings in the top bar to open it or close it.
The blocks you can add
Most pages are mostly blocks. Blocks you may see include:
- Basic Hero. The big headline and buttons at the top of a page.
- Story. A few paragraphs about you, next to a photo.
- Services. Cards for your services, taken from Content, Business Info, Services.
- Testimonials. Customer quotes, taken from Content, Website, Testimonials.
- Gallery. A grid of photos, taken from your albums.
- FAQ. Questions and answers that open and close.
- Pricing. A price card for each of your plans.
- Map. A map of where you are. See The map below.
- Branches. A card for each of your shops or offices. See Branches.
- Before / After. Two photos of one job, with a slider between them. It comes with the page blocks, so every site has it.
- Social Post. One post from a social account. You see it only when the Social Embeds plugin is on. See Social Embeds.
- Latest posts. Your newest blog posts. It comes with the blog add-on. See Posts.
- Projects. Cards for your projects. It comes with the portfolio add-on. See Projects.
- Pricing Plans. Plans people can buy on your site. It comes with the commerce add-on. See Products and plans.
- Product Grid. A row of things you sell. It comes with the commerce add-on too. See Products and plans.
The editor has a few more of its own: Image, Video, Iframe and HTML. Each one has its own part of this page, further down.
Some blocks pull their words from somewhere else in the panel. The Services block is one. To change a service, you edit it under Content, then Business Info, then Services, and every page that shows it updates.
A button to see them all
Five blocks can end with a button that leads to the full list: Services, Testimonials, Gallery, Projects and Latest posts. A home page might show three services, then a button to all of them.
Each of those blocks has two boxes for it, both starting Link to all:
- (button text) is the words on the button, such as “See all our work”.
- (URL) is where it goes. Start with a slash for your own pages.
Each block has its own rule:
| Block | When the button shows | Where it goes if the URL is empty |
|---|---|---|
| Services | When the button text is filled in. | /services |
| Gallery | When the button text is filled in. | /gallery |
| Projects | When the button text is filled in. | /work |
| Testimonials | Only when both boxes are filled in. | Nowhere. The button needs a URL. |
| Latest posts | Always. With no text, it reads “All posts”. | /blog |
Changing the words in a block
- Click the block once. An orange line appears around it.
- Click the pencil icon on the right of the card.
- A form opens, holding the block’s words in boxes. Change what you need.
- Click Save.
- Click Publish changes, then Publish changes again to confirm. The change is on your website.
Adding a block
A new block lands wherever the cursor is, so put the cursor there first. To add one at the end of the page, click at the end of the last line and press Enter to open an empty line.
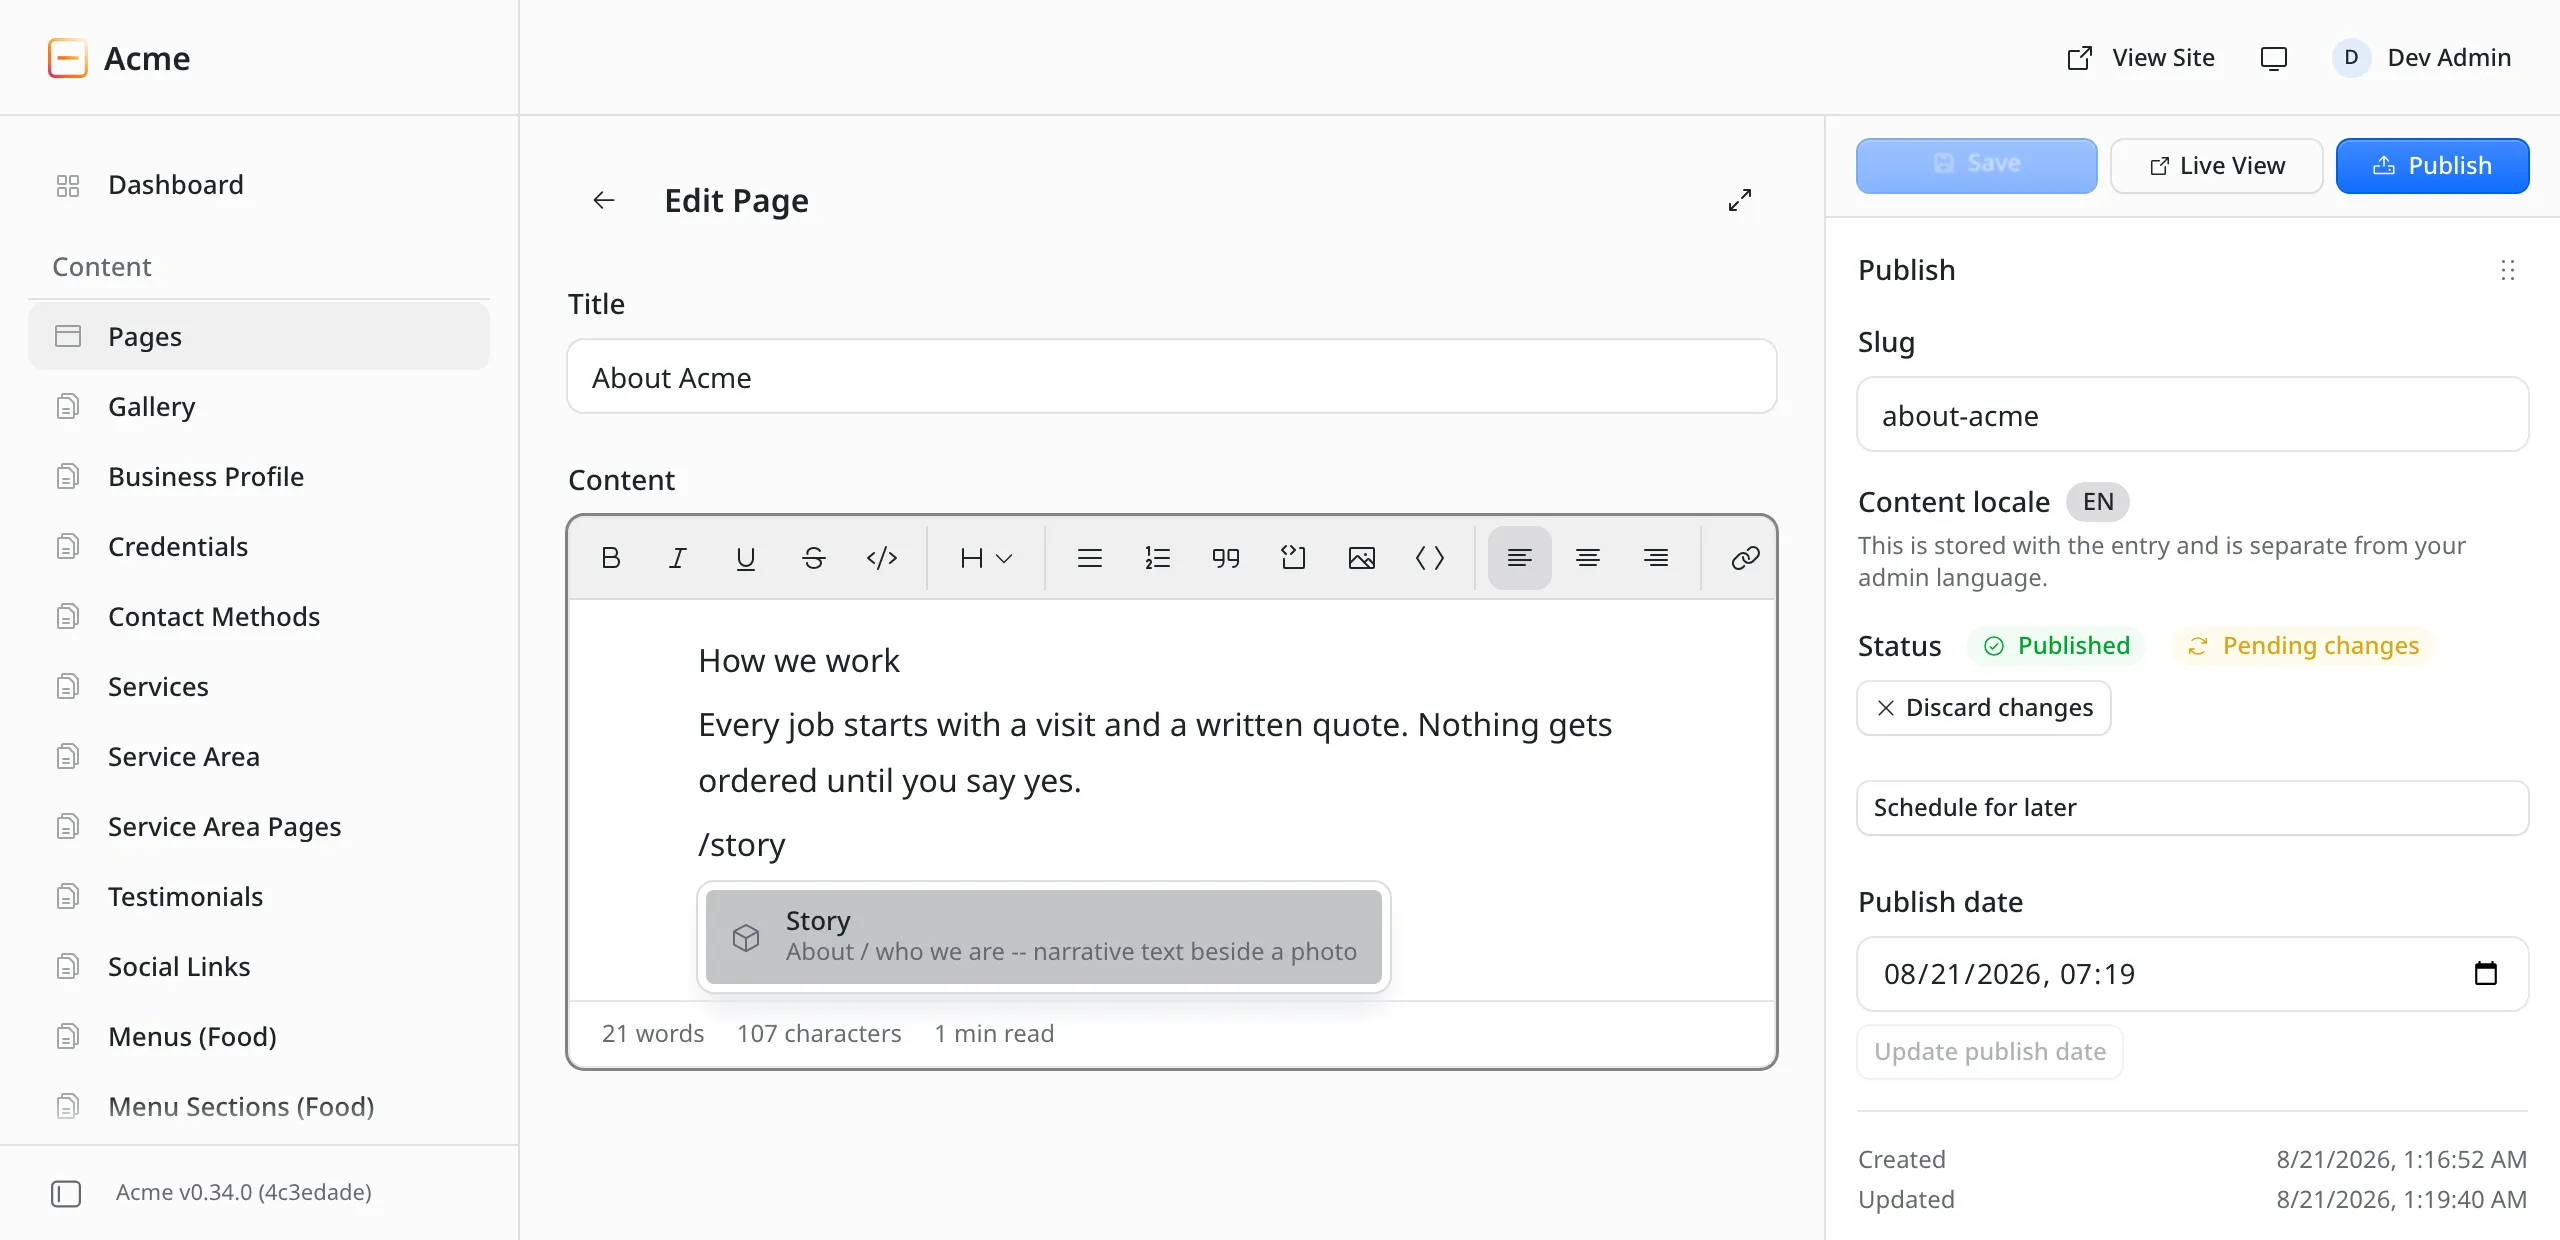
Type a slash, then a word. The list shrinks to what matches.
- Type
/on the empty line. A menu opens. It only opens on an empty line, so press Enter first if you are at the end of a sentence. - Type a word from the block name, such as
story. - Click the block in the menu.
A form opens with the block’s fields. On a new block its title starts with Insert and it ends in an Insert button. The picture shows the same form opened on a block that is already on the page, so it reads Edit and Save instead.
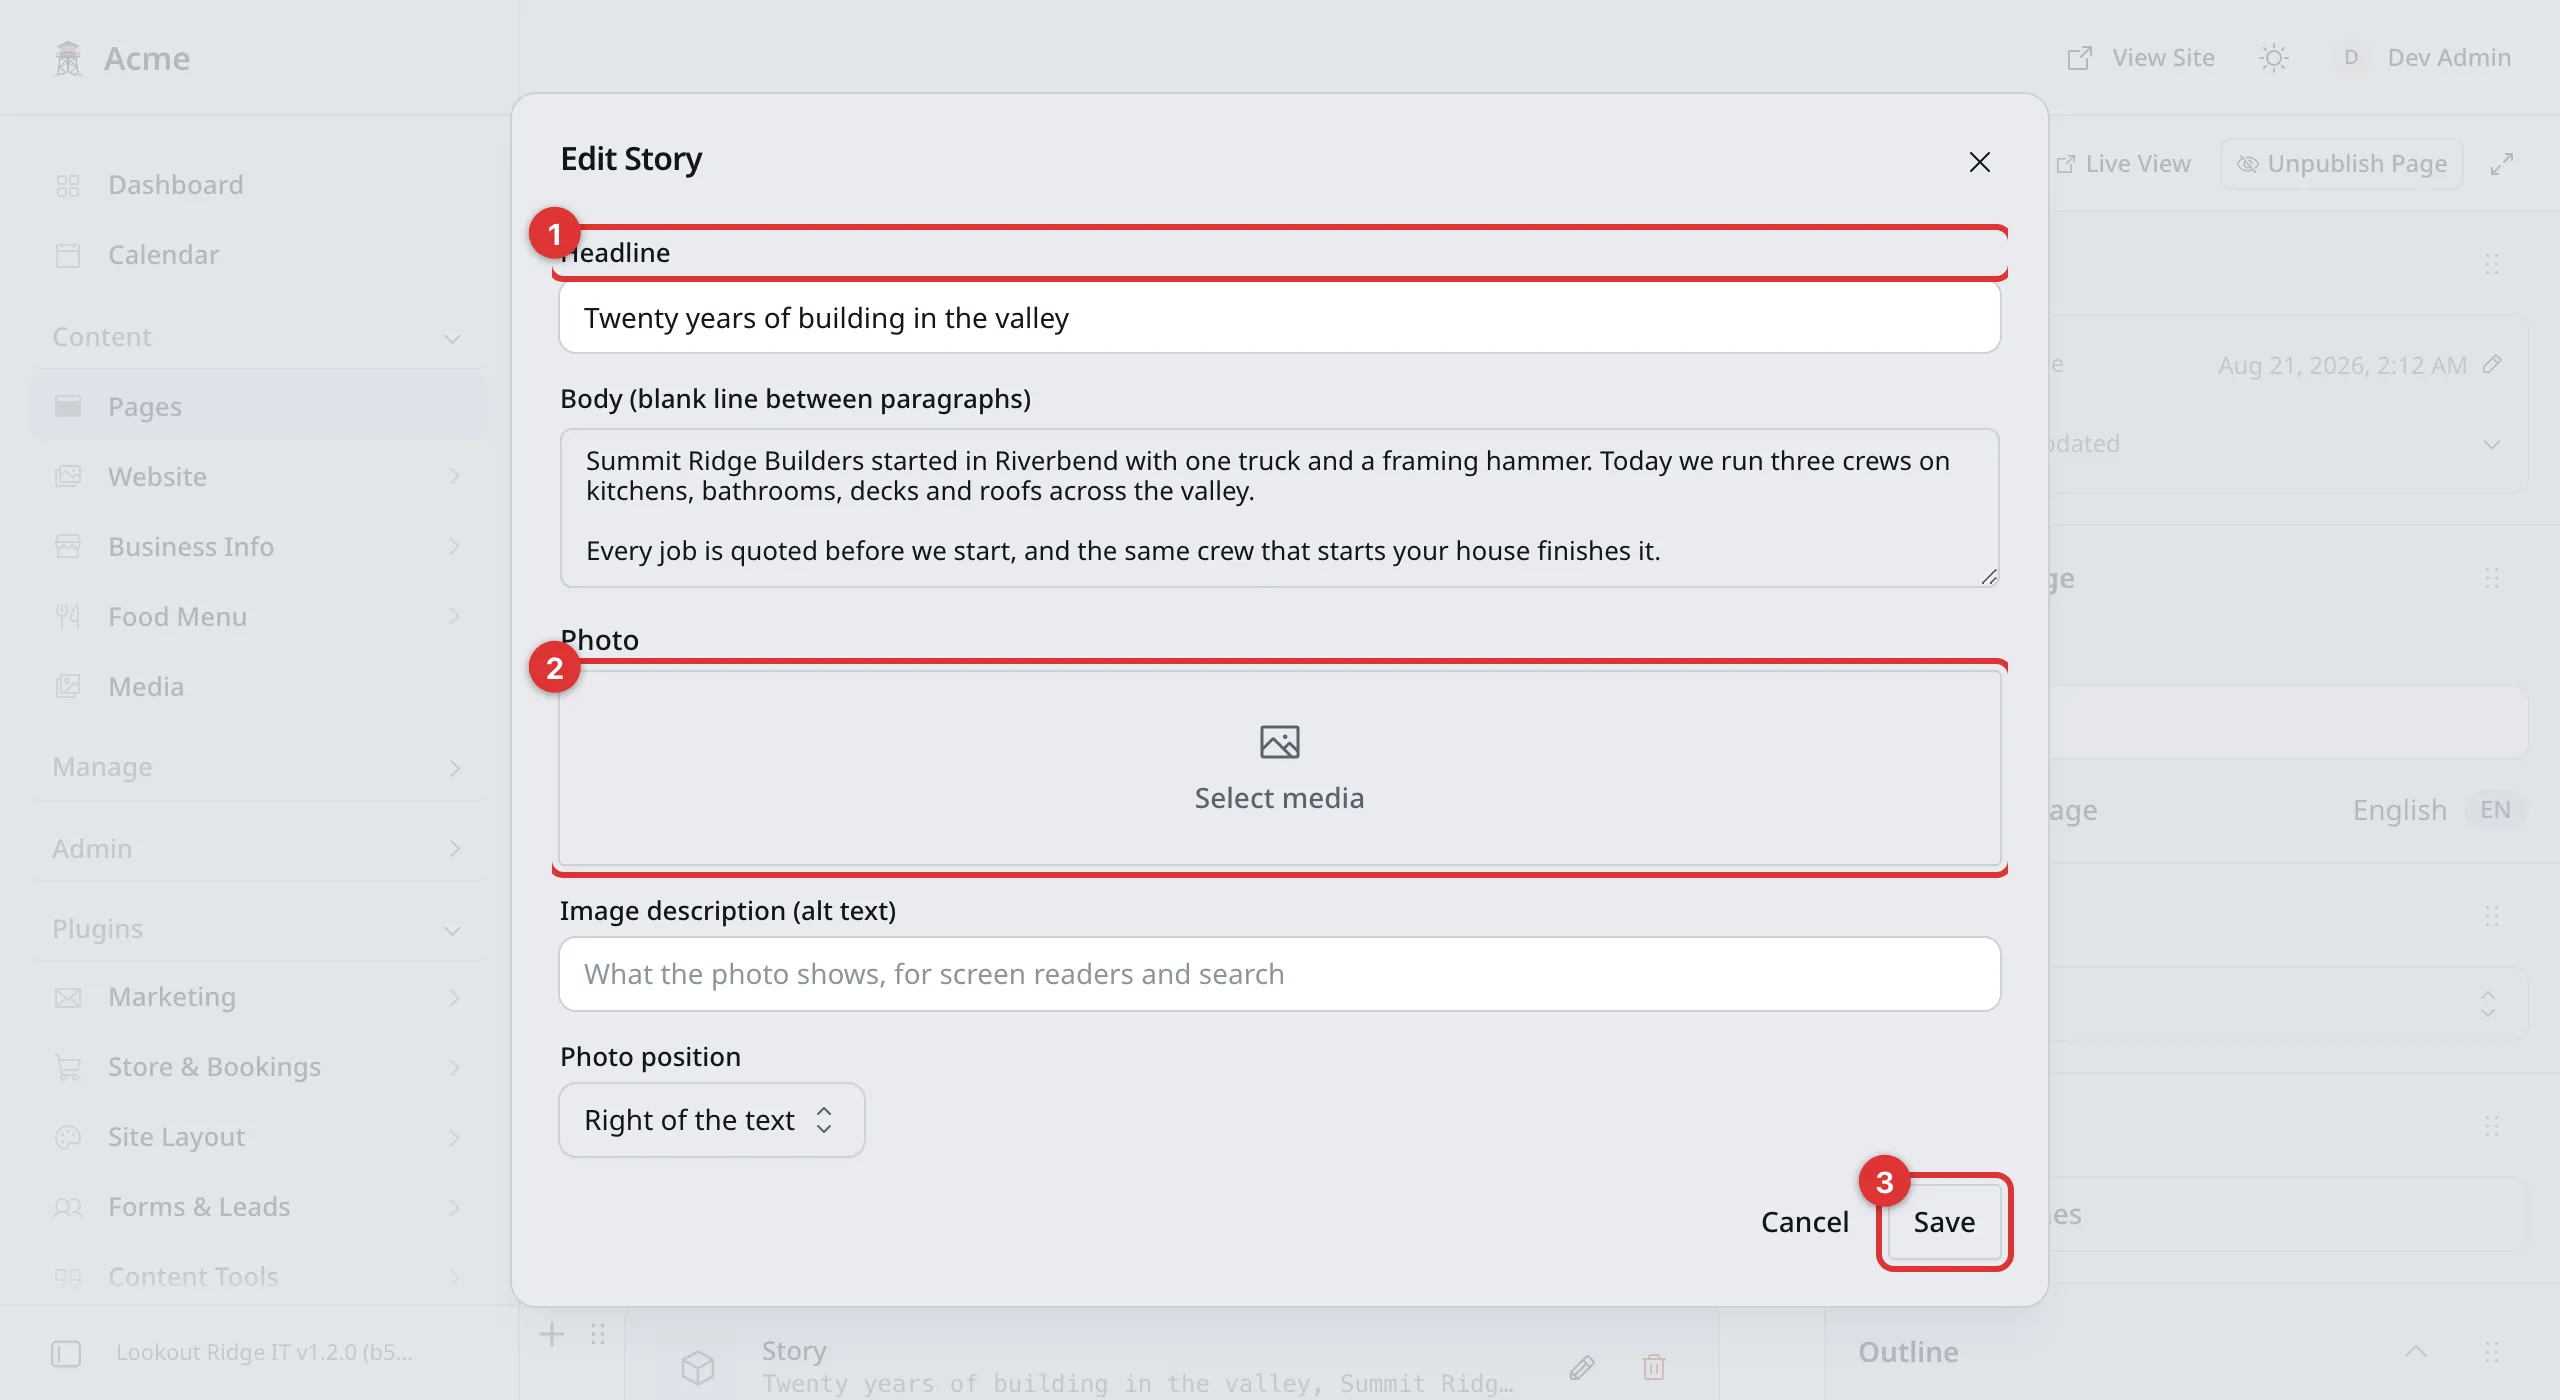
Every block has its own form. This one is Story.
1. Headline. The heading for this part of the page.
2. Photo. Click Select media to open your photo library. Media walks through picking a photo.
3. Insert or Save. Insert adds a new block to the page. The form closes and the gray card appears. Save keeps your changes to a block that is already there.
Then click Publish changes, then Publish changes again to confirm.
Leave a field empty if you do not need it. The block simply leaves that bit out.
Moving a block
Click the block once. Six small dots appear to the left of the card. Hold the mouse button down on those dots, drag the card up or down, and let go.
The other blocks move out of the way. When the order is right, click Publish changes, then Publish changes again to confirm.
Removing a block
Warning
Removing a block takes that whole part of the page away, with all the words in it. Once you publish, visitors stop seeing it.
If you only want it gone for now, it is safer to copy the words into a note first.
Click the block once, then click the red trash icon on the right of the card. Then click Publish changes, then Publish changes again to confirm to make the change live.
Photos in the text
You can put a photo straight into your words. There are three ways:
- Drag a photo from your computer onto the page, where you want it.
- Copy a photo, click in the text, and paste it with Cmd+V on a Mac or Ctrl+V on Windows.
- Type
/imageon an empty line and pick a photo from your library.
A dragged or pasted photo goes into your Media library too, so you can use it again.
Click the photo once and a small row of buttons appears over it:
- Alt text. A few words that describe the photo. Type them and click Save alt text. Media says what to write.
- Alignment. Puts the photo on the left, in the middle or on the right.
- Add link. Makes the photo a link.
- Image settings. More choices, such as the size it shows at.
- Delete image. Takes the photo out of the page. The file stays in your library.
To add a caption, click just under the photo and type. The caption shows under the photo on your website.
Then click Publish changes, then Publish changes again to confirm.
Videos
Type /video on an empty line and click Video. Then upload a video from
your computer, or pick one from your library. You can also drag a video file
onto the page.
Type a caption under it if you like. Visitors can play the video, and skip ahead in it, on a computer or a phone.
Then click Publish changes, then Publish changes again to confirm.
Tip
Video files are big. A short clip of a minute or two uploads faster and plays better than a long one.
A page from another site
The Iframe block shows a page from another website inside yours. A YouTube
or Vimeo video is the usual reason. It works for any address that starts with
https://.
- Type
/iframeon an empty line and click Iframe. - Paste the address of the video or page. You can also paste the “embed code” a site such as YouTube gives you.
- Click Publish changes, then Publish changes again to confirm.
The block only takes addresses that start with https://. If the code you
pasted runs a script, the block says so. That kind of code needs an HTML block
instead.
HTML blocks
An HTML block holds code you paste in, such as a booking widget or a
signup form from another company. Type /html on an empty line and click
HTML.
It has two modes:
- Inline takes plain HTML only. Your website cleans it and uses its own look. Scripts are removed.
- Isolated frame runs the code in a box of its own, with its own look and scripts. The code inside cannot see the rest of your website.
Warning
Only paste code that comes from a company you trust, and only if you know what it does. Code that runs a script can change what visitors see in that box.
If you are not sure, ask us first.
Before and after photos
The Before / After block shows one job twice. A visitor drags a handle across the picture to wipe from one photo to the other.
Add it the way you add any block. Type / on an empty line, type before,
and click Before / After. The form has six boxes:
- Headline. The heading above the pair.
- Before photo. The first shot.
- After photo. The finished shot.
- Before label. The word on the first photo. It starts as “Before”.
- After label. The word on the second. It starts as “After”.
- Caption (optional). A line under the pair, such as the town and the job.
Important
Both photos are needed. With one photo, or none, the block draws nothing at all. Nothing turns red to tell you.
One block holds one pair. For a second job, add a second block.
Two photos work best when they were taken from the same spot, at the same height. Then the slider lines them up and the change reads at a glance.
A visitor can also use the arrow keys on the handle, and click either photo to open it full size.
The map
The Map block shows where you are. It has three boxes: Headline, Subheadline, and CTA label, the words on the button under the map. Leave the label empty and the button reads View on Google Maps.
There is no address box on the block. The spot comes from the Business profile card on the SEO page. Your map pin is used first. With no pin, your street address is used instead. See Business Profile.
If you have branches, the map shows your main branch instead.
Important
No address and no map pin means no map. The block draws nothing at all. Fill in the address on Business Profile first.
The map is drawn by Google, so it waits for the cookie banner. Until a visitor says yes, they see a box the same size with a Load map button in it. One click and the map opens. See Analytics and cookies.
Putting two things side by side
Everything on a page runs full width by default, one thing under the next. Sometimes you want two things next to each other instead: a few paragraphs beside a photo, two short lists, your opening hours next to a map.
That takes three pieces, added in this order: Columns start, Column break, Columns end. Whatever you put between them ends up in the columns.
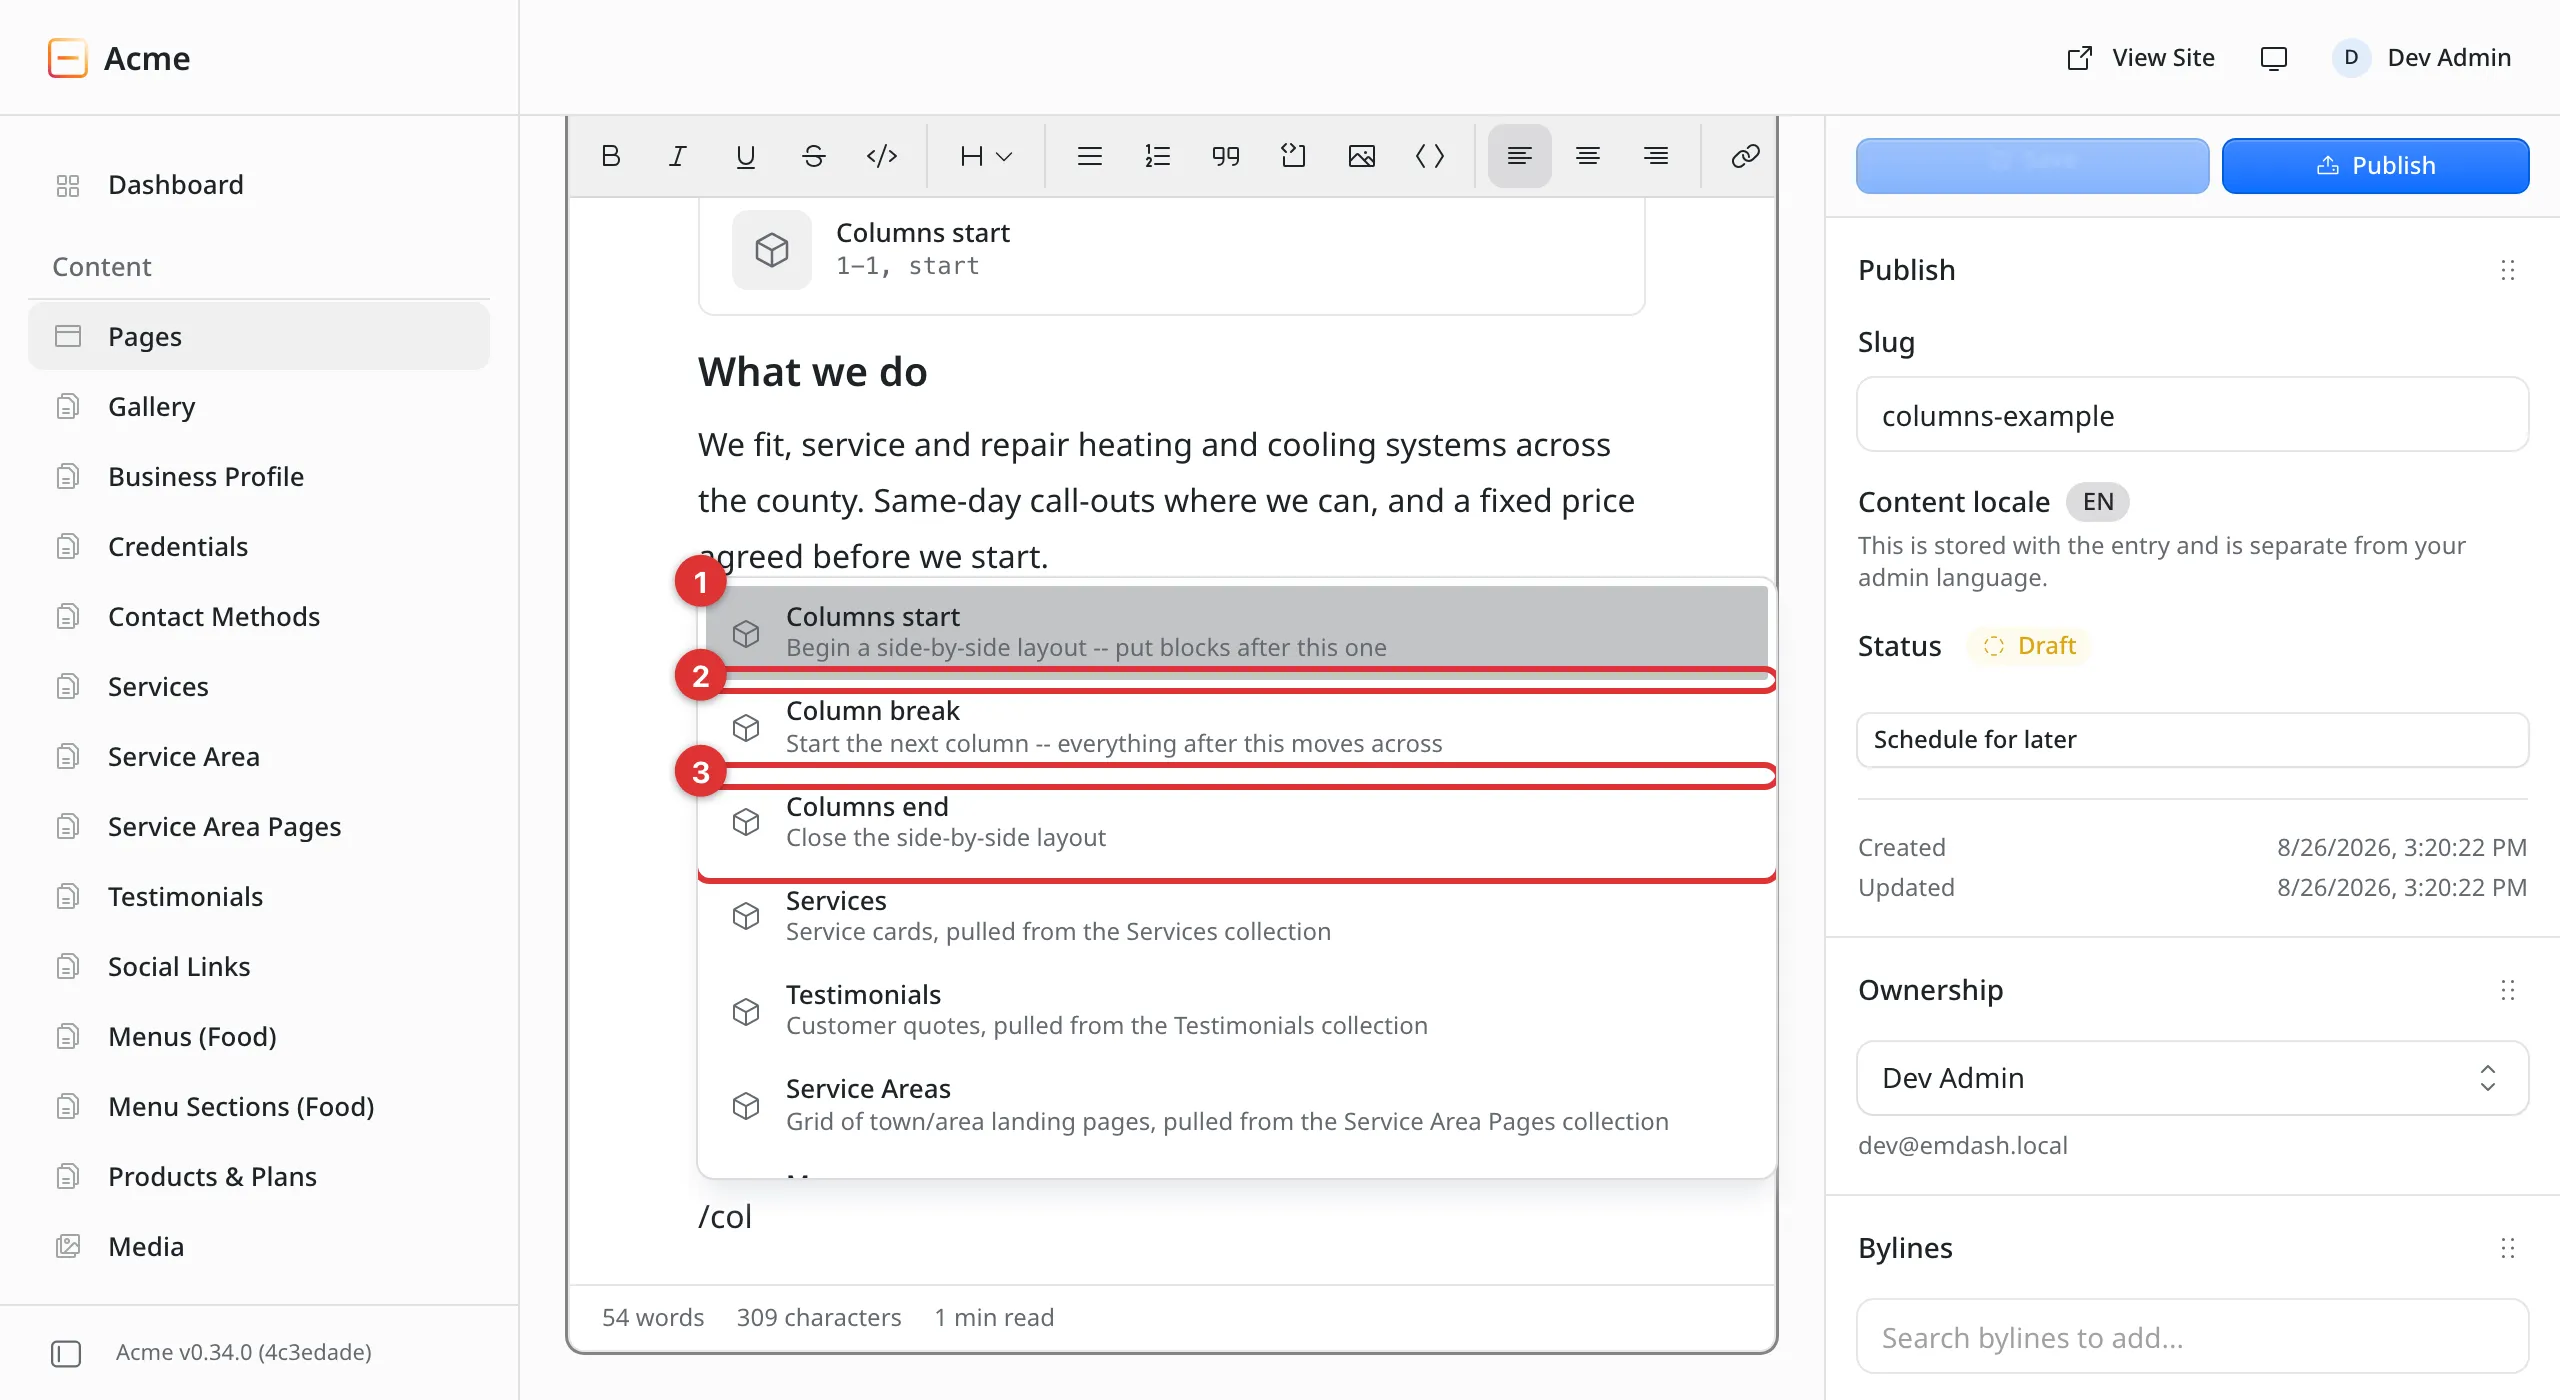
All three are in the menu together. Type /col and they come up.
1. Columns start. Opens the columns. What you add after it goes in the left one.
2. Column break. Ends the left column and starts the right one.
3. Columns end. Closes the columns. What comes after it runs full width again.
Here is the order you type them in:
- Put the cursor on an empty line and type
/col. - Click Columns start. Pick your settings, click Insert.
- Type the words for the left column, or add a block for it.
- Type
/colagain and click Column break. - Type the words for the right column.
- Type
/colonce more and click Columns end. - Click Publish changes, then Publish changes again to confirm.
Your column settings
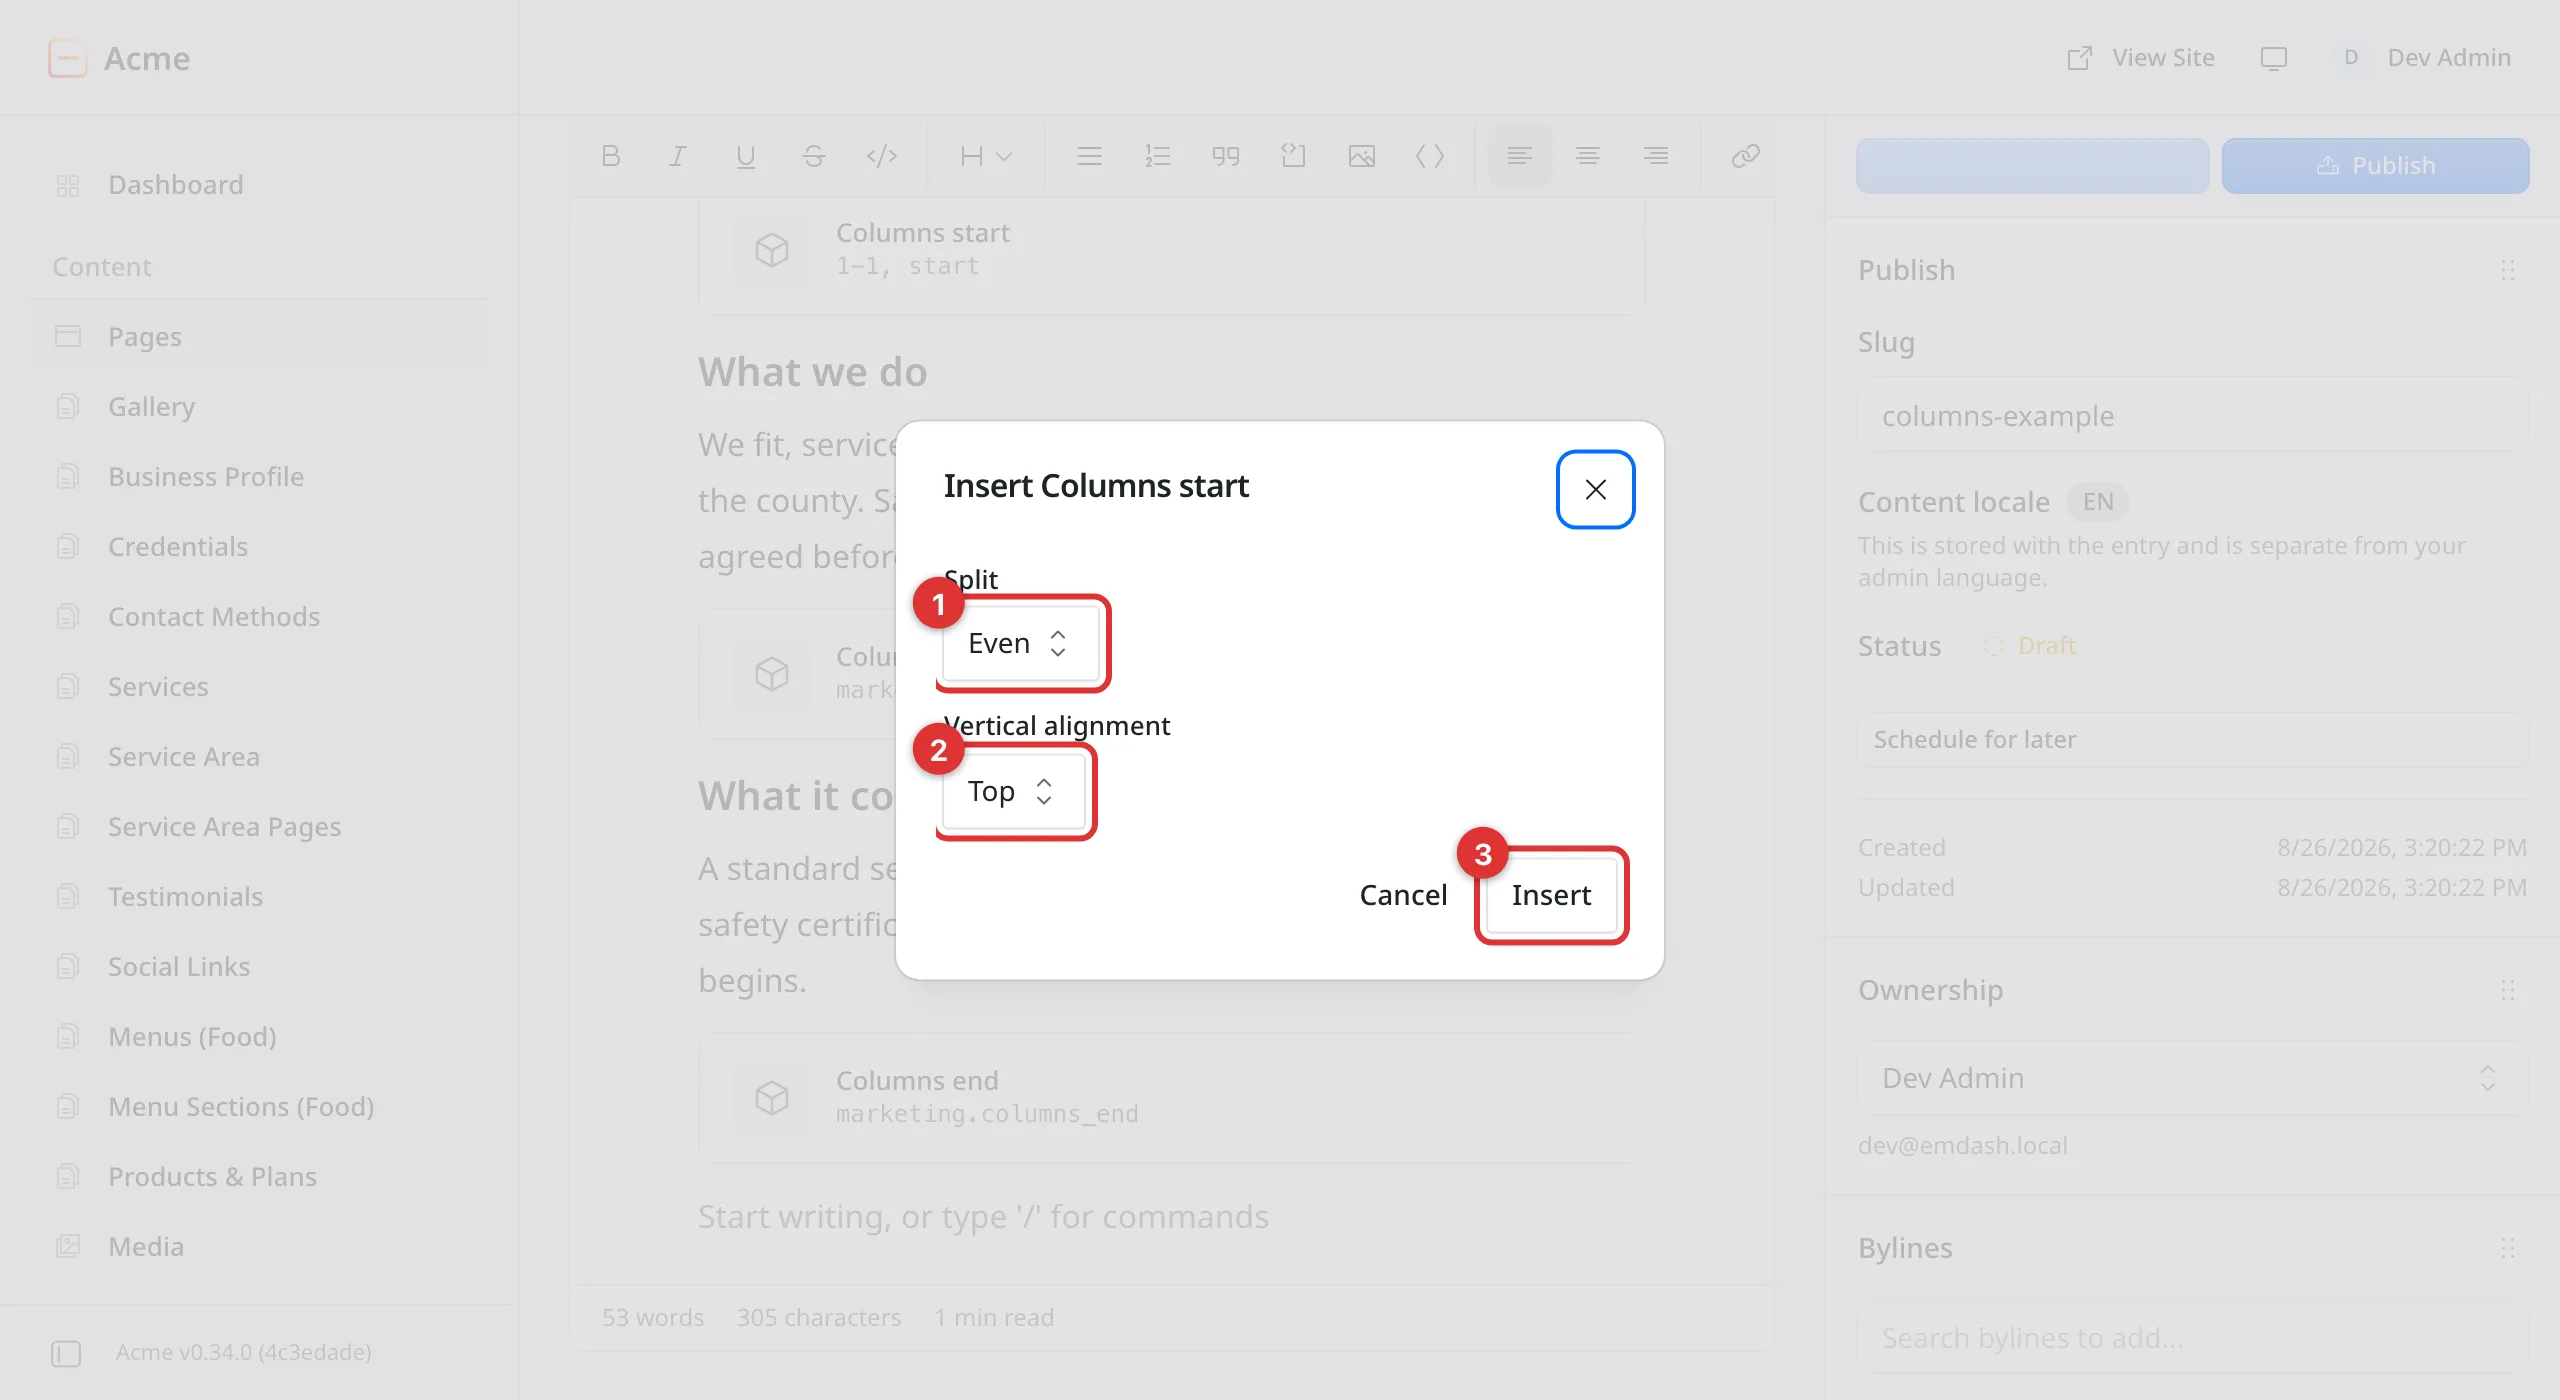
Both boxes already have a setting chosen. You can click Insert right away.
1. Split. How the width is shared. Even gives both columns the same width. Wider left gives the left one twice as much as the right. Wider right does the opposite.
2. Vertical alignment. Where the columns sit when one is shorter than the other. Top lines them up at the top. Centered floats the shorter one to the middle.
3. Insert. Adds it to the page.
Two more settings live on the other two pieces:
- Draw a line between the columns, on Column break, runs a thin dividing line down the middle.
- Extra space below, on Columns end, adds a gap under the whole thing before whatever comes next.
What it looks like while you are editing
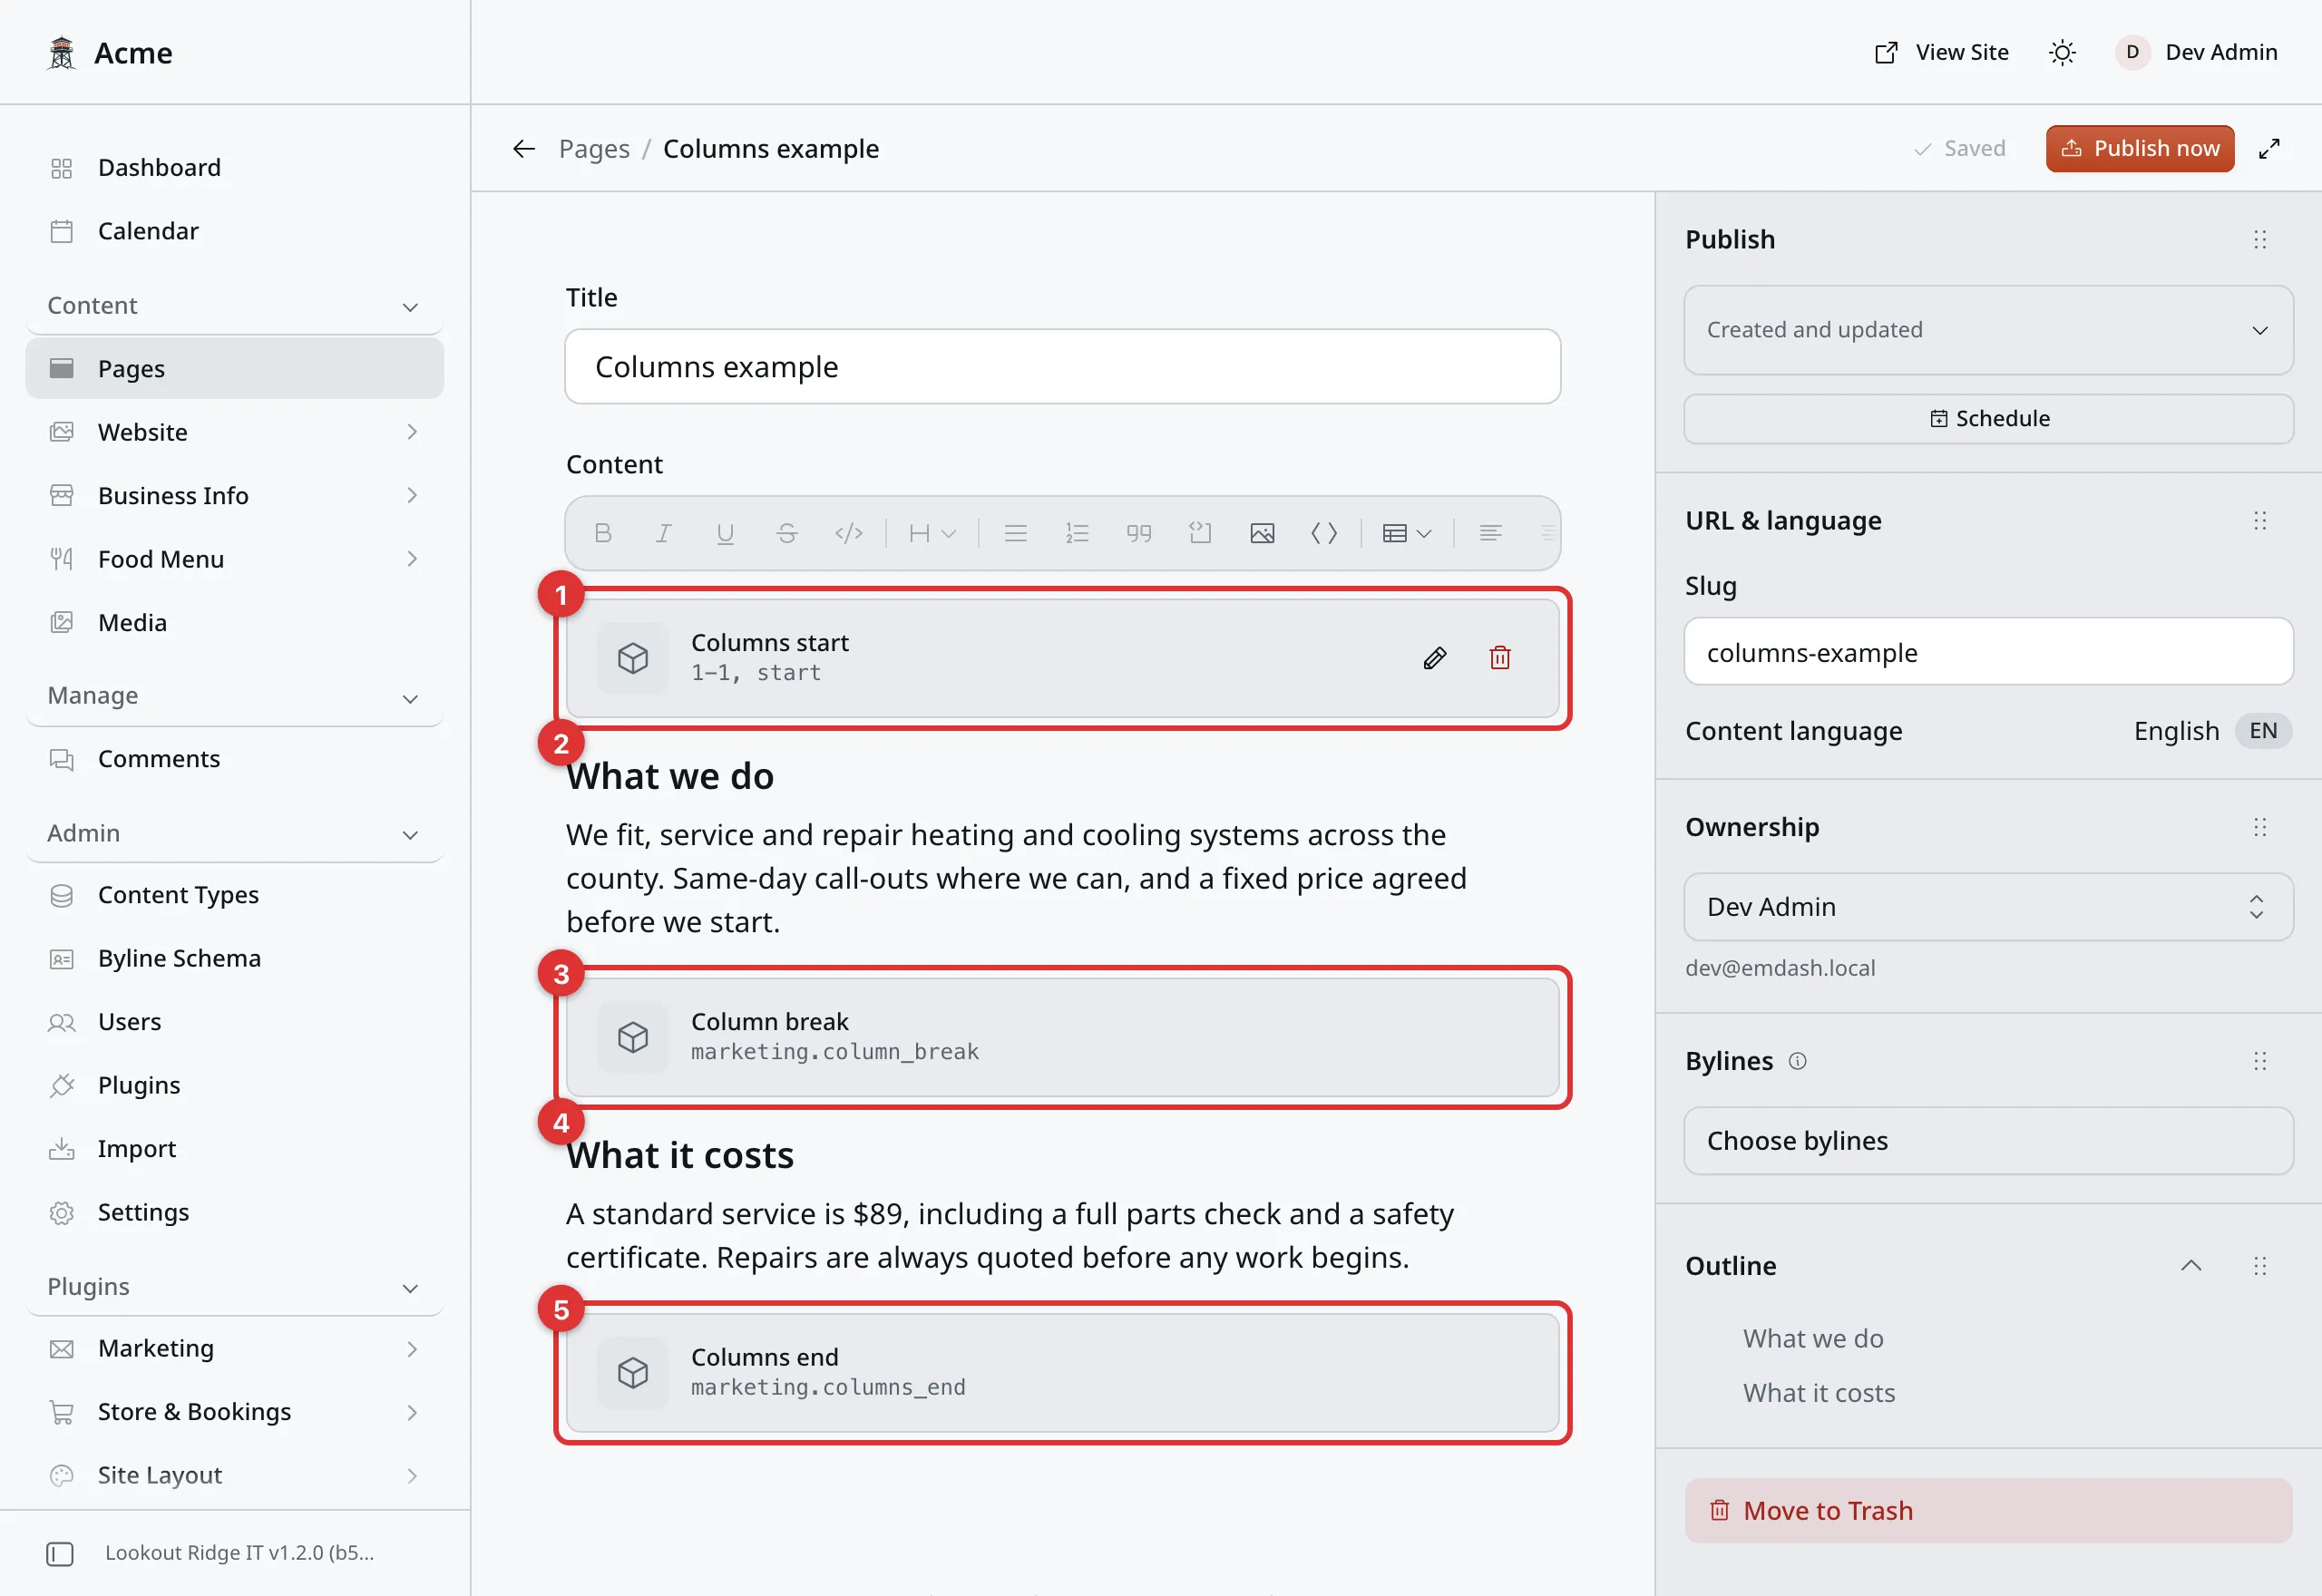
In the editor it is a list. On your website it is two columns.
1. Columns start. A gray card, like any other block.
2. The left column. Your words, sitting between the first two cards.
3. Column break. The card that splits the two.
4. The right column. Your words, sitting between the break and the end.
5. Columns end. The card that closes the group.
Five things in a row, one under another. The editor does not show them side by side.
That is normal, and it is the one thing about columns worth getting used to. To see the real thing, click Publish changes, then Publish changes again to confirm. Then click Live View. It opens the page on your website in a new tab.
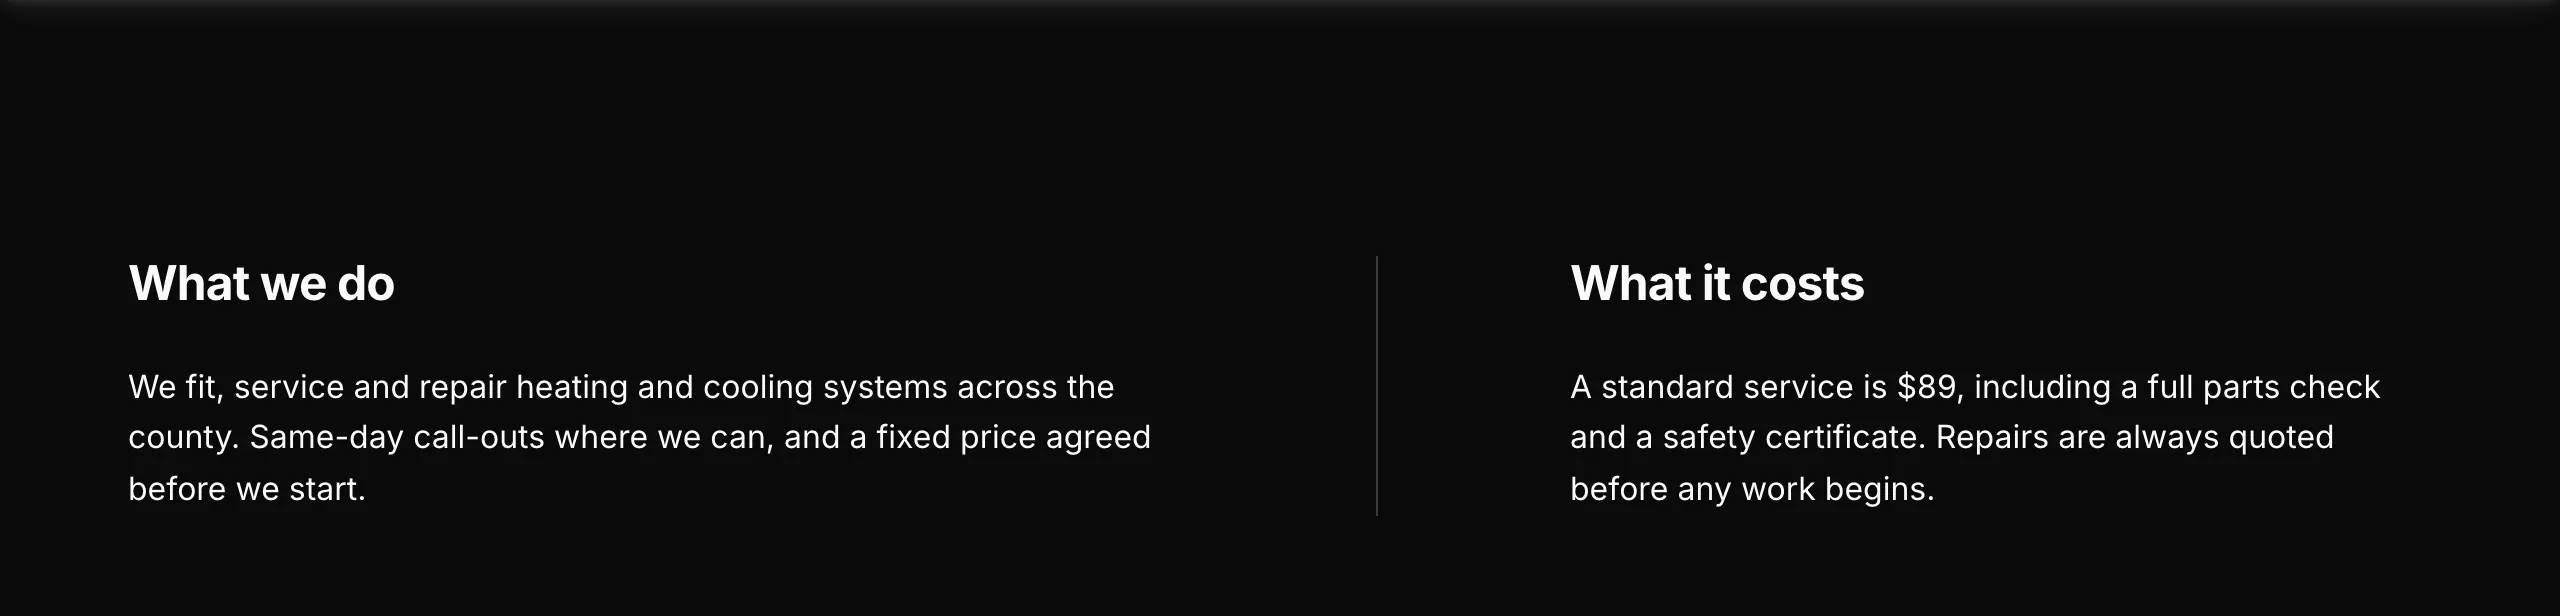
The same page on the website.
On a phone
Two columns need width, and a phone has none to spare. So on a narrow screen they stack: the left column first, then the right one, each full width. The dividing line disappears. A tablet and a small laptop window do the same.
Nothing to set up, and nothing to fix. But it is worth knowing while you write. Anything that only makes sense read side by side, a before and after for instance, should say so in the words, because anyone on a phone will read it stacked.
If the columns look wrong
Important
Everything below is in the columns. You left out Columns end. Without it, the second column runs to the bottom of the page. Add Columns end where you want the columns to stop, and publish.
Nothing shows up at all. The three pieces are there, but empty. Empty columns are skipped, so the whole group disappears. Put your words or a block between the cards. Then click Publish changes, then Publish changes again to confirm.
A gray card sits there doing nothing. A Column break or Columns end on its own, with no Columns start above it, is ignored. It shows in the editor and changes nothing on your website. Click it and use the red trash icon to tidy it away.
Headings, bold, and links
These work on plain text, not on blocks.
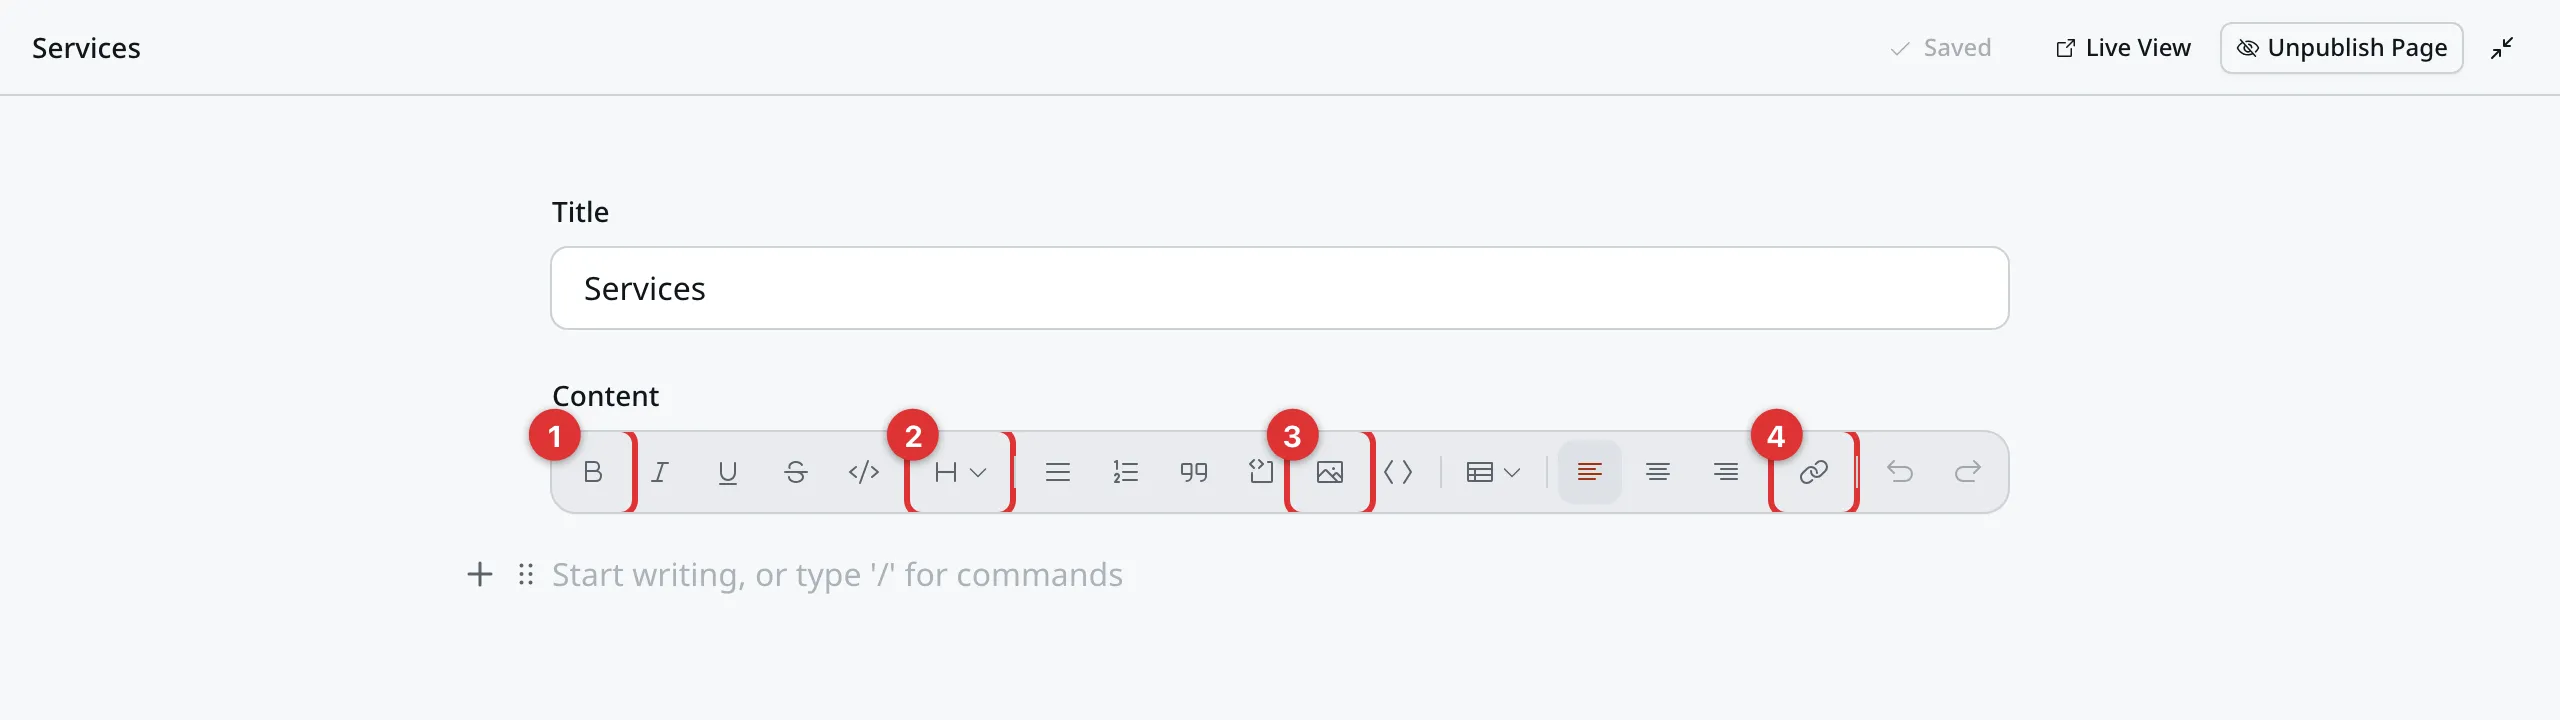
Select your words first, then click a button.
1. Bold. Select the words, click B.
2. Headings. Click on the line you want to be a heading, click H, then pick Heading 2. Use Heading 2 for the main parts of a page, and Heading 3 for smaller parts inside them.
3. Insert image. Opens your photo library, and drops the photo you pick into the text. Media covers the picker.
4. Link. Turns selected words into a link. See below.
When you select words, a small row of buttons also pops up right above them. It has bold, italic and Add link too, so you do not have to reach for the top row.
To add a link:
- Select the words you want people to click.
- Click the link button.
- Type the address in the box. Or type a few words of one of your page titles, and pick the page from the list.
- Click Apply.
For a page on your own website, type the part after your web address, starting
with a slash: /contact, or /services. For anywhere else, type the whole
address, starting with https://.
To take a link off, select the linked words, click the link button, and click Remove.
Tip
Links are easy to get slightly wrong. After you publish, click Live View and click the link yourself. Ten seconds now saves a customer landing on nothing.
What Google shows
Two places on every page change how it looks in Google and when someone shares it. Neither one changes the page itself.
The SEO boxes. Open the Settings panel on the right and find SEO.
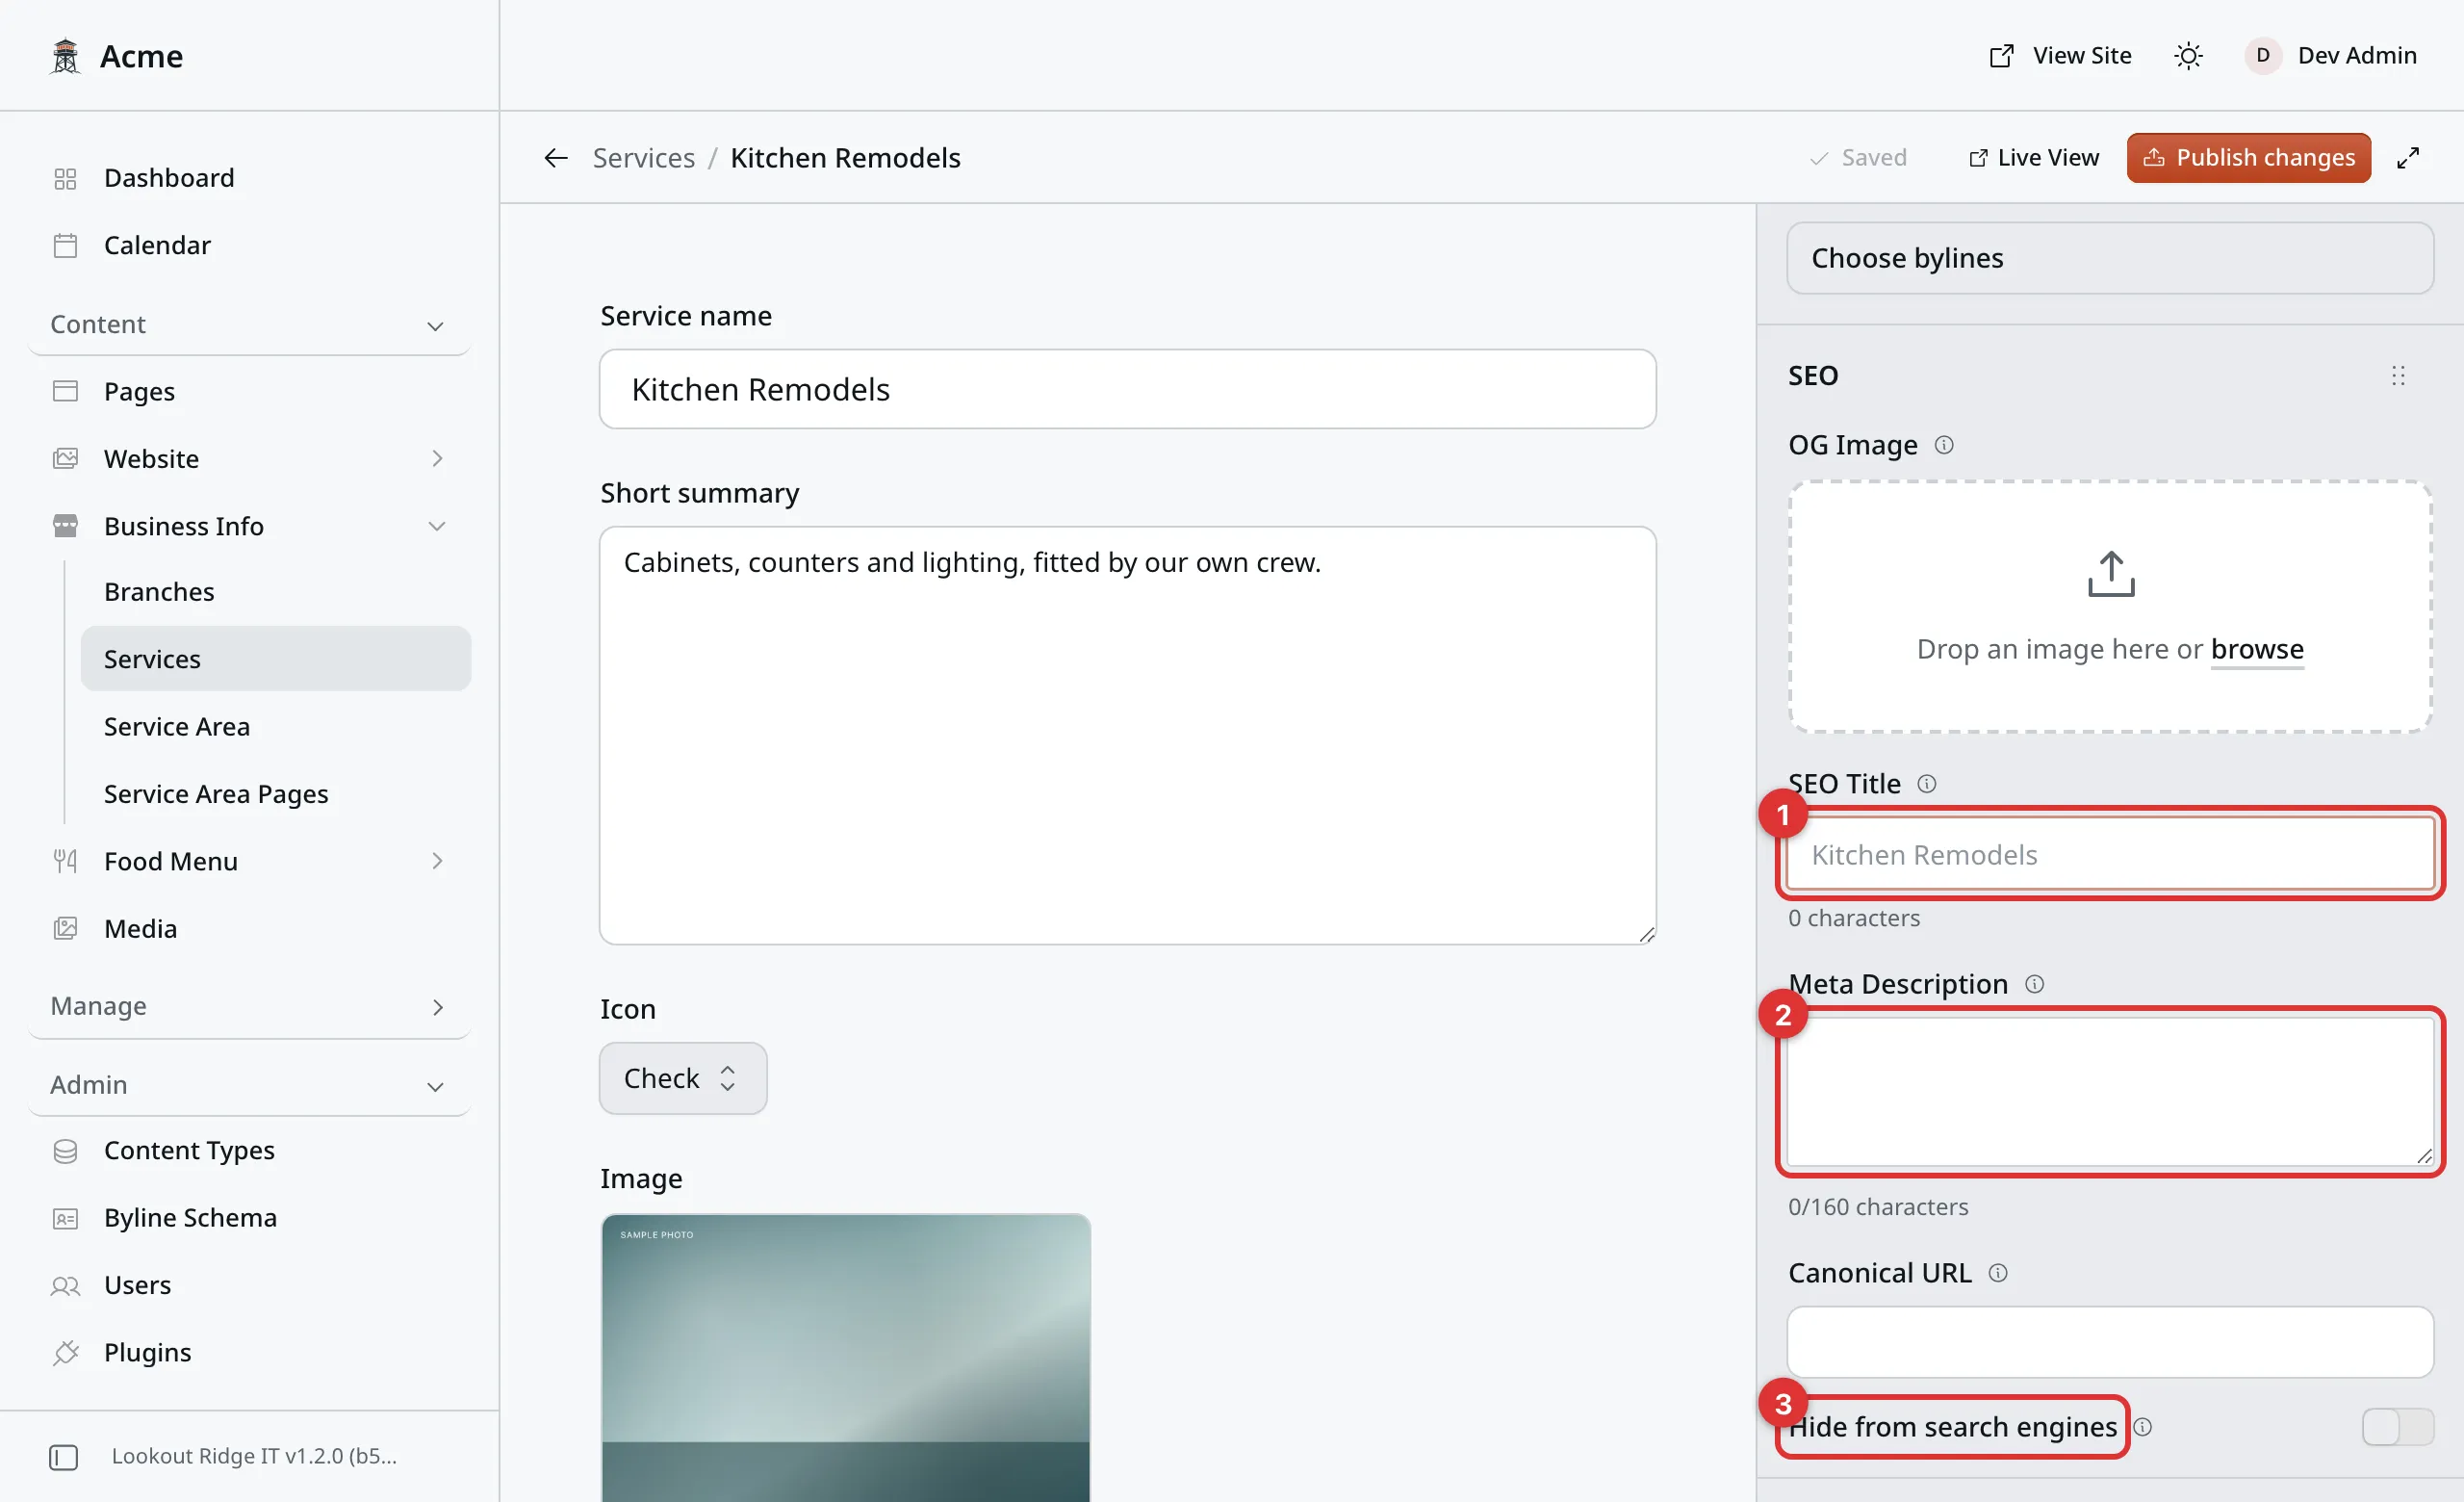
Two boxes worth filling in, and one switch to leave alone.
1. SEO Title. The blue line people click in Google. Leave it empty and your page title is used, with your business name after it. Fill it in when you want different wording. Keep it short, around eight words.
2. Meta Description. The gray sentence under that blue line. Say what is on the page and why someone should click. The counter under the box stops at 160 characters, so write for that.
3. Hide from search engines. Leave this switch off. It exists for a page you want kept out of Google, which is almost never what a small business wants. If you think you need it, ask us first.
OG Image is the picture shown when the page is shared, such as on Facebook or in a text message. Leave it empty and your website uses its default share picture. Canonical URL is for a page copied from somewhere else. Leave it empty.
Search & social. This box sits under the page content, in the main part of the editor. At the top, two previews show the page as a search result and as a shared link. They change as you type.
- Social title. The headline shown when the page is shared. Leave it empty and the page title is used.
- Social description. The line under that headline. Leave it empty and your Meta Description is used.
- Title format for this page. How this one page’s title is put together. Leave it empty to use the format the whole site uses.
- Search engine requests. Checkboxes that ask search engines not to follow the links on this page, or not to show a line of text from it. Leave them all off unless we tell you otherwise.
Save and publish the page as usual. The same two places are on your services, posts, projects, town pages and branches. Settings for your whole website, such as the default share picture, are on the SEO page.
Adding a new page
You can add a page yourself. A Warranty page, a page of questions, a page about paying over time: anything you can build out of blocks.
- Go to Content, then Pages, and click Add New.
- Type the Title, such as
Warranty. - Pick a Parent page, or leave it on None (top level). See below.
- Build the page with blocks and text, the way this page shows.
- Check the Slug in the Settings panel. It fills itself in from the title. It is the last part of the page’s address.
- Click Save. Then click Publish now, then Publish now again to confirm.
The page is live the moment you publish it. With the slug warranty and no
parent, it lives at /warranty on your website.
A new page is not in your menu yet. Nobody finds it until you link to it. Add it to your menu on the Navigation screen, with Add item. See Menus. Then click the link on your website to check it.
Parent page
Parent page puts a page inside another one, in the address. Pick About
as the parent of a page slugged history, and it lives at /about/history.
The list shows every page you have, with its title and its address. The top choice is None (top level). That is where every page starts.
A parent changes the address only. It does not add the page to your menu, and it does not put a link on the parent page. Do those yourself.
Important
Changing the parent or the slug of a published page changes its address. Your website sends anyone who uses the old address to the new one, by itself, once you publish. Old links keep working.
Search results still show the old address for a while, so do not change it for no reason. You can see these signposts on the Redirects screen.
Changing the slug of a parent does not move the pages under it. They keep the old word in their address. Open each one and pick the parent again. The old choice shows with (missing) after it.
Some parents do not work. Services, Service Areas, Shop, Work and Blog already own everything under their address. A page you put under one of them lands on a “page not found” screen. Pick another parent.
A page slugged locations is a special case. Its address belongs to your
Branches, so do not put other pages under it either.
Addresses you cannot use
Every page needs a slug of its own. Two pages can never share one, even under different parents. If a slug is taken, the panel tells you when you save. Pick another word.
Your website also keeps some words for itself. Do not use these as a slug, or as the first part of an address:
account, admin, api, bio, blog, booking, checkout, consent,
feeds, forms, lp, mcp, media, menu, order, preview, proof,
public, search, service-areas, services, shop, testimonial, work.
A page that uses one of them never shows. Visitors get a “page not found” screen, and the panel does not warn you.
Addresses that start with /lp/ belong to your
landing pages. Addresses that start with /forms/
belong to your forms. Keep your own pages out of both.
The pages that came with your website already hold their own slugs too:
home, about, contact, quotes, pricing, gallery and team, plus a
few more if you have add-ons.
Taking away a page you added
Warning
Unpublish hides the page from the public. Move to Trash does the same, and you can still get it back from the Trash tab. Either way, every link to that page now lands on a “page not found” screen.
Take its link out of your menu first. See Menus.
Only do this for a page you added yourself. Leave the pages that came with your website in place, as the warning at the top of this page says.
The menu across the top of your website is edited under Plugins, then Site Layout, then Navigation.
Last updated Oct 20, 2026