

Content
Media
The media library: uploading and reusing files.
The Media Library holds every photo and file you have uploaded. Upload a photo once, then use it on as many pages as you like.
Go to Content, then Media.
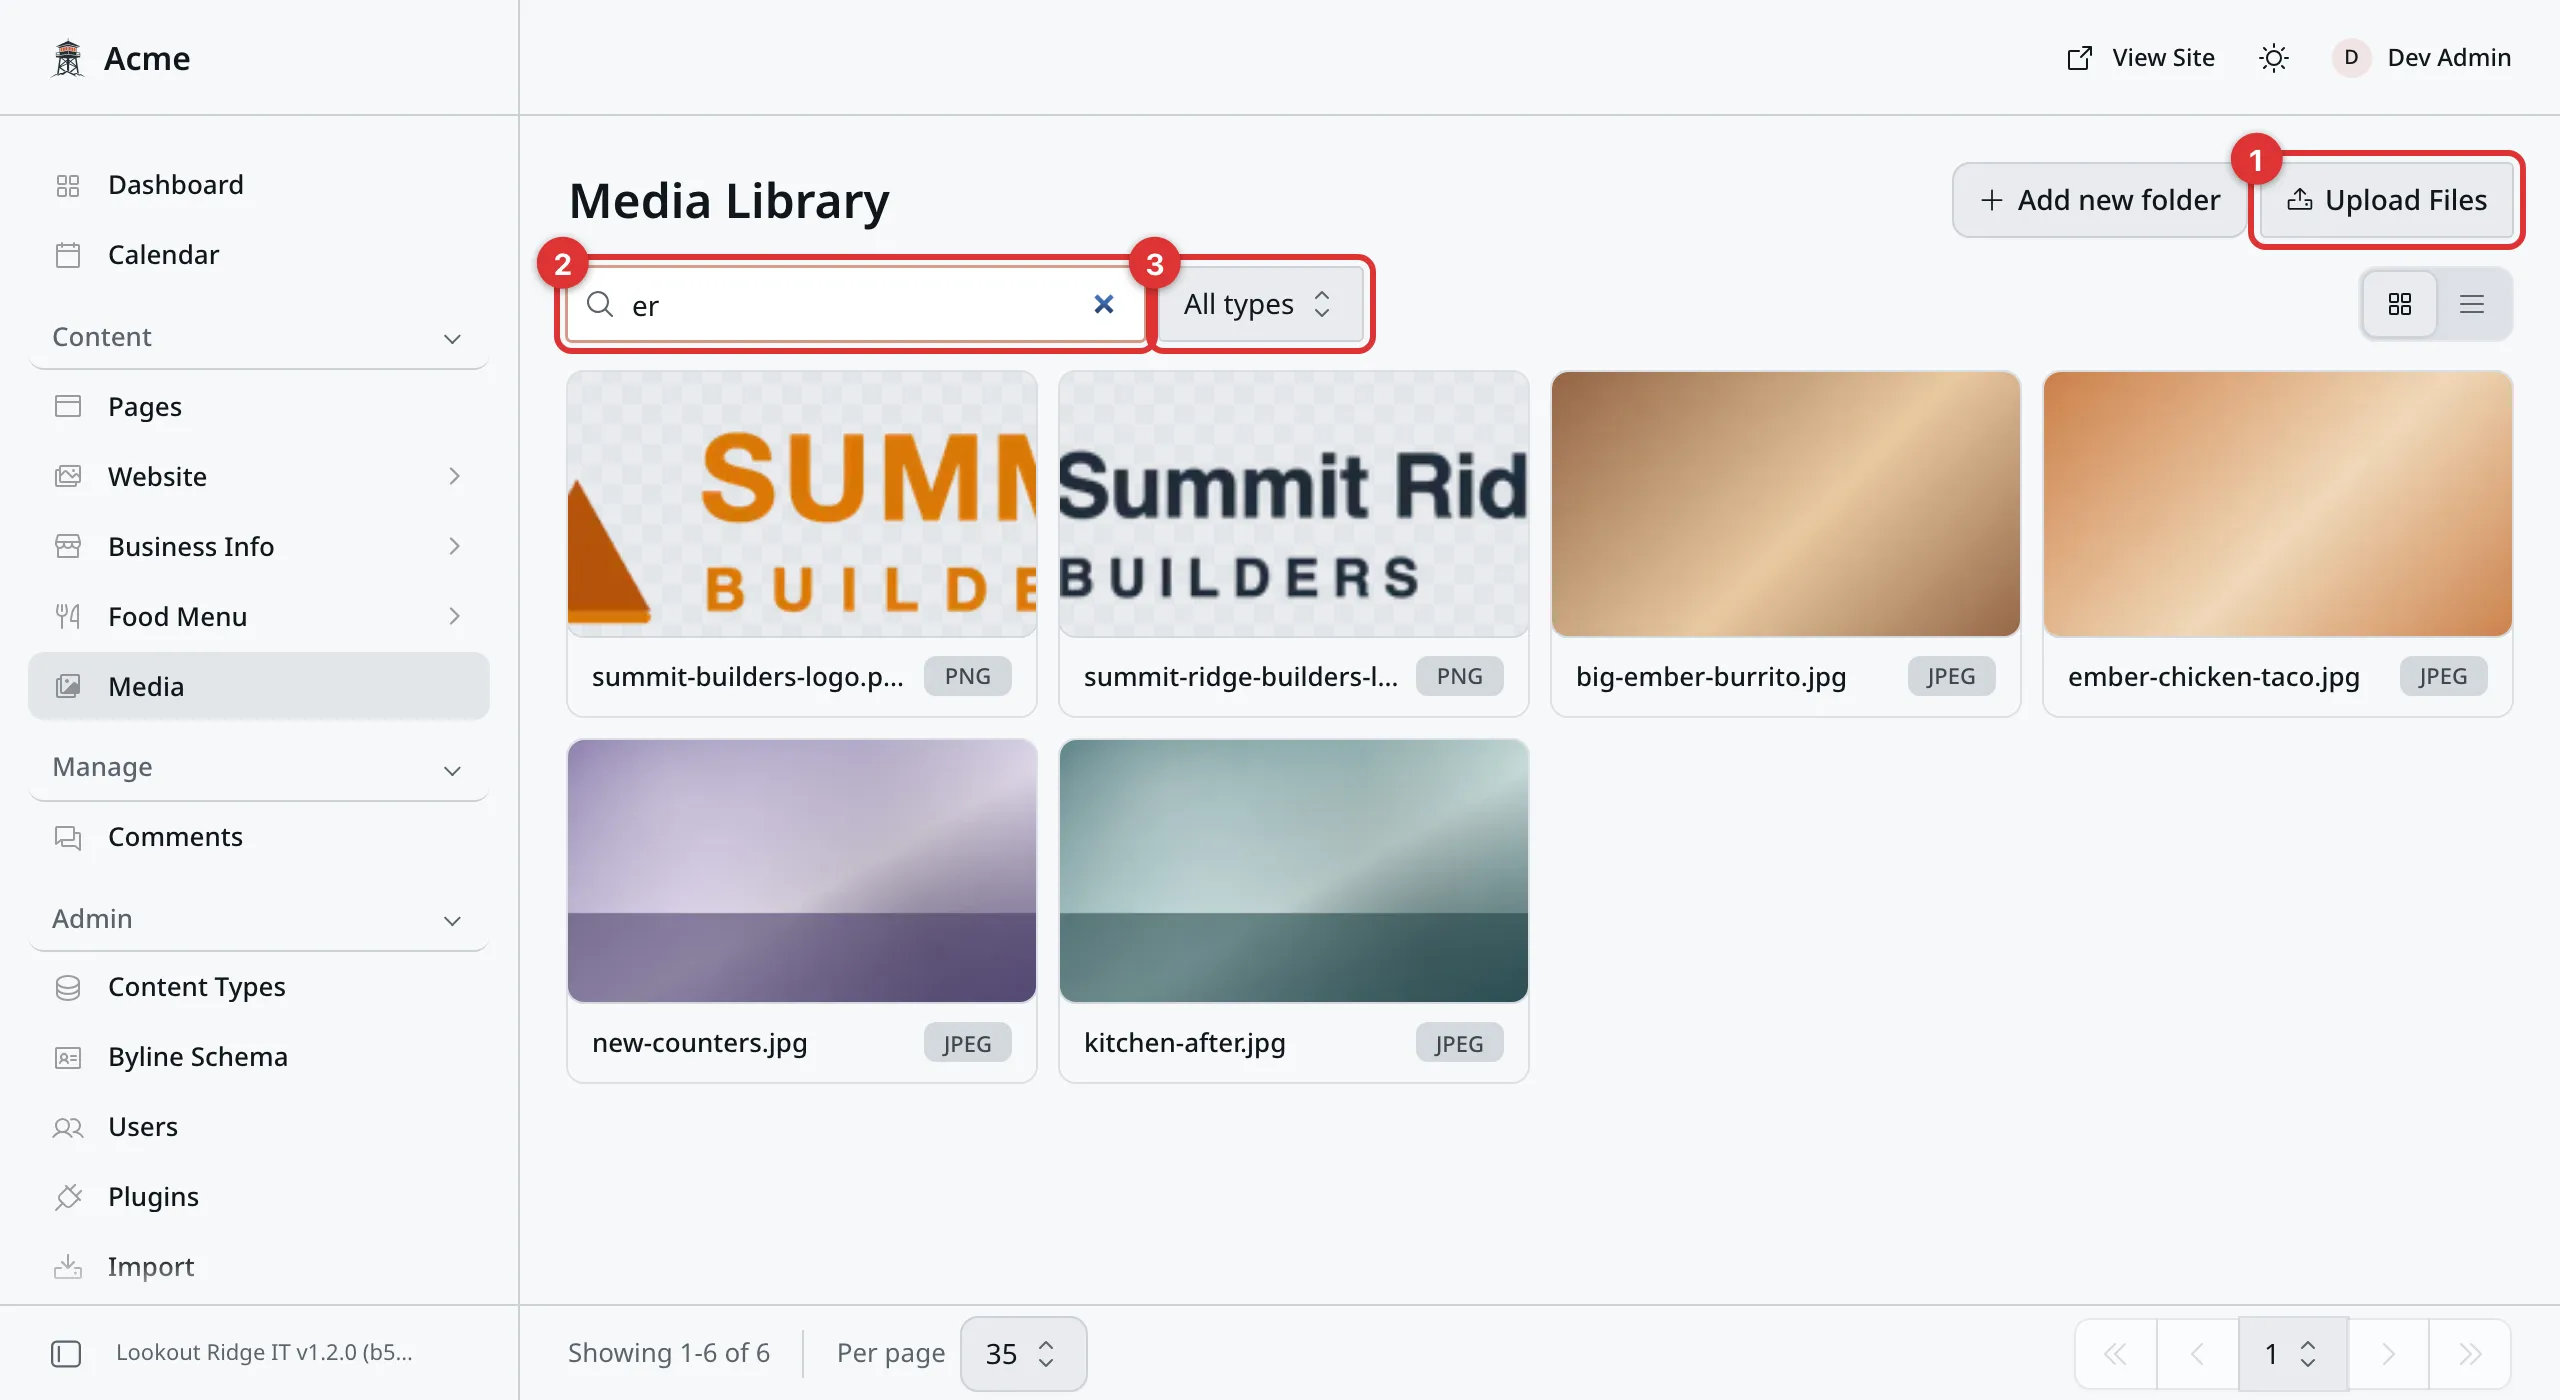
Type part of a name and the grid shows only the files that match.
1. Upload Files. Adds files from your computer.
2. Search by filename. Type part of a file name to find it.
3. All types. Narrows the grid to one kind of file, such as images only.
The two small buttons on the right switch between the grid you see here and a plain list.
Uploading
- Click Upload Files. A box opens.
- Drag your files into the box. Or click Browse files, pick one or more, and click Open. To pick several, hold Cmd on a Mac or Ctrl on Windows.
- Each file starts to upload as soon as you add it. Wait for each one to say it is done.
- Click Done.
The new files appear at the front of the grid. Big files take a little while, so give it a moment before you go looking.
You can also drag files from your computer straight onto the Media Library screen. They upload the same way.
The Upload Media button on the Dashboard is a shortcut. It brings you to this screen, where you still click Upload Files.
You can upload photos, video, sound files and PDFs. Try something else and the box marks that file Upload failed. Nothing is added, and you can try again with another file.
Tip
Photos straight off a phone are fine. Your website makes its own smaller copies of your photos before showing them to a visitor, so a big photo does not slow your pages down. It only makes the upload itself slower.
Send us a photo that is too small, though, and nothing can fix it. It will look soft and blurry on a wide screen. Bigger is the safer mistake.
Using a photo on a page
Photo fields all work the same way, whether you are filling in a block or an album. The field says Select image or Select media. Click it.
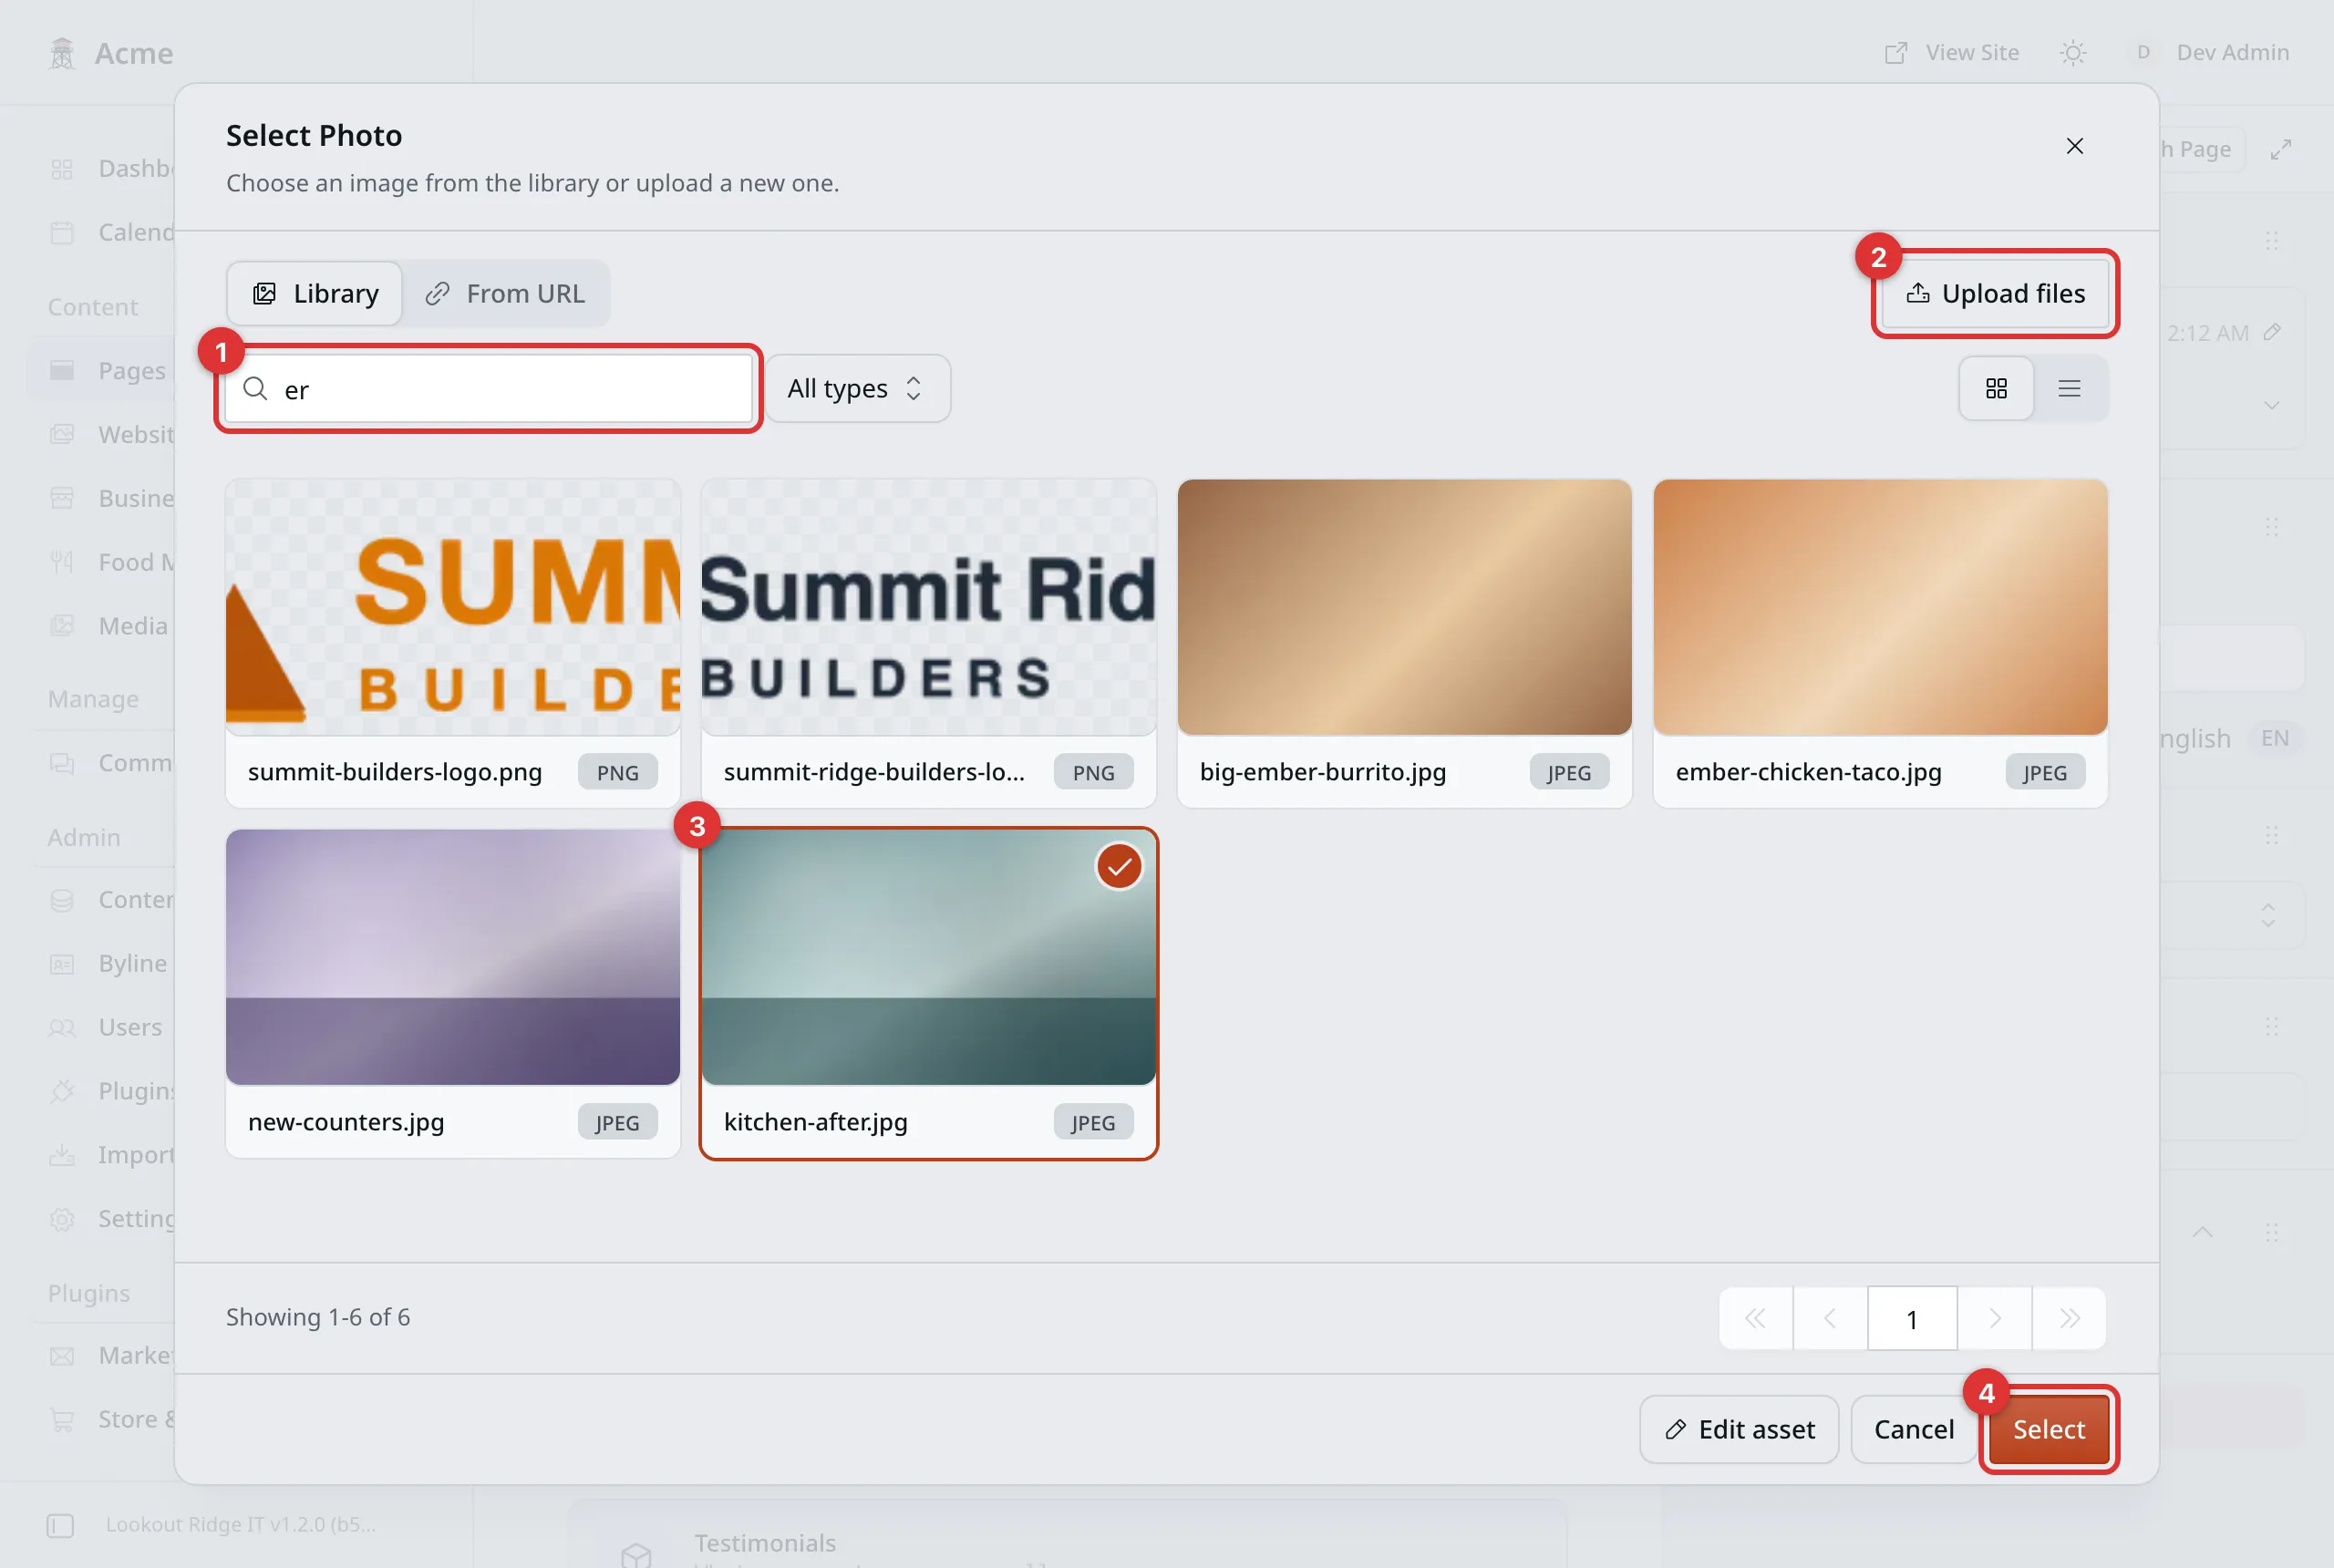
Your whole library, in the picker.
1. Search by filename. Same search as the Media screen.
2. Upload files. Adds a new file without leaving this box.
3. Selected. Click a photo and a check mark appears on it. Its name shows down here, so you can check you got the right one.
4. Select. Puts that photo in the field and closes the box. On a field that takes more than one photo, this button counts them, such as Add 3 images.
Then click Publish changes, then Publish changes again to confirm. On a draft, click Publish now, then Publish now again to confirm.
Swapping one photo for another
Once a field has a photo, the button under it reads Change.
- Click Change.
- Pick the new photo.
- Click Select.
- Click Publish changes, then Publish changes again to confirm.
Until you publish, visitors keep seeing the old photo.
Alt text
Alt text is a short line that describes a picture in words.
It is read out to people who cannot see the picture, and it shows in place of the photo if the picture ever fails to load. Search engines read it too.
To write it, click the file in the Media Library. A Media details box opens. It has three tabs: Details, Edit image and Used in. The alt text is on Details.
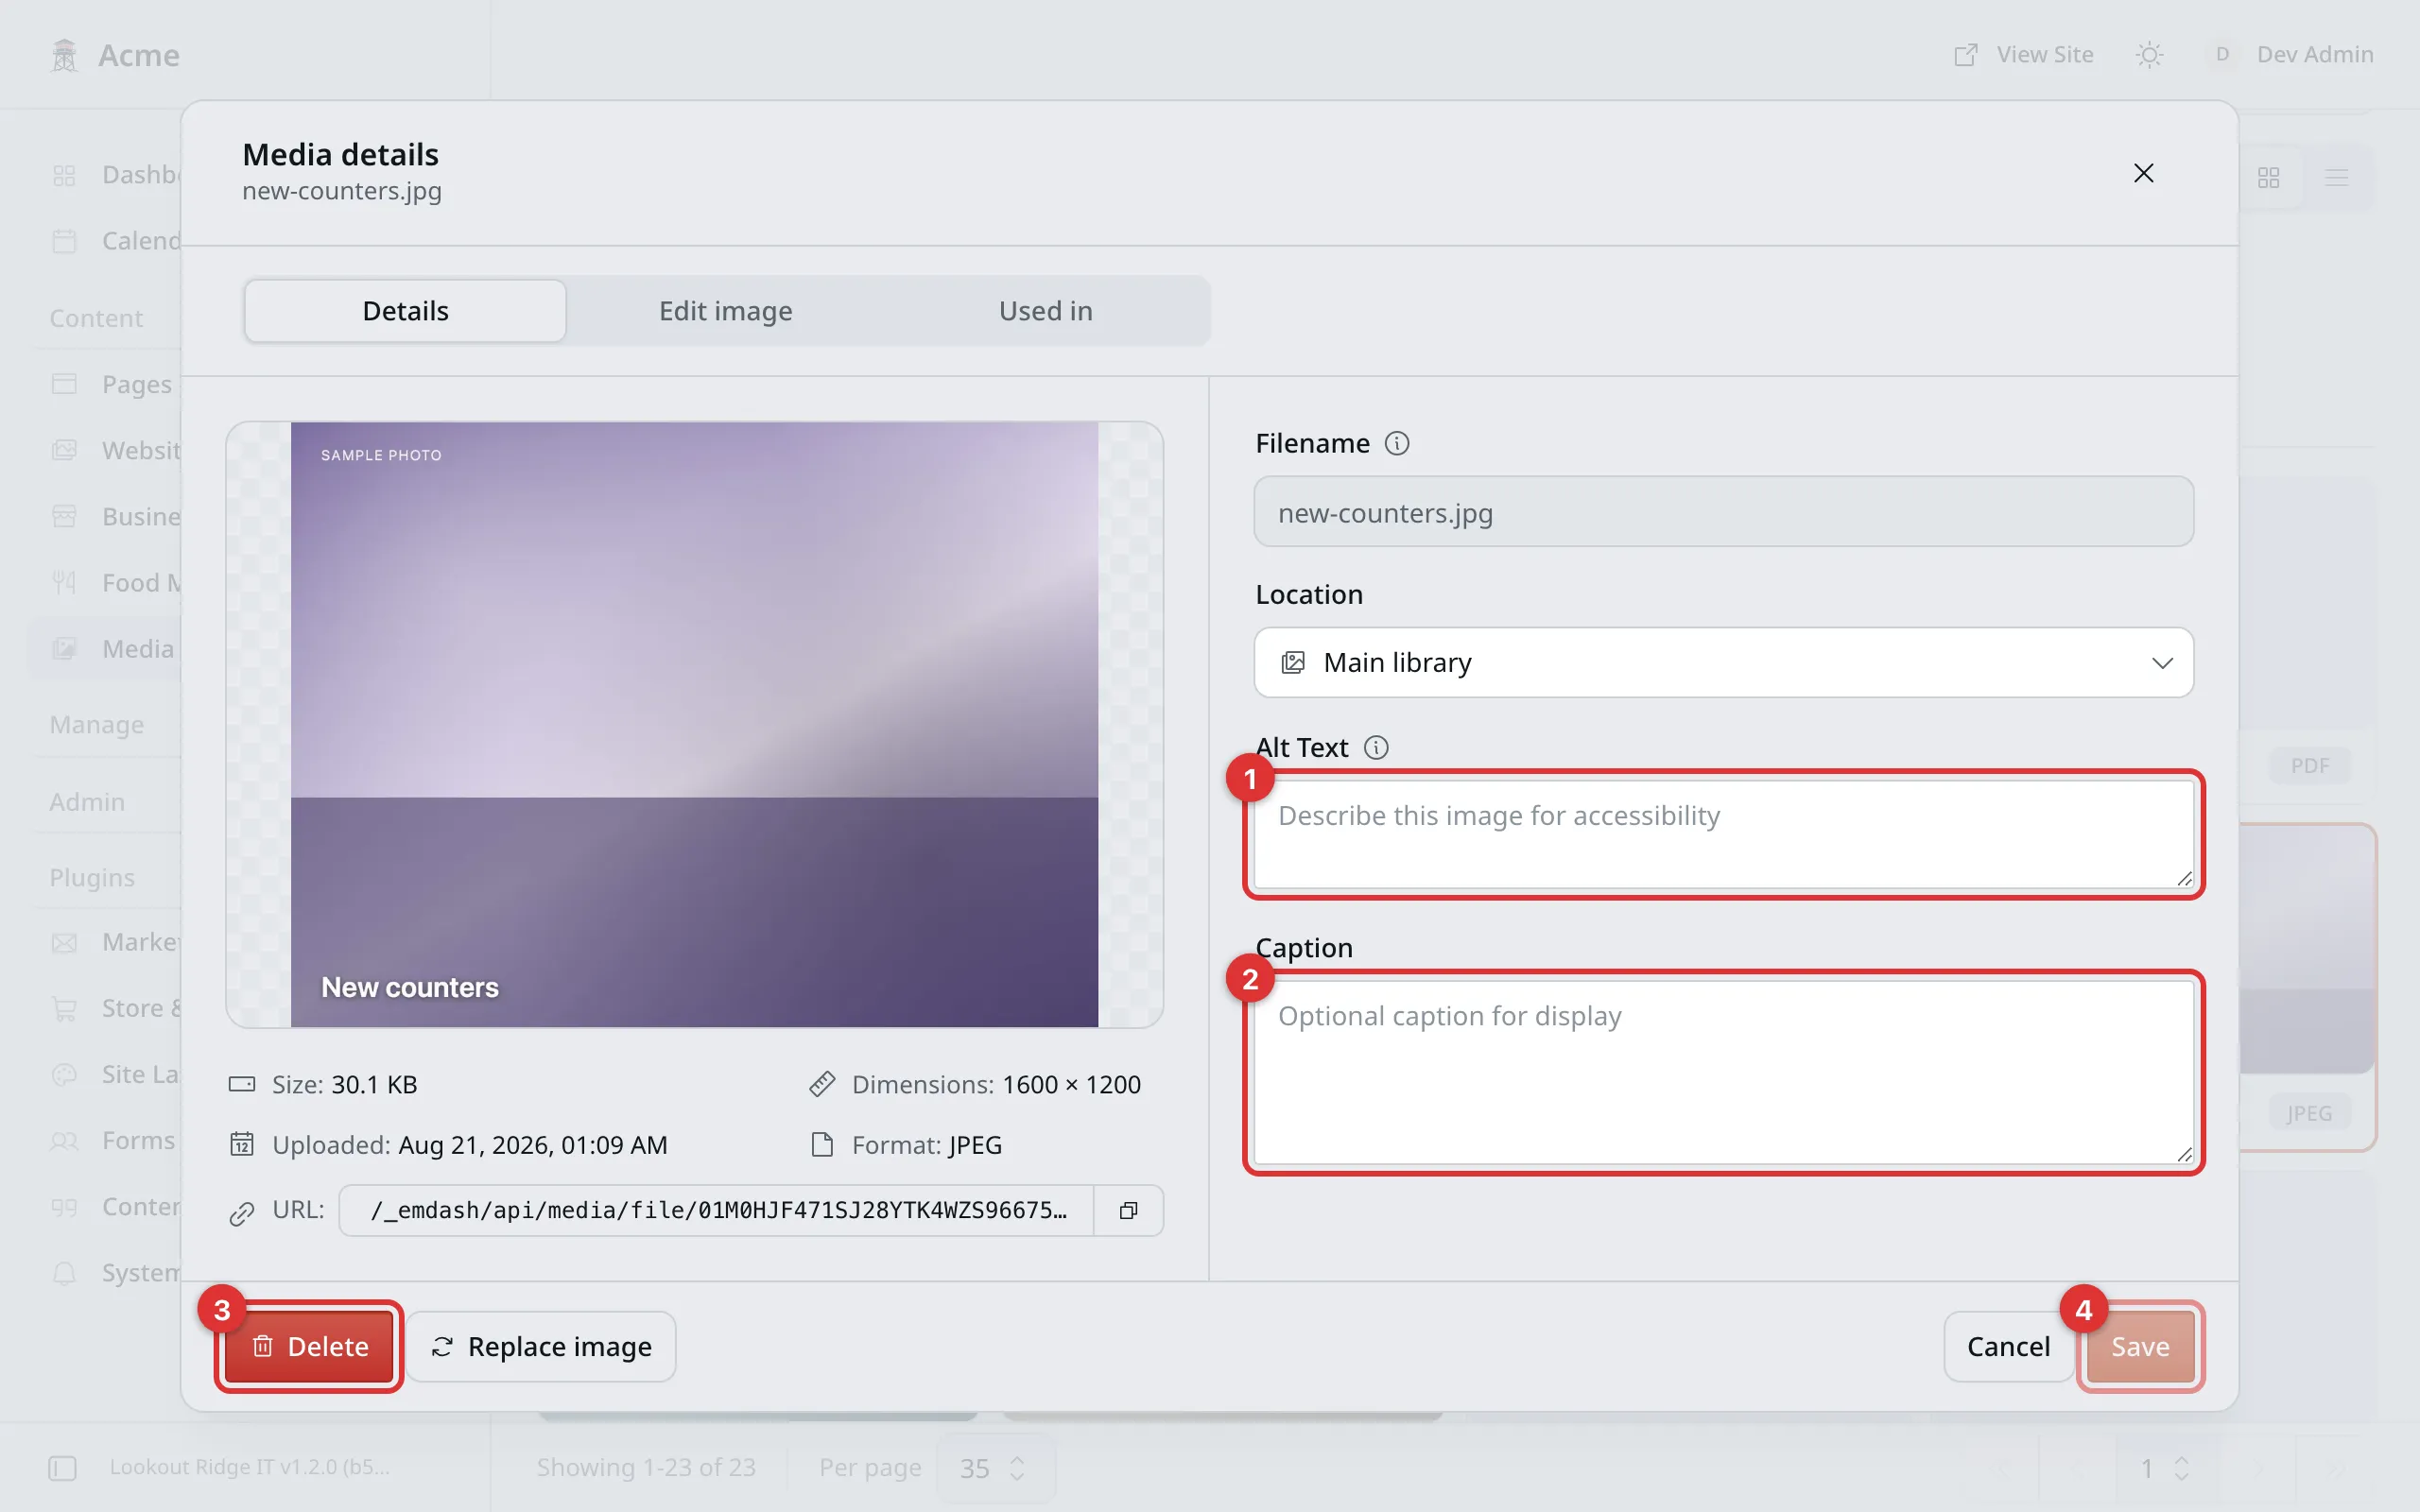
The Details tab, with the size, the width and height, and the date it went up.
1. Alt Text. The description. Type it here, then click Save.
2. Caption. Optional, and you can leave it empty. Photo albums have their own caption box, on the photo itself, and that is the one your Gallery page uses.
3. Delete. Read the warning further down before you use this.
4. Save. Stores your text.
Good alt text says what is in the picture, in a few plain words:
-
Good: A new white kitchen with a wooden worktop.
-
Not so good: IMG_4471.
-
Good: Two of our installers carrying a bathtub up a backyard path.
-
Not so good: Photo of our work, best plumbers, bathroom fitting.
Keep it under about fifteen words. No need to start with “a photo of”.
Important
Write the alt text when you upload, before you put the photo on a page.
The description is copied onto the page at the moment you pick the photo. Come back and change the alt text later and the pages that already use that photo keep the old wording. To bring them up to date, open the page, click Change, pick the same photo again, and publish.
In a photo album, the Caption you type beside the photo is used as the description if the file has no alt text of its own. Gallery covers albums.
Where a file is used
The Used in tab lists every entry that shows this file. Click the file in the Media Library, then click Used in. If it reads No tracked references found, no page or entry shows it.
That list only works once an Admin turns on Media usage tracking. Until then, the Media Library shows a notice at the top: Set up media usage tracking. Settings has the steps.
Choosing what stays in view
Your website often trims a photo to fit a space, such as a wide banner or a square card. The focal point is the spot you want to keep in view when it does. Put it on a face, or on the thing you are showing off.
- Click the photo in the Media Library.
- Click the Edit image tab.
- Click Focal point.
- Drag the dot onto the part that matters most.
- Click Save.
The same tab has Crop, for trimming the picture itself. Pick the shape and drag the box over the part you want. Then choose:
- Create cropped copy keeps the original and adds the trimmed one as a new file. This is the safe choice.
- Replace original trims the file itself. Every page that uses it shows the trimmed version, and the uncropped picture is gone for good. It only works with the Original shape picked.
Swapping a photo everywhere at once
Say your van has a new paint job, and the old photo of it is on six pages. You can swap the file itself, and every page changes with it.
- Click the photo in the Media Library.
- On the Details tab, click Replace image.
- Pick the new photo from your computer. Use the same kind of file as the old one, such as a JPG for a JPG.
- The panel asks Replace original image? Click Replace image.
Warning
Every place that uses the photo shows the new one at once. The old photo is not kept. If you might want it back, upload the new one as a separate file instead.
Videos
Upload a video the same way as a photo. To put it on a page, use the Video block. Pages shows how.
Visitors can play your videos on a computer or a phone, and skip ahead in them. Keep them short. A minute or two uploads faster and plays better than a long film.
Deleting a file
Warning
Deleting is final. The Trash cannot bring the file back.
If a page or entry is showing that photo, the panel warns you, but it does not stop you. The page keeps pointing at a file that is no longer there, and visitors get a broken picture.
Before you delete, open the Used in tab and check that it is empty. If that tab is not set up, click Live View on any page you think uses the file, and look. If in doubt, leave the file where it is. An unused file costs you nothing.
- Click the file in the grid.
- Click Delete, at the bottom left of the box.
- A message asks Delete media? and says it cannot be undone.
- Click Delete again to confirm.
The file goes from the grid right away.
Some screens hold on to a file outside your pages: your footer, your menu icons, your 404 page, saved QR codes and shop products. If one of those still uses the file, the panel refuses to delete it. The message names the screen, such as “Used by: Footer”. Take the file out there first, then delete it here.
Folders
Folders keep your files in tidy groups, such as one per job or one per year. The Folders row sits at the top of the Media Library. Everything that is not in a folder sits in the Main library.
To make a folder:
- Click Add new folder, beside Upload Files. A box opens. On a phone the button reads New folder.
- Type a Name.
- Click Create.
To put a file in a folder, click the file. On the Details tab, pick the folder in the Location box, then click Save. You can also drag a file onto a folder.
Click a folder to open it. Back to Main library takes you out again.
To rename a folder, click the pencil icon beside its name. The Edit folder box opens. Change the Name, then click Save.
Warning
Delete folder removes the folder, but not the files in it. They go back to the Main library. No photo is lost. You cannot get the folder itself back, though.
To remove a folder, click its pencil icon, then Delete folder. The panel asks if you are sure, and says no files will be deleted. Click Delete folder again.
A folder does not change your website. Pages that show a photo keep showing it, wherever the file sits.
Important
These folders are not the same as the photo folders on the Media Folders screen under Plugins, then Content Tools. Those are for your gallery albums. The folders here only tidy your Media Library.
Last updated Oct 20, 2026