

Content
Menu Sections (Food)
The courses and groups inside a food menu.
Add-on
Menu Sections (Food) is an add-on, so not every website has it. If it is not in your menu, see Add-ons to add it.
A section is a group of dishes under one heading: Tacos, Sides, Drinks. One entry here is one section, and the dishes live inside it.
This is where your food is. The menu itself holds only a name and an intro. Menus (Food) covers that side.
Go to Content, then Food Menu, then Menu Sections (Food). One row is one section, and the list is flat. It does not group sections by menu.
Making a section
- Click Add New.
- Type a Section title, such as “Tacos”. This is the heading on your website.
- Write an Intro if you want one. It is a line under the heading. Leave it empty and the heading stands on its own.
- Click Save.
- Add your dishes, as shown below.
- Click Publish now, then Publish now again to confirm.
The Menu box
Under the Intro is a box named Menu. It says which menu this section belongs to.
If your site has one menu, leave it empty. The section joins that menu on its own. This is the normal case, and there is nothing to think about.
If you have two or more menus, type the slug of the one you want. A menu’s
slug is in the Settings panel on the right when you have that menu open,
and it is
usually the title in lower case with dashes, such as lunch-menu.
Leave it empty on a site with several menus and the section joins whichever menu is first. It is never dropped, so a section that turns up under the wrong heading is telling you this box needs filling in.
Adding dishes
Your dishes are the Items list, further down the form. One row is one dish.
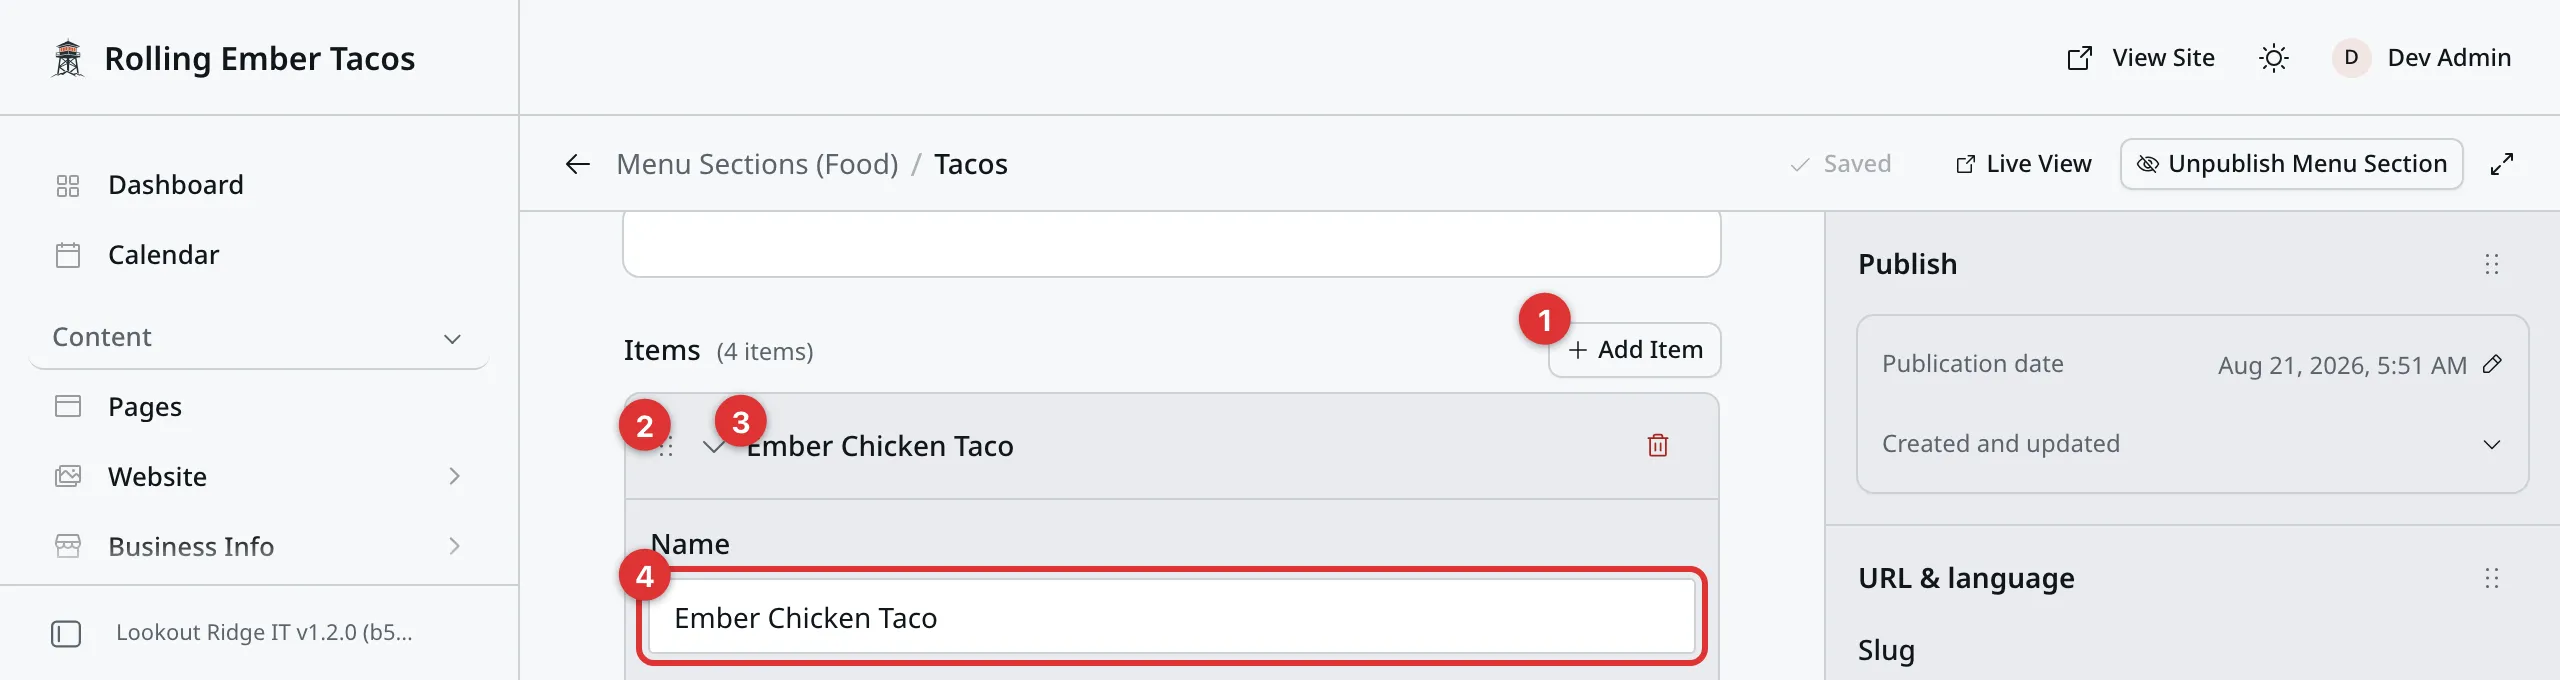
Each row is named after the dish, so you can find one without opening them all.
1. Add Item. Adds an empty row. Click it once per dish.
2. The six dots. Drag these to move a dish up or down.
3. The row title. Click it to open or close the row.
4. Name. What the dish is called. This is the only box a dish must have.
For each dish:
- Click Add Item.
- Type a Name, such as “Ember Chicken Taco”.
- Fill in the boxes below it. All of them can be left empty.
- When the whole section is done, click Publish now, then Publish now again to confirm. On a section that is already live, click Publish changes, then Publish changes again to confirm.
The other boxes in a row are these.
Description. A short line under the name. One sentence is plenty.
Price. Covered in its own section below.
Dietary tags. Short labels, separated by commas, such as GF, V.
Photo. A small square picture beside the dish. Click Select image and pick one. Media walks through the picker.
A row with no name never shows on your website. If you add a row and change your mind, click the red trash icon on the right of it.
What a dish looks like on your website
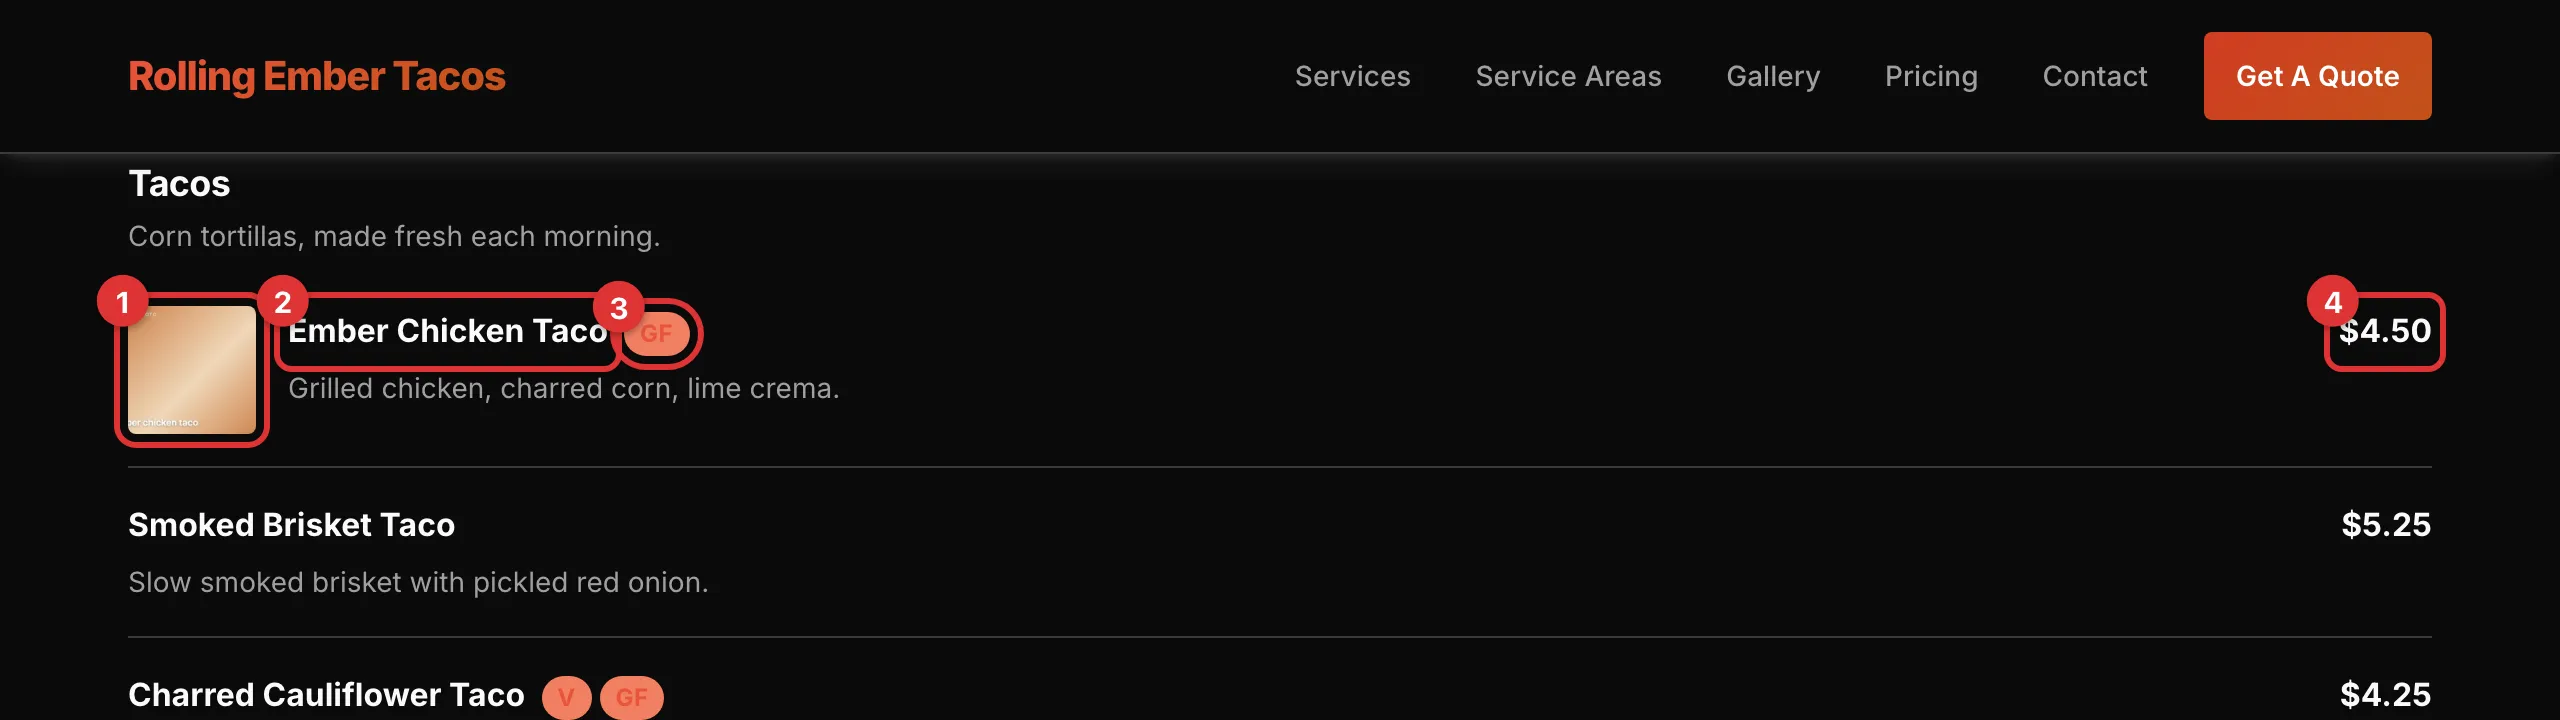
One row in the Items list becomes one line on the menu.
1. The photo. A small square on the left. Dishes with no photo simply start at the name, and the line still reads well.
2. The name.
3. A dietary tag. Each tag becomes its own small badge, in capitals.
4. The price. On the right, on the same line as the name.
The photo is used on the menu page only. The printable copy of your menu, and the short Menu block on other pages, both leave photos out. Menus (Food) covers those two.
Writing a price
Your website prints the price exactly as you type it. It adds nothing.
So type it the way you want it read: $4.50, not 4.5. If you type 12,
your menu says “12” with no dollar sign.
Leave the box empty and no price shows at all. That is the right choice for a dish priced by weight or by the day.
Pick one shape and use it for every dish on the menu. A menu that mixes
$4.50 with 4.50 looks like a mistake.
Important
Search engines read your prices too, but only when the price is a plain
number, with or without a dollar sign. A price such as 12 each or Market price still shows on your menu, exactly as you typed it. It is simply
skipped by search engines. Nothing on your website breaks either way.
Dietary tags
Type them in one box, separated by commas: GF, V. Each one becomes a small
badge next to the dish name, in capitals.
Any wording works, and it shows as you typed it. A short handful of them,
GF, V, VG, Vegan, Vegetarian, Halal, Kosher, are also
understood by search engines. Anything else is shown but not understood.
Keep tags short. They sit beside the dish name, and a long one crowds it.
There is no sold out switch
A dish is either in the list or it is not. Nothing marks one as sold out for the day.
Two ways round it:
- Take the row out. Click the red trash icon on its row. Then click Publish changes, then Publish changes again to confirm. Add it again when the dish is back.
- Say so in a tag. Type
Sold outin Dietary tags. It shows as a badge beside the name, the same asGFdoes.
The second one is quicker to undo, and it keeps the dish and its price where you can see them.
Putting dishes and sections in order
Dishes are in the order of the rows. Drag the six dots on the left of a row to move one.
The new order saves on its own, but your website does not change until you click Publish changes, then Publish changes again to confirm. Until then, visitors see the old order.
Sections are ordered by the Sort order box at the bottom of each section. The lowest number goes first, and an empty box counts as zero. Two sections with the same number fall back to A to Z by title.
Give every section a number, or none of them. Numbering only some is what makes this confusing.
Tip
Number your sections in tens: 10, 20, 30. Then a new section can slip between two of them without renumbering everything.
A section with no dishes
It does not show on your website. Not the heading, not the intro, nothing.
That is deliberate. An empty heading on a menu looks broken to a customer, so your website leaves the whole section out until a dish is in it.
Taking a section off your website
Warning
Both of the buttons below take the section off your website the moment you click. Its heading and every dish in it stop showing.
If it is the only section on the menu, your menu page then has no food on it at all. Menus (Food) explains what visitors see then.
Unpublish Menu Section hides it and keeps it. Use it for a section you run some months and not others. The dishes wait exactly as you left them.
Move to Trash is for a section you are done with. It goes to the Trash tab, so you can still get it back.
Saving and publishing covers both buttons and how to undo them.
Last updated Oct 20, 2026