

Start here
Saving and publishing
The difference between saved and live, and every button that changes what the public sees.
This is the page to know by heart. Every other page in this manual sends you back here.
The short version: saving stores your work, publishing puts it on your website. They are two steps, and doing the first does not do the second.
Saving happens on its own
Open any entry and look at the bar across the top. Near its right end is a button that reads Saved most of the time.
While you type, it changes to Save. A couple of seconds after you stop, it flips to Saving…, then back to Saved. When it reads Saved, your work is stored. You can close the tab.
In a hurry? Click Save while it shows, and your work saves that second.
Brand new entries are the one exception. On a blank form, Save is an orange button, and there is no publish button yet. Click Save once. From then on the entry saves itself, and the publish button shows up.
Draft and Published
Every entry is one or the other. The Publish part, at the top of the panel on the right, tells you which.
- A draft has an orange Publish now button in the top bar, and a Schedule button in the Publish panel on the right. The entry is not on your website. Only people who can sign in to the panel can see it. Type its address into a browser and you get sent away, as if the page were not there.
- A published entry shows Live version, with “Visitors see this published version” under it. The orange button is gone. In its place is a plain button named after the kind of entry, such as Unpublish Service. The entry is on your live website, and anyone can read it.
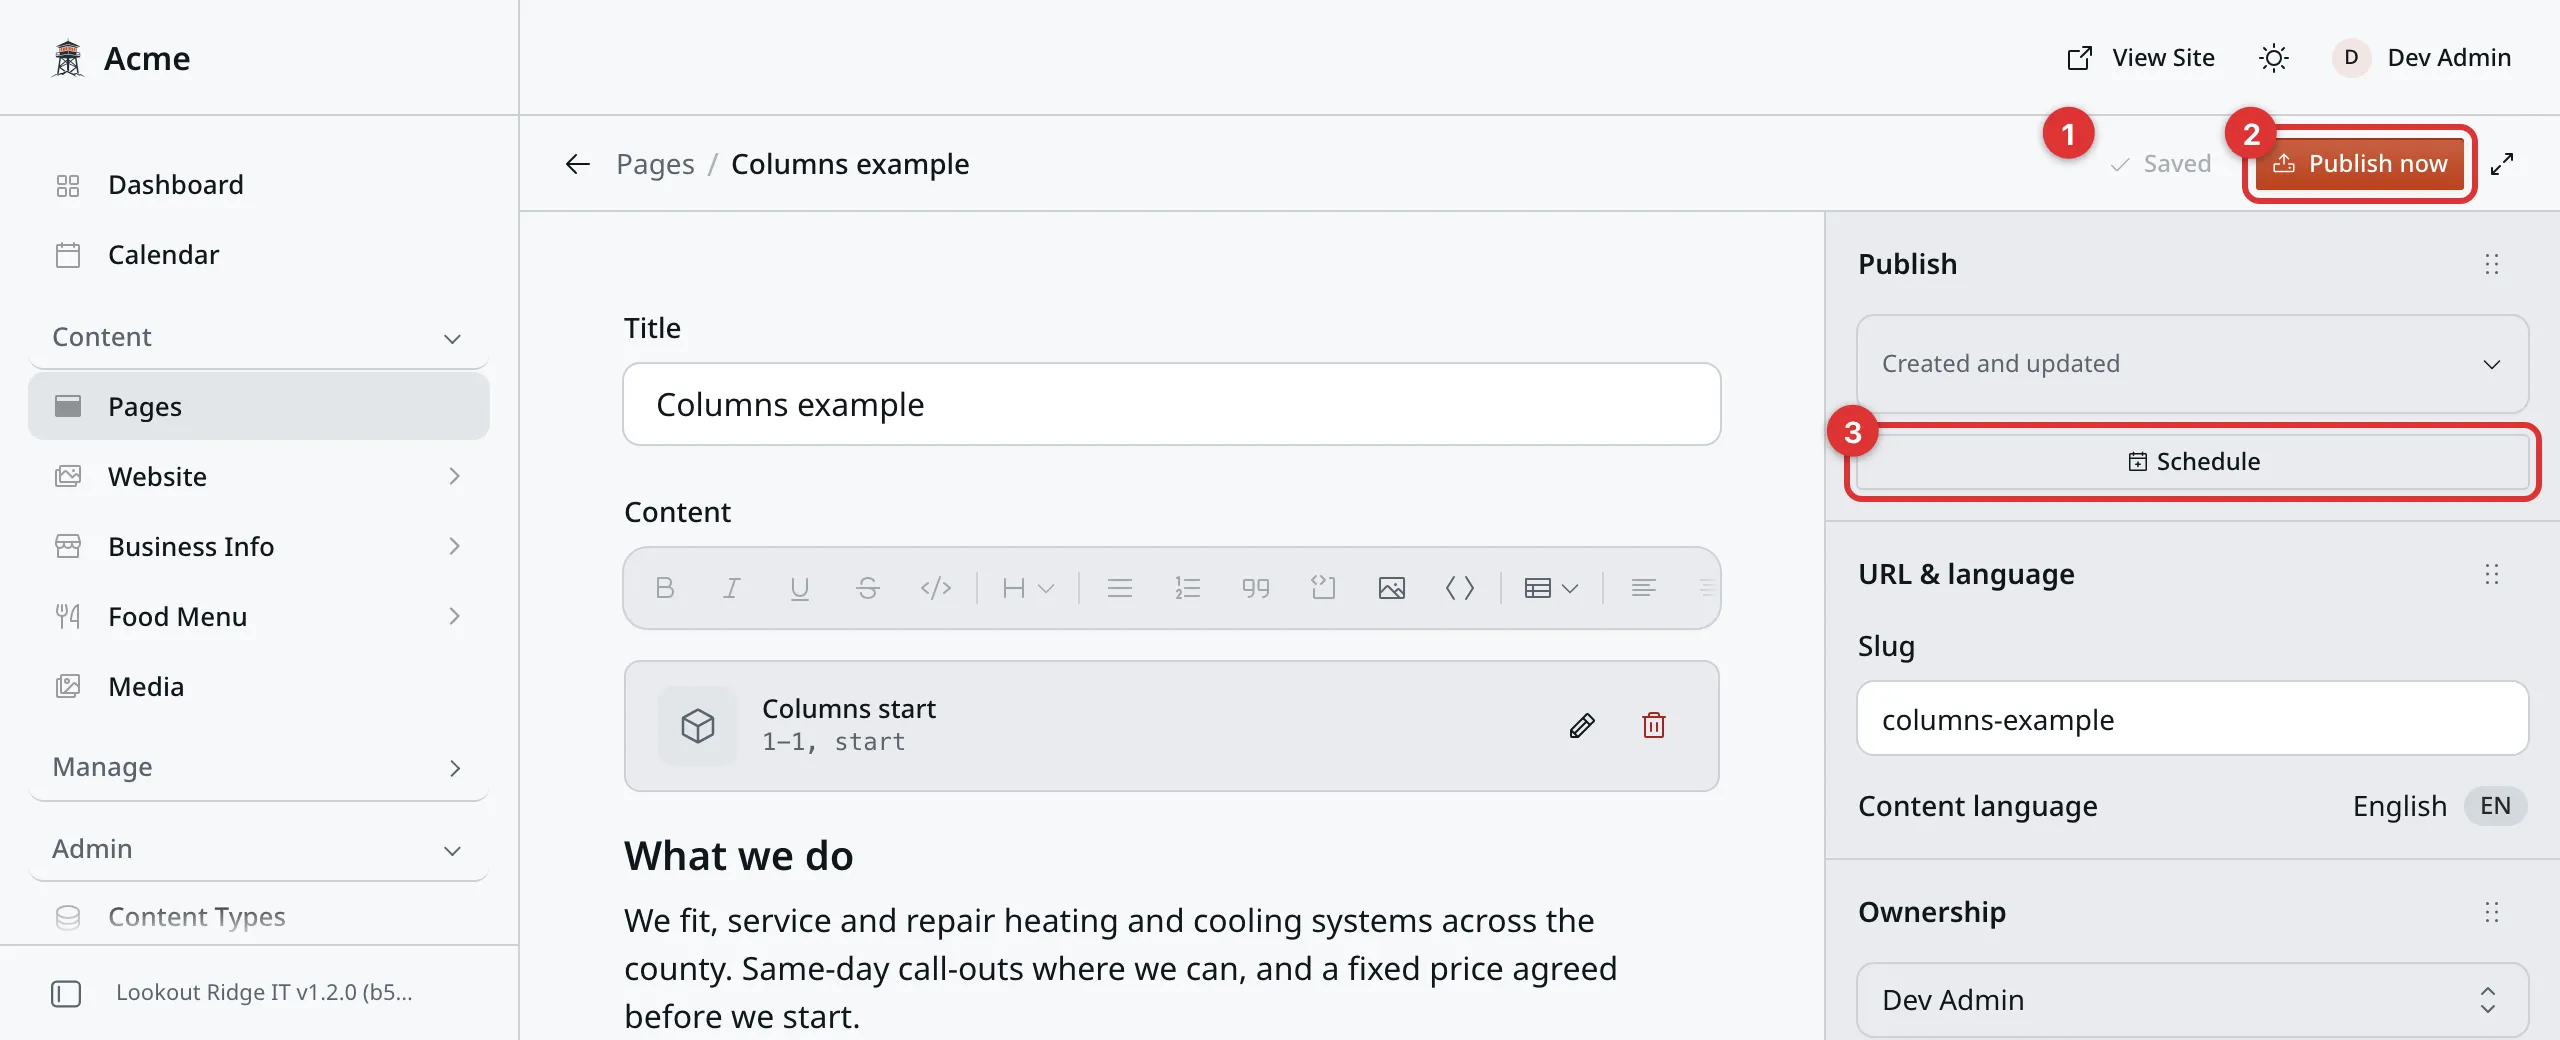
A draft. Nothing on it is on your website yet.
1. Saved. Your work is stored.
2. Publish now. The button that puts the entry live.
3. Schedule. Sets a time for it to go live on its own. See Schedule for later.
Publishing
- Click the orange Publish now button in the top bar. A small box opens, headed Publish now? It says the content will be visible on the site right away.
- Click Publish now in that box.
A message appears: Content is now live.
It is live that second. Not in an hour, not overnight. The orange button turns into Unpublish and the kind of entry, and a Live View button appears beside Saved. Click Live View and you are looking at what your visitors see.
That is the whole of it. Nobody else has to approve it.
Preview a draft
Live View only shows up once an entry is published. On some sites there is also a Preview button in the top bar. If yours has one, it works like this.
Click it and your draft opens on the real page of your website, in a new tab. Same design, same layout, your new words. Nothing is published, and nobody else sees it.
The link is yours alone, and it stops working after a while. Send it to a friend and they land on nothing. To show the page to someone else, publish it.
On an entry that is already live with an edit waiting, the button reads Preview draft instead. It works the same way: you see the waiting edit, the public still sees the old page.
Important
A page that lists other entries, such as your Services page, only lists published ones. So a draft service is not in that list, even in a preview. Preview the service itself and you will see it fine.
Changing something that is already live
Here is the part that surprises people.
When you edit an entry that is already published, your changes are saved, but they do not go out. The public keeps reading the old version. Your changes sit and wait.
You can tell from the list screen at a glance.
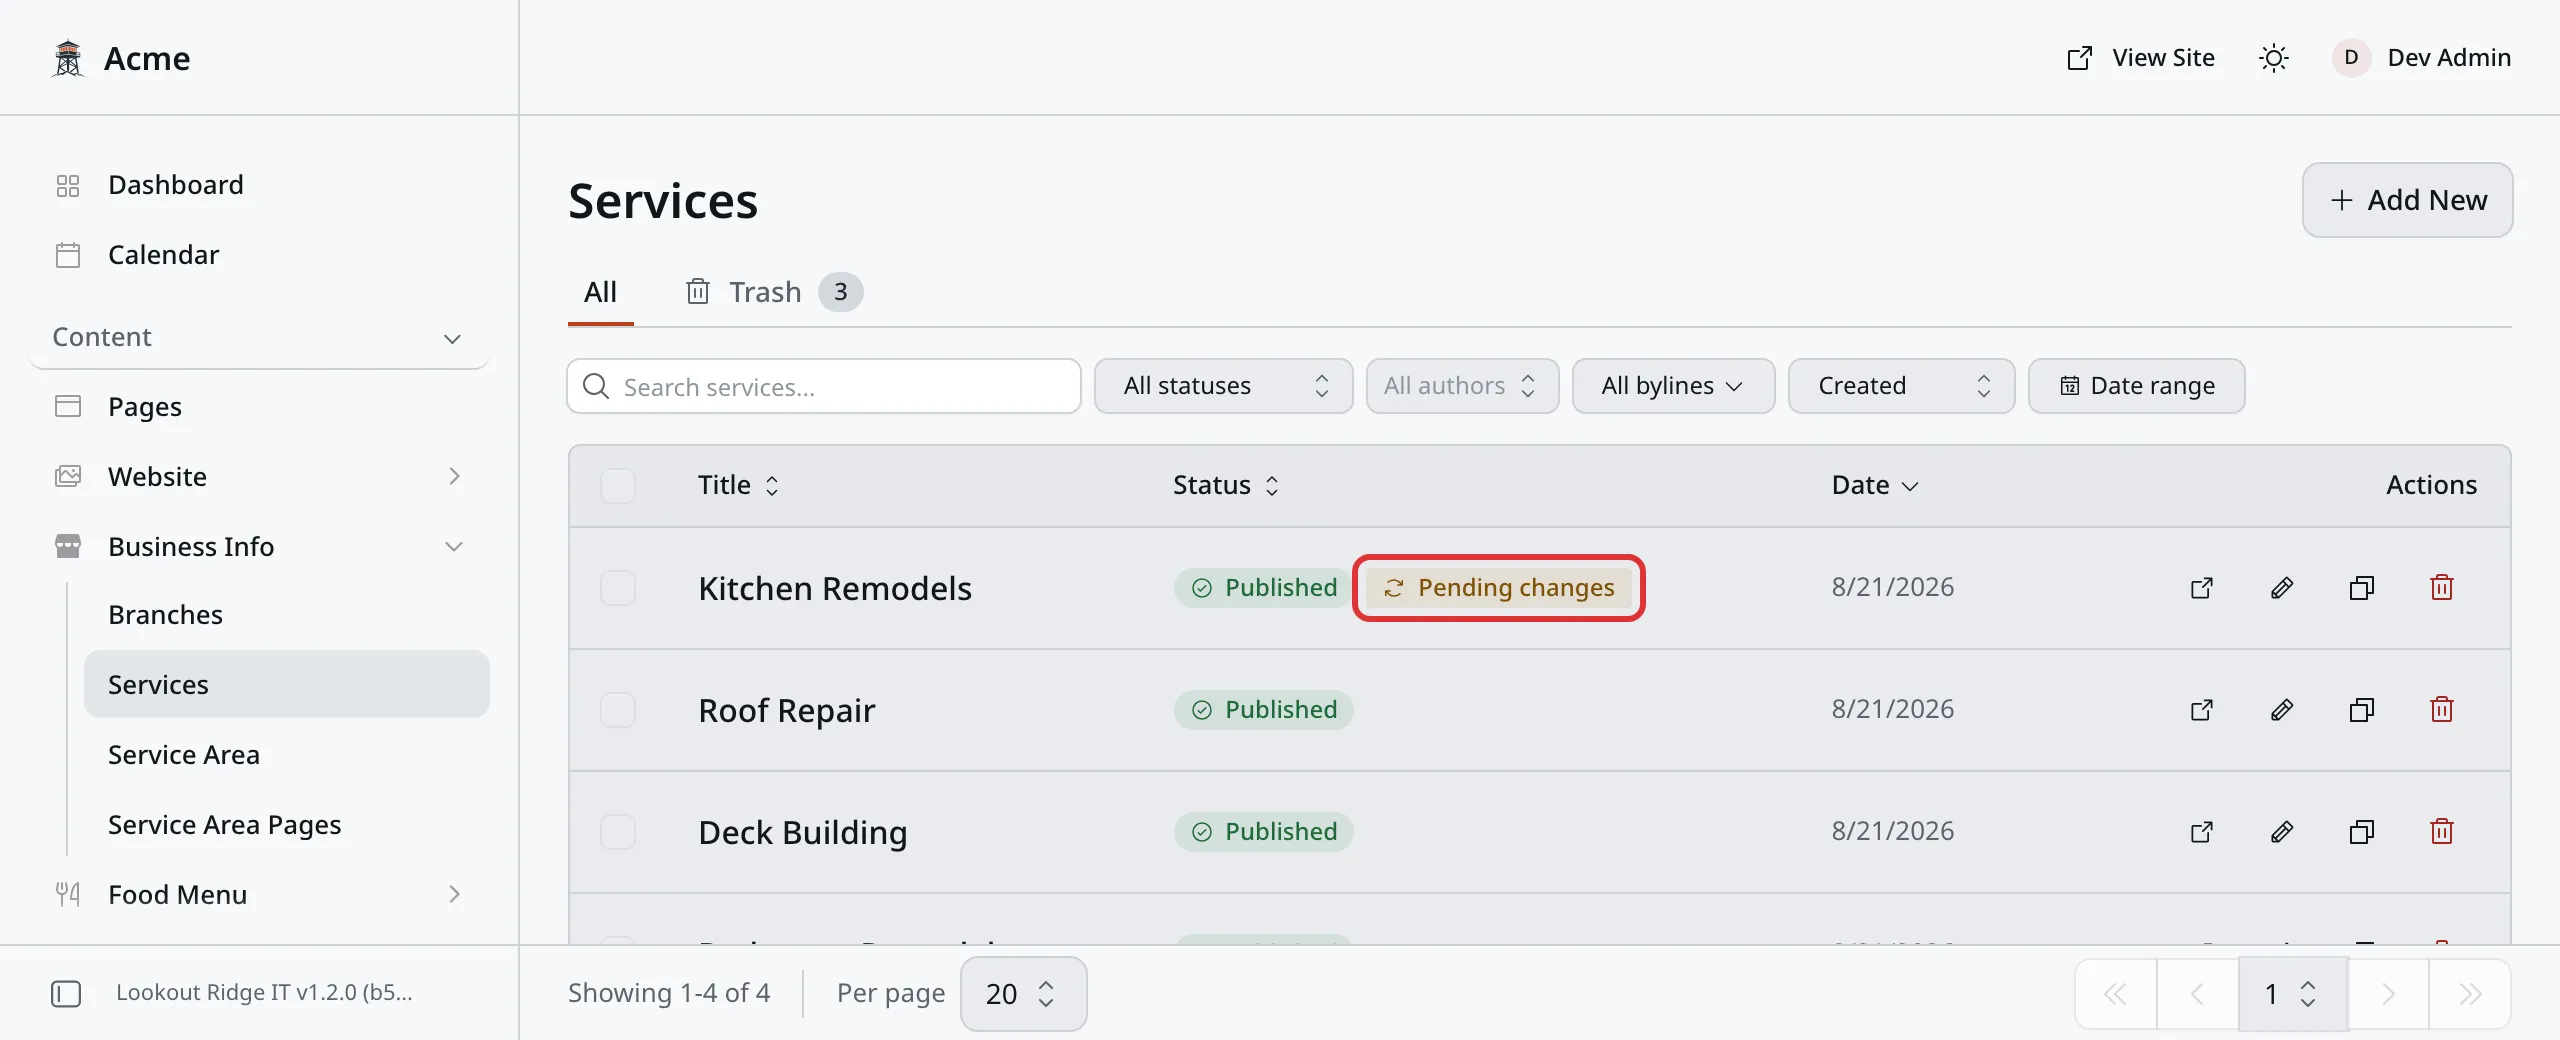
Published, with changes waiting. The public still sees the old version.
The yellow Pending changes tag is the sign. Open that entry and the panel on the right says the same thing.
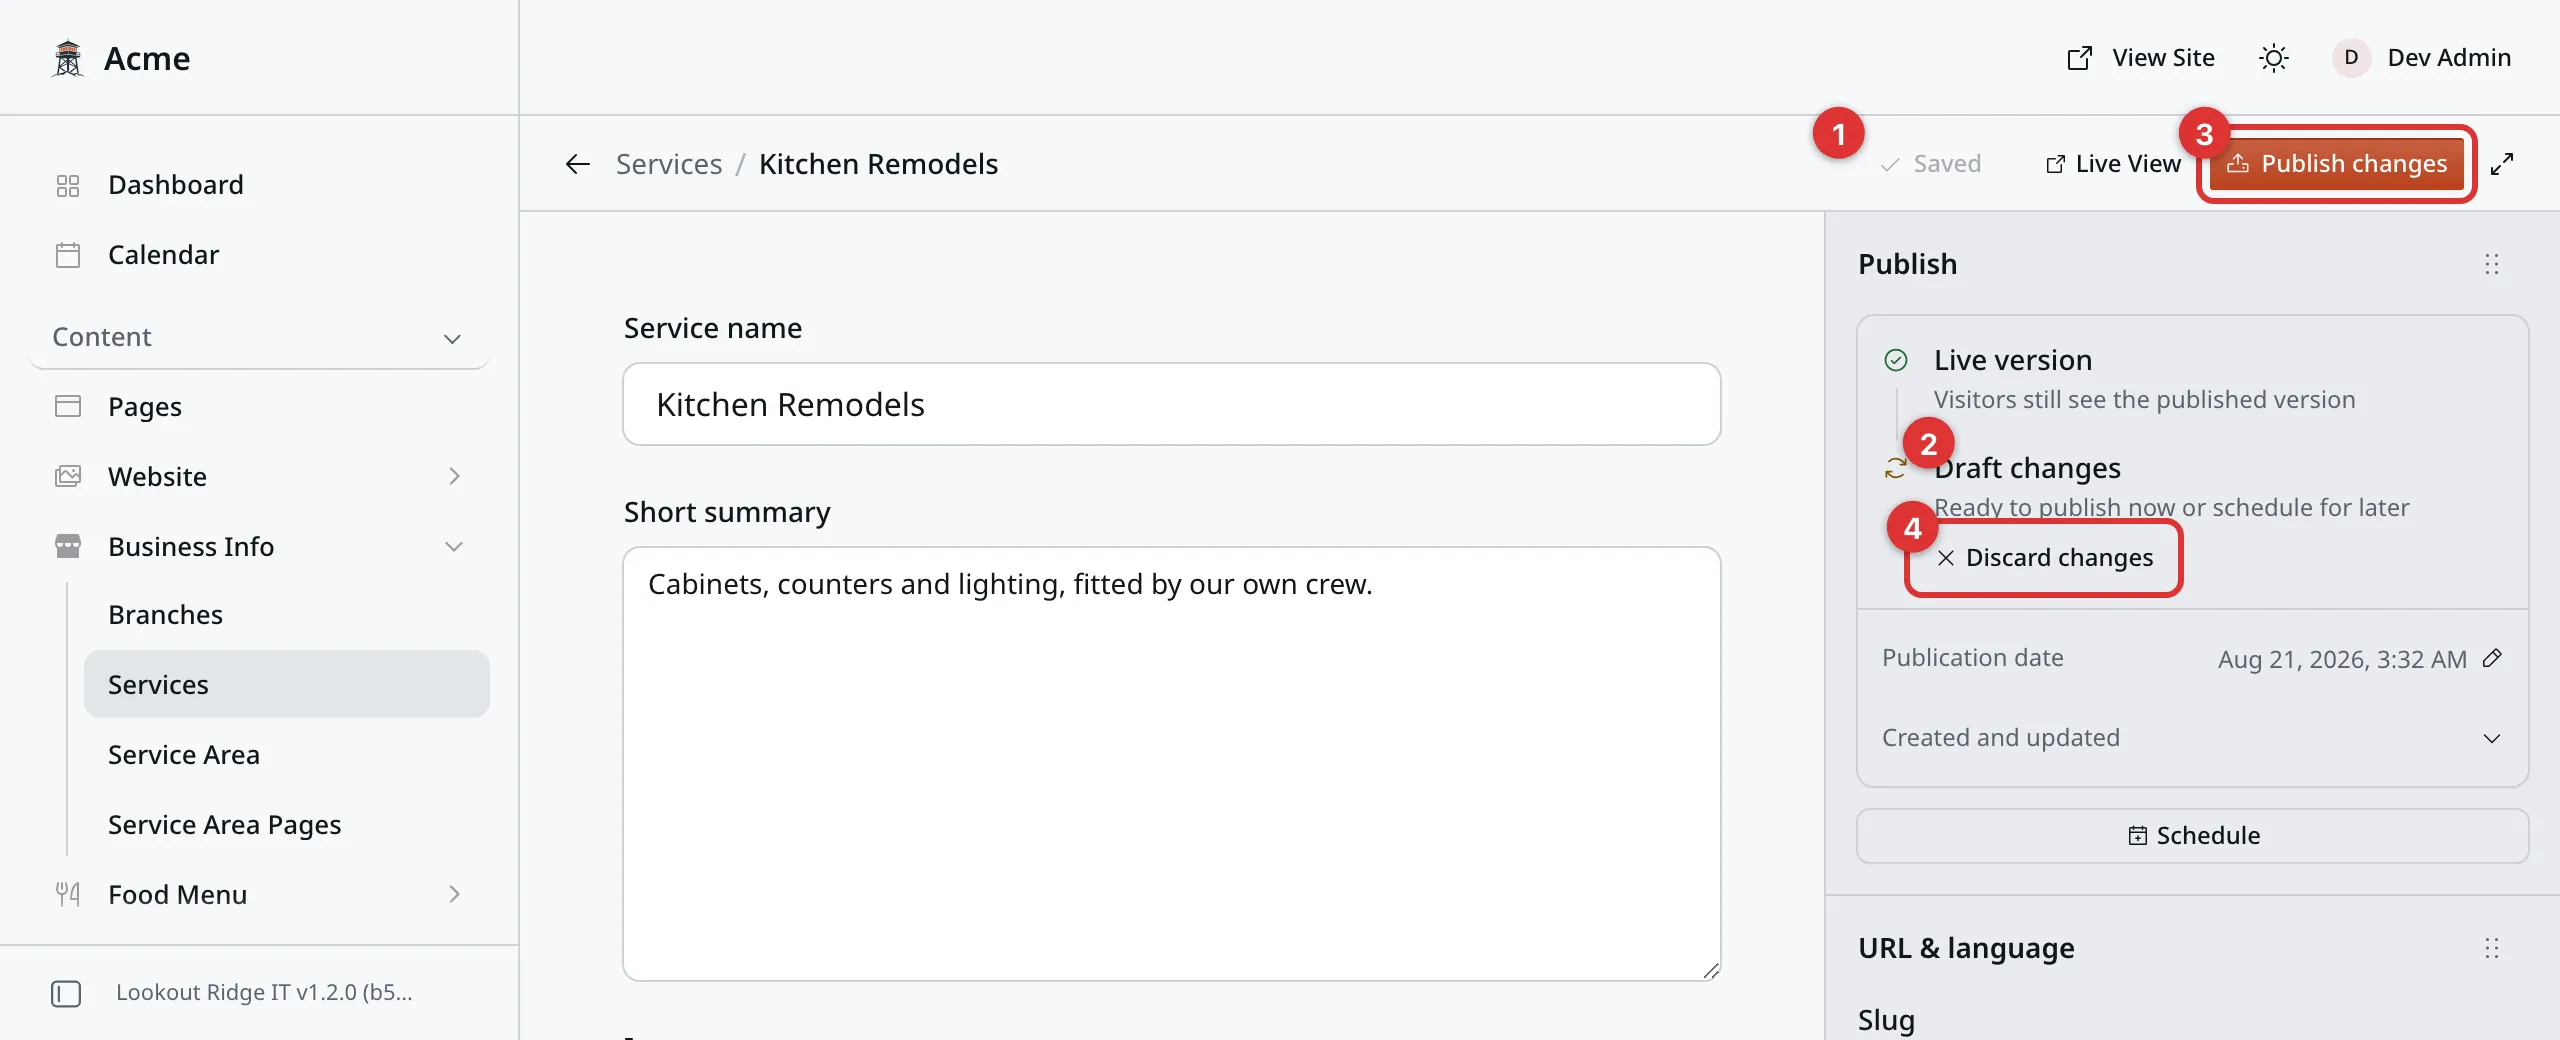
The same entry, open. Number 3 is the button that ends the wait.
1. Saved. Your edit is stored.
2. Draft changes. The Publish box now shows two lines. Live version says “Visitors still see the published version”. Draft changes under it says “Ready to publish now or schedule for later”. That is your waiting edit.
3. Publish changes. Click it, then click Publish changes again in the box that opens. The waiting edit goes out to the public that second.
4. Discard changes. Throws the waiting edit away. The entry goes back to the version the public can already see. You are asked to confirm first: the box reads Discard draft changes?, and you click Discard changes again.
Important
Finished editing? Check the top bar. An orange Publish now or Publish changes button means your work is saved but nobody can see it. Click it, then click the same words again in the box that opens. Then click Live View and read the page. That is how you know it worked.
Warning
Changing the Slug on a live entry changes its web address when you publish. Your website sends the old address to the new one by itself. Even so, search results take a long time to catch up. Set the slug when the entry is new, then leave it alone. The tour of the admin panel explains why.
If an old link still lands on nothing, the Broken links tab on the SEO page can send it to the right place.
Schedule for later
Use this when the change should go out at a set time. A price rise on the first of the month, or opening hours that change on a Monday.
The Schedule button only shows when there is something to schedule: a draft, or a live entry with an edit waiting.
- Open the entry. Find the Publish part at the top of the panel on the right.
- Click Schedule. A box opens. On a draft it is headed Schedule publication. On a live entry it is headed Schedule changes.
- Pick a date and a time.
- Click Schedule, or Schedule changes on a live entry.
A message says the content has been scheduled. The Publish box now says Scheduled for, then your date and time.
When that time comes, it publishes on its own. Nobody has to be at a computer. Until then, the public sees nothing new.
Changed your mind? Two buttons sit under the date:
- Change schedule lets you pick a new time. Click Save schedule.
- Remove schedule cancels it. Nothing is published, and your work stays saved.
Want it out right now instead? Click the orange button in the top bar and confirm. The box warns you that this removes the schedule.
The Calendar
Calendar sits just under Dashboard in the menu. It shows what went live and what is set to go live, day by day, from every list at once. The times are in your website’s own time zone.
It has two views, Month and Agenda. Use the arrows and Today to move around.
Click an entry to see more about it. A scheduled entry also gets these buttons:
- Reschedule picks a new time. Click Save schedule in the box that opens.
- Remove schedule cancels it. The entry stays a draft, or keeps its waiting edit.
- Open in editor opens the entry itself.
You only see Reschedule and Remove schedule if you are allowed to publish that entry.
A scheduled entry that missed its time shows Overdue, with a Publish now button. Click it to send the entry out by hand.
Contact support
Contact us if an entry shows Overdue. It means scheduled publishing on your site may have stopped. Tell us which entry, and when it was due.
Email support@lookoutridgeit.com. Getting support says what to put in the message.
Revisions: your safety net
Every time you publish, the panel keeps a copy of what the entry said. Think of it as a time machine.
Scroll down the panel on the right to the Revisions part.
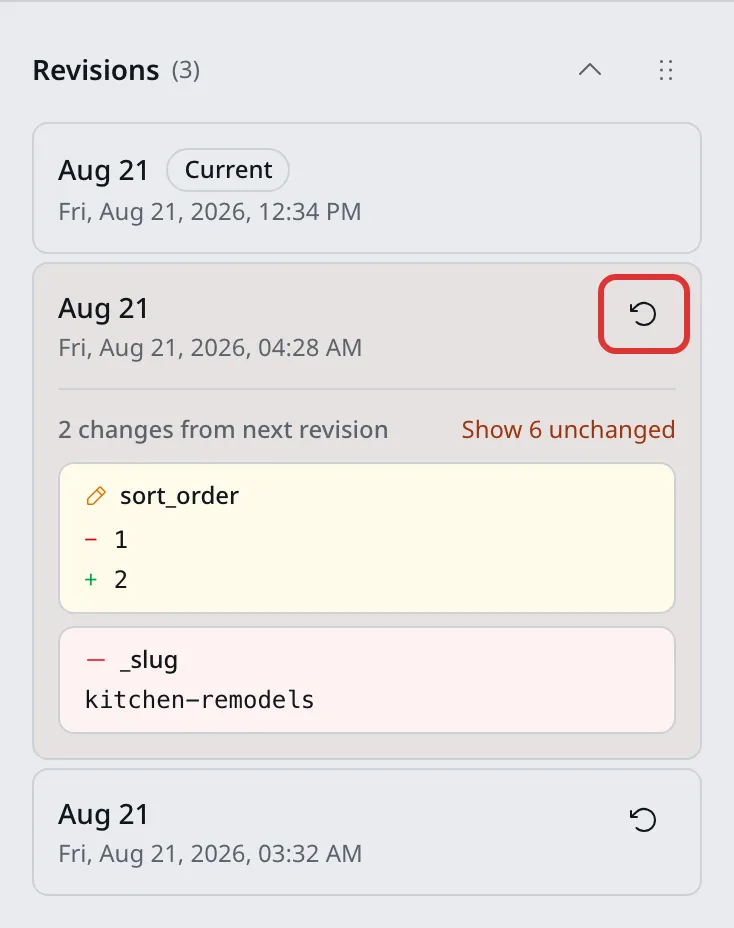
Older versions, newest at the top. The circular arrow puts one back.
Click any dated version to see what changed. Removed words show in red with a minus sign, new words in green with a plus sign, one field at a time.
To put an older version back, click the circular arrow on its row. A box asks Restore Revision? Click Restore, and the entry fills back in with the old wording.
Important
Restoring does not publish. The old wording comes back as Draft changes, and the public still sees the current version until you click Publish changes, then Publish changes again to confirm. If you restored by mistake, click Discard changes.
Unpublish: hiding without deleting
Unpublish takes an entry off your website and keeps it. Use it for a service you have stopped offering, or an offer that has ended.
Warning
The moment you click, the entry disappears from your website. Any visitor on that page, and any link or search result pointing at it, lands on nothing. Check that no other page links to it first.
The button sits in the top bar, where the orange publish button usually is. It is named after the kind of entry: Unpublish Service, Unpublish Page. There is no second question. Click it and a message confirms the content has been removed from public view.
You only see this button when no edit is waiting. If the top button reads Publish changes, publish or discard those changes first. Then Unpublish shows up.
Nothing is lost. The entry goes back to being a draft, word for word as you left it. Click Publish now, then Publish now again, to put it back.
Move to Trash
Trash is a junk drawer, not a shredder. Things you put in it can come back out.
Warning
Moving an entry to Trash takes it off your live website right away, exactly like unpublishing. Do this only when you are done with the entry for good.
The Move to Trash button is at the very bottom of the panel on the right. There is also a trash icon on each row of a list screen. Either way, a box asks Move to Trash? and you click Move to Trash again.
Getting something back
Every list screen has two tabs above the table: All and Trash. An entry you move there waits in Trash, with the date it went in.
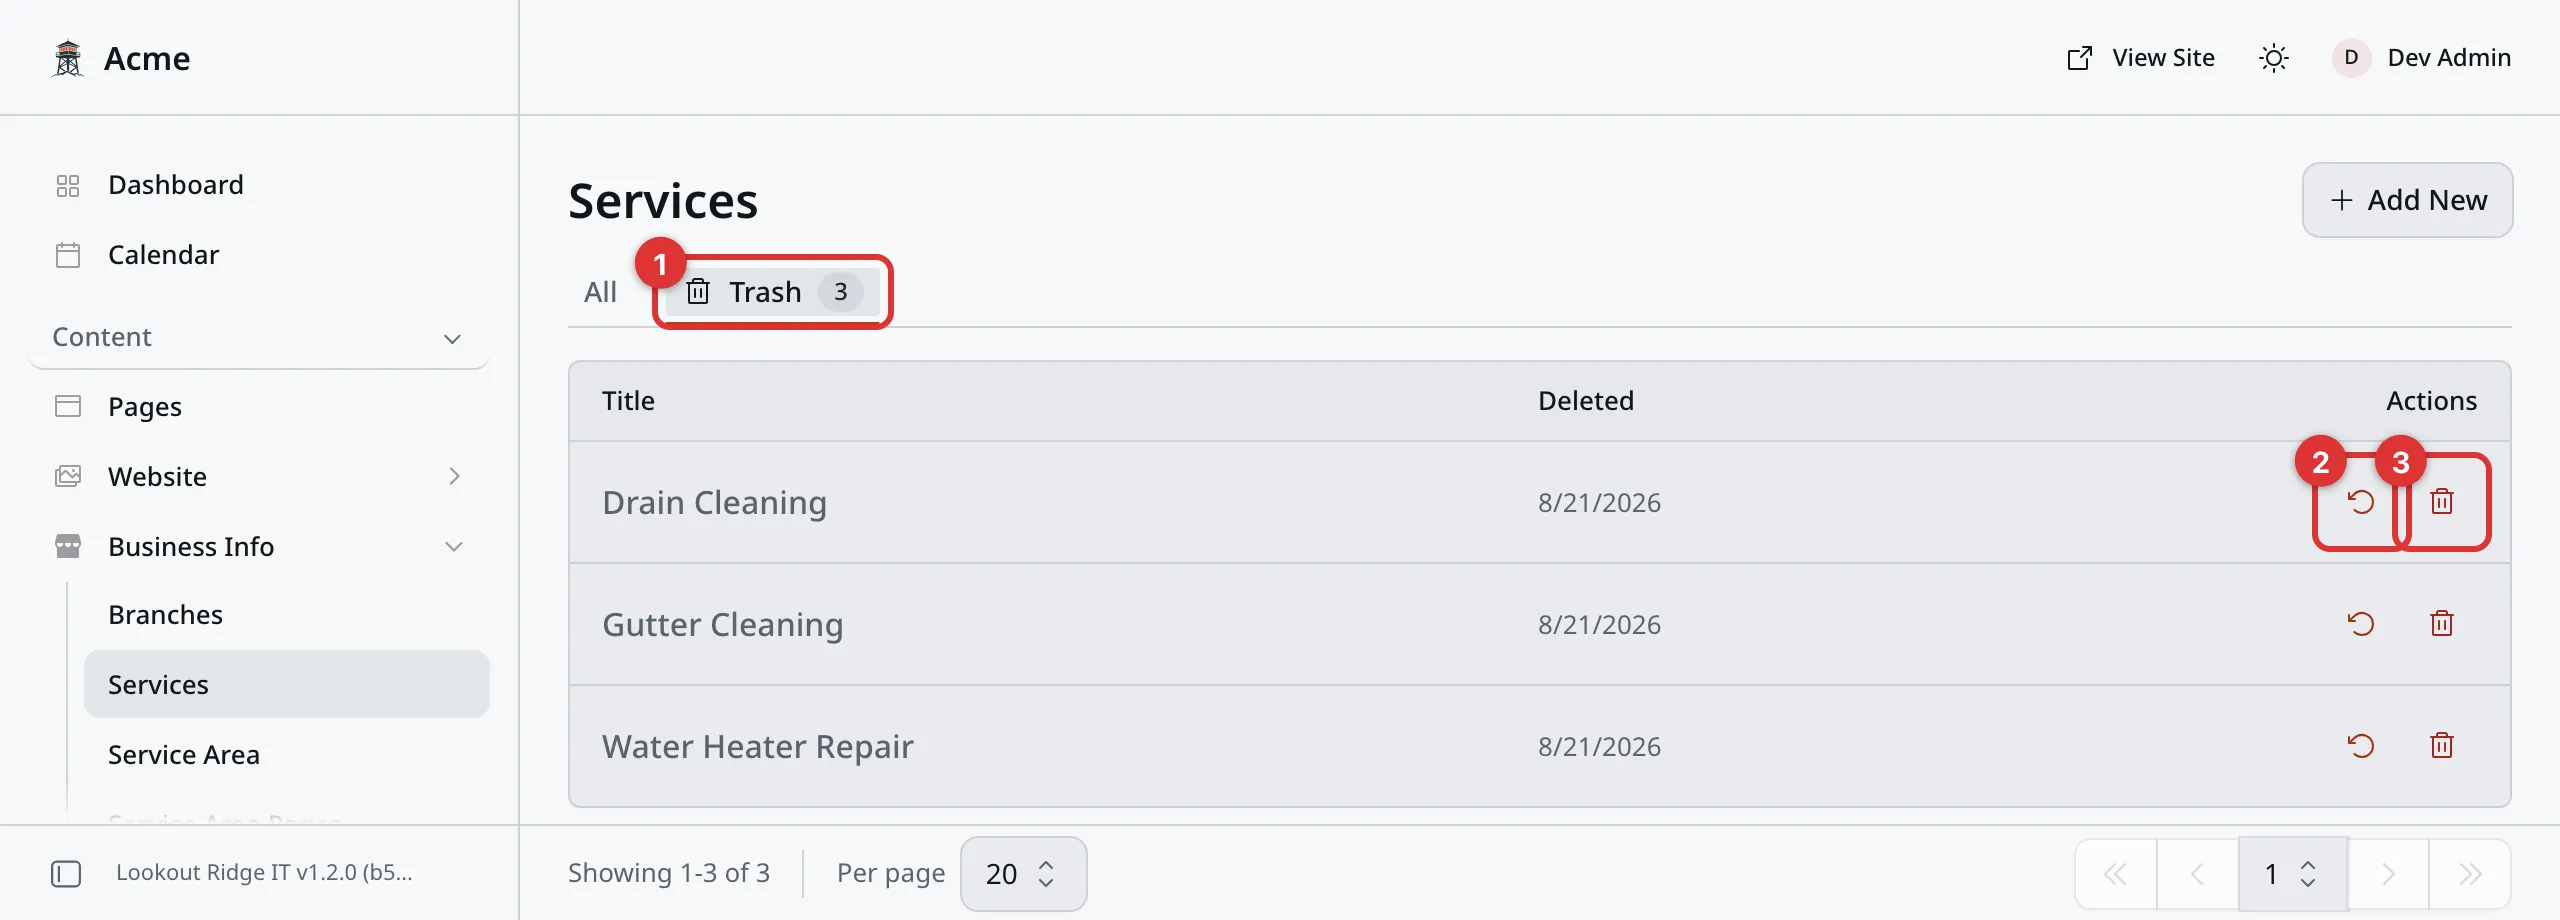
The Trash tab. Number 2 brings an entry back.
1. The Trash tab. The number beside it is how many entries are in there.
2. Restore. The circular arrow. It puts the entry back on the All tab as a draft. Publish it when you want it live again.
3. Delete Permanently. The red trash icon. Read the warning below before you touch it.
Delete Permanently
Warning
This one is final. The panel says so in its own words: it cannot be undone. Once an entry is gone this way, Trash cannot bring it back, and neither can we.
If you are not certain, leave it in Trash. It costs you nothing to keep it there.
Click the red trash icon on a row in the Trash tab. A box asks Delete Permanently? and says plainly that it cannot be undone. Click Delete Permanently only if that is what you mean.
The words, side by side
| Word | What it does | Does the public see it? |
|---|---|---|
| Save | Stores your work on the entry. | No, not on its own. |
| Preview | Shows a draft on the real page, for you only. | No, only you. |
| Live View | Shows you the entry as a visitor would see it. | No, only you. |
| Publish now | Puts a draft on the live website, once you confirm. | Yes, right away. |
| Publish changes | Puts a waiting edit on the live website, once you confirm. | Yes, right away. |
| Schedule | Publishes on a date and time you pick. | Yes, when that time comes. |
| Discard changes | Throws away edits you have not published. | No, they never went out. |
| Unpublish | Hides the entry. It is not deleted. | It disappears. |
| Move to Trash | Moves the entry to the Trash tab. You can get it back. | It disappears. |
| Restore | Brings an entry back out of Trash, as a draft. | Not until you publish it. |
| Delete Permanently | Removes it for good. Nothing can bring it back. | It disappears. |
When a page in this manual says “publish it”, it means: click Publish now, or Publish changes on an entry that is already live, then click the same words again in the box that opens.
Last updated Oct 20, 2026