
Manage
Menus
The navigation menus on your site: the links across the top and in the footer.
This is where the links at the top of your website live. The links in the footer live here too.
Go to Plugins, then Site Layout, then Navigation.
Important
Two things in the panel are called a menu, and they do different jobs.
Navigation is this one. It is the row of links on your website.
Content, then Food Menu, then Menus (Food), is a food menu: dishes and prices. See Menus (Food) for that one.
The menus you have
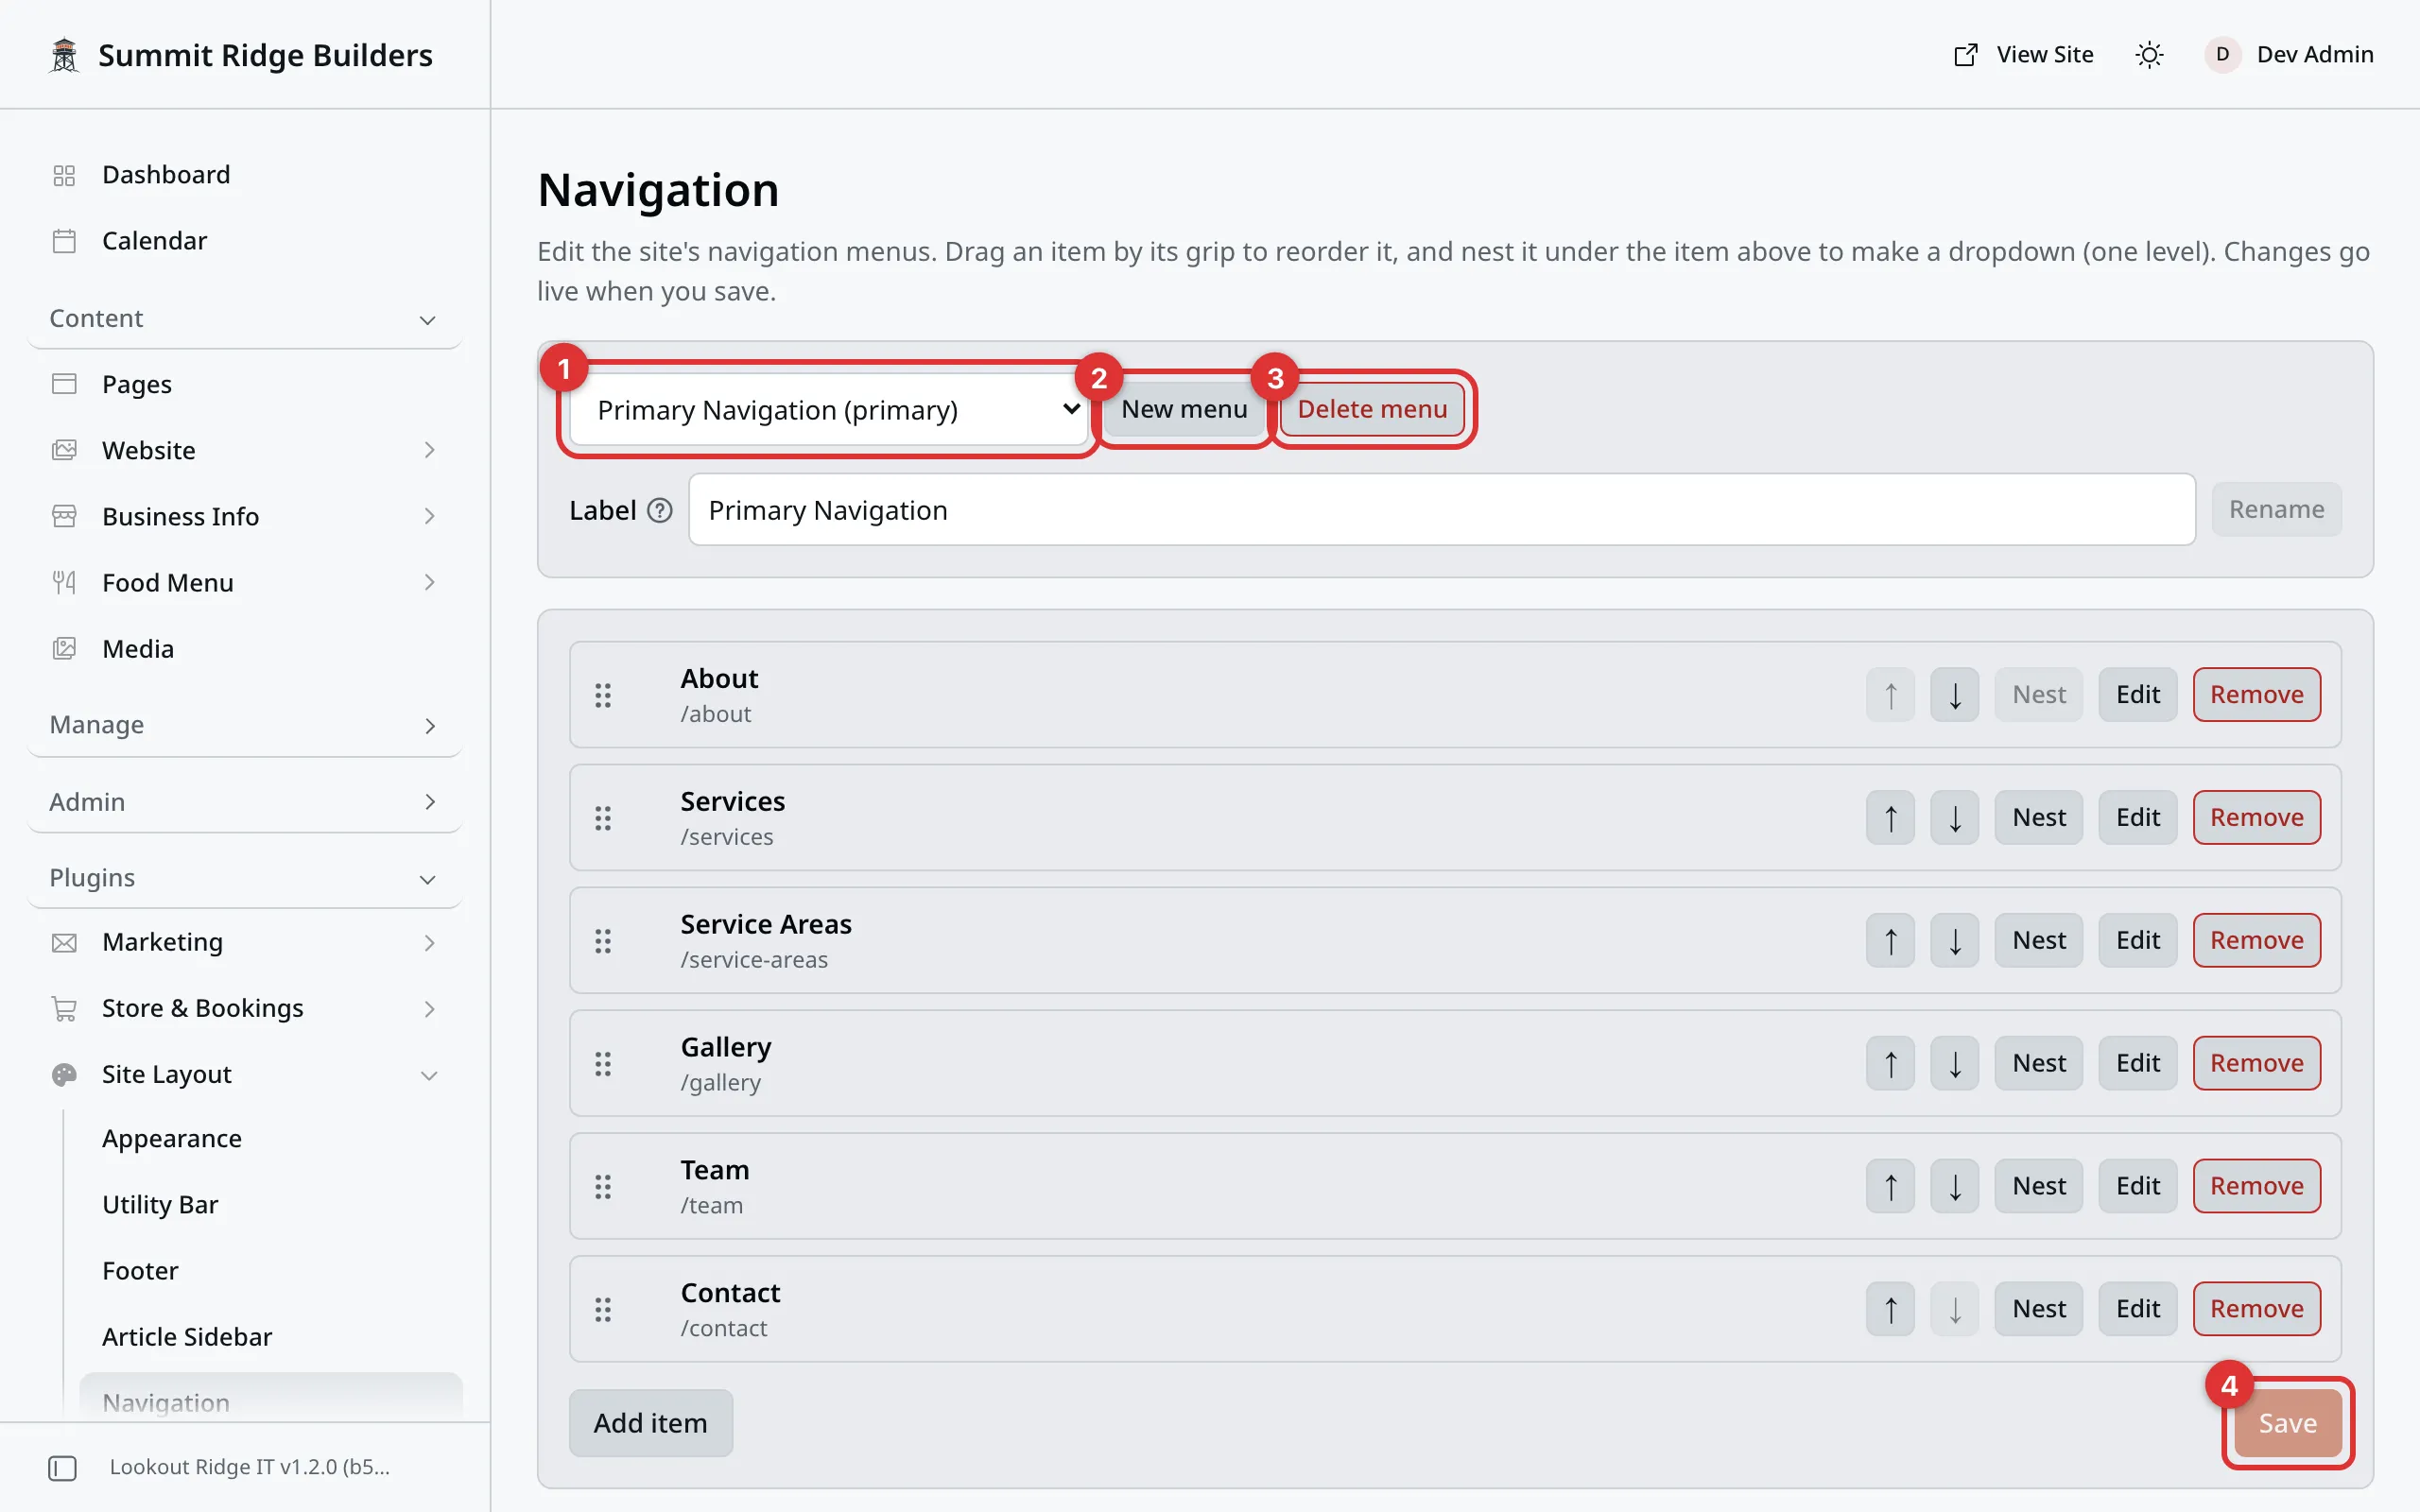
One screen holds every menu. The box at the top picks which one you see.
1. The menu box. Picks which menu you are working on. Each one shows its label, then its name in brackets, such as Primary Navigation (primary).
2. New menu. Makes a new menu. See Making a new menu.
3. Delete menu. Deletes the menu you are looking at. Read the warning below first.
4. Save. Puts your changes on your website. It stays gray until you change something.
Four menus come with your website:
- Primary Navigation is the row of links across the top of every page. This is the one you will open most.
- Footer: Services, Footer: Company and Footer: Support fill the link columns in your footer.
Which footer menus show depends on your website’s style. Some styles use all three, some use one. The footer itself is set up on the Footer screen.
Nothing changes until you click Save
Work through your changes, then click Save at the bottom of the screen. Every change goes on your website at that moment. Until then, the words Unsaved changes sit next to the button, and visitors see the old menu.
If you leave the screen with unsaved changes, your browser asks you first. Pick another menu in the box and the panel asks too.
Tip
After every save, open your website in another tab and look at it. It takes five seconds and it is the only way to be sure.
The list of links
One row is one link. The top of the list is the leftmost link on your website. The bottom is the rightmost, next to your header button.
Each row shows the link’s words and where it goes. At the end of the row sit these buttons:
- ↑ and ↓ move the link up or down one place.
- Nest tucks the link under the one above it, in a drop-down. Unnest brings it back out.
- Edit opens the link so you can change it. Close folds it up again.
- Remove takes the link out of the list.
You can also drag a link. Hold the mouse button down on the six dots at the left of a row, move it, and let go.
Adding a link
- Click Add item, under the list. A new row opens at the bottom.
- Type the Label. These are the words your visitors see, such as
Food Menu. Keep it to one or two words. Long labels crowd the bar. - Under Link, pick where it goes. See below.
- Move the row to where you want it.
- Click Save.
The link is on your website as soon as you save.
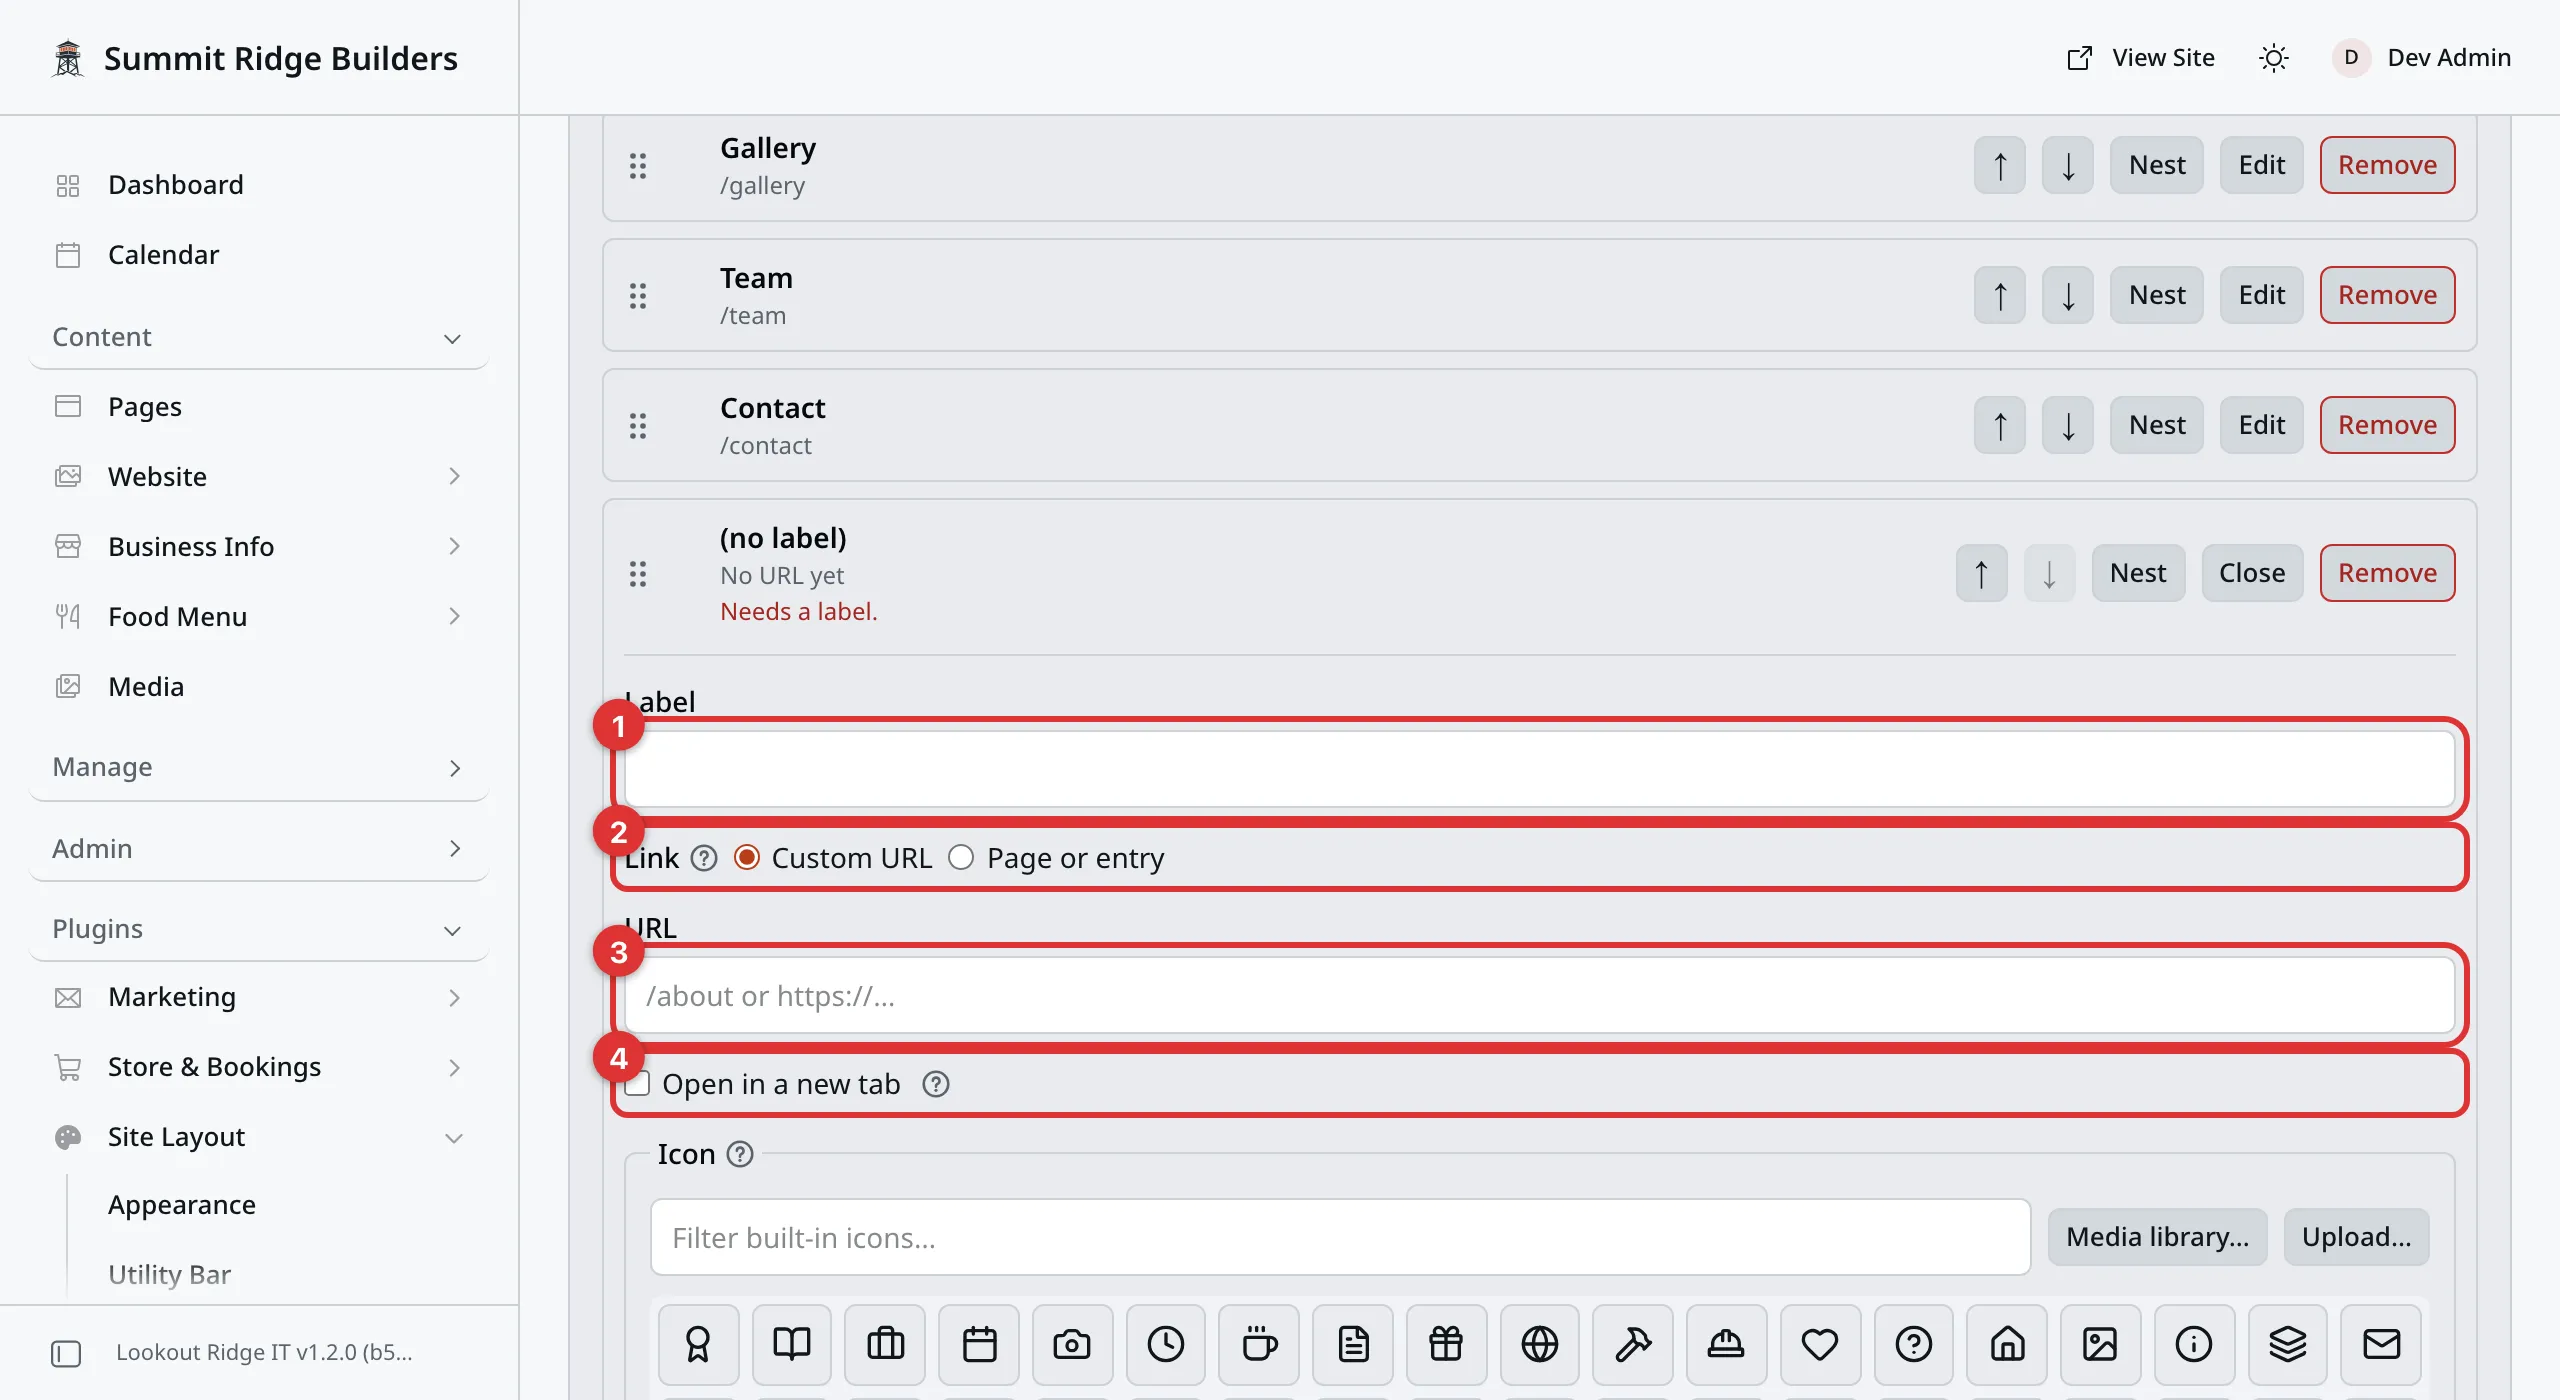
A new row, just after Add item. The red line says what it still needs.
1. Label. The words on the link.
2. Link. Where it goes. Custom URL is picked at first.
3. URL. The address, for a Custom URL.
4. Open in a new tab. Leave it off for your own pages.
Where a link goes
Page or entry links to one of your own pages. The first box picks the kind of entry, such as Pages. Type a word from the title in the search box and click Search, then click the page in the list. If the label is still empty, it fills in with the page’s title.
This is the best choice for your own pages. If the page’s address ever changes, the link follows it by itself.
Custom URL is for anything else. Type the address in the URL box:
- For a page on your own website, start with a slash:
/about,/contact,/shop. - For somewhere else, paste the whole address, starting with
https://.
Open in a new tab opens the link in a second tab and leaves your website open behind it. Use it for links to other people’s websites. Leave it off for your own pages.
Warning
Check a Custom URL before you save. Nothing here tests it.
A wrong address, or a link to a page you have not published, sends every visitor who clicks it to a “page not found” screen. The link looks perfectly normal until somebody uses it.
Type the address into your browser first. If it opens the page you meant, it is safe to use here.
If a row is missing something, it turns red and says so, such as Needs a URL. The panel will not save until you fix it.

A new Food Menu link on the live site, at the right end of the bar.
Links that sites often need
- Your blog. Custom URL
/blog. See Posts. - Your portfolio. Custom URL
/work. See Projects. - Your food menu. Custom URL
/menu. See Menus (Food). - Your shop. Custom URL
/shop. See Shop page. - One shop category. Pick Page or entry, then pick Product Categories in the first box, and find the category. Only a published category works.
Icons on a link
A link can carry a small picture before its words. Open the link with Edit and find the Icon part.
- Click one of the built-in icons in the grid. The box above the grid filters
them by name, such as
phone. - Or click Media library… to pick a picture you uploaded, or Upload… to add one from your computer. It must be a PNG or an SVG file.
- Remove icon takes it off again.
Tint sets the icon’s color. Off keeps its own colors. On matches the color of the link’s words. Brand uses your website’s main color.
Icon only hides the words and shows just the icon. Screen readers still read the words out, so keep a label anyway.
Then click Save.
Tip
A PNG icon needs a see-through background to take a tint. On a solid background, the tint fills the whole square.
Changing or renaming a link
Click Edit on its row, change the Label or the Link, and click Save.
Warning
The new wording is on your website the moment you save.
Renaming does not change the address, so nothing breaks. It does change what regular visitors are looking for. If Gallery becomes Our Work, the people who knew where to click now have to hunt.
Removing a link
Warning
Once you save, the link is gone from your website. Every visitor loses that route, including people who use it every week.
The page itself is untouched. It is still there, still published, still at the same address. Only the link to it is gone.
Before you remove a link, make sure another page still links to that page. If none does, leave the link where it is.
Click Remove on the row, then click Save. Removing a link that has links tucked under it removes those too.
Removed one by mistake and not saved yet? Leave the screen without saving, and the link stays.
Drop-down menus
A link can sit inside another link. The top one grows a small arrow, and the links under it appear in a panel when a visitor clicks it.
To put a link inside another one, move it just under the link it should sit in, then click Nest. It shifts to the right. Click Save.
Only one level works. There is no menu inside a menu.
Warning
A link with links under it stops being a link. Click it and it opens the panel, and nothing else. Its own address is never used.
So if people still need that page, add it again inside the drop-down. Under
Services, add a second link named All services that points at
/services.
On a phone, the same link opens and closes inside the menu when a visitor taps it.
Your footer works differently. A footer column shows only the top level, so a link tucked under another one shows nowhere at all. Keep footer links at the top level.
Making a new menu
A new menu does not show anywhere on its own. To put it on your website, add a Menu piece to your footer on the Footer screen.
- Click New menu.
- Type a Name, such as
footer-links. Use lowercase letters, numbers and dashes only. It cannot change later. - Type a Label, such as
Footer links. It is the name you see here. A footer column with no heading of its own shows it too. - Click Create.
To rename a menu later, change the Label box under the menu box and click Rename.
The name matters in one case. Your website always shows the menu named
primary across the top. That is Primary Navigation.
Deleting a menu
Warning
Delete menu deletes the menu and every link in it, right away. You do not click Save for it. Anywhere your website showed that menu now shows nothing.
Delete Primary Navigation and the top of your website has no links left at all: just your name and your header button.
Nothing on this screen puts a deleted menu back.
Pick the menu in the box, click Delete menu, and confirm.
When something goes wrong
Contact support
Contact us if:
- the links across the top of your website are gone
- you deleted a menu by mistake
- a menu is missing from this screen
Tell us which menu and roughly when. We keep a copy of how your navigation was set up, and putting it back takes us minutes.
Email support@lookoutridgeit.com. Getting support says what to put in the message.
Last updated Oct 20, 2026