

Start here
The admin panel
What the admin panel is, how to get in, and what every part of it does.
The admin panel is your website’s control room. It is where you change what the public sees: your prices, your photos, the words on any page.
Only people you invite can get in. Visitors never see it.
You do not need to know any code. If you can use email, you can do this.
Getting in
- Open your web browser.
- Click the address bar and type your website’s address.
- Add
/_emdash/adminto the end. Like this:yoursite.com/_emdash/admin. - Press Enter.
- Sign in.
You land on the Dashboard. Think of it as home base: every visit starts here, and you can always get back to it.
Tip
Bookmark the panel now, while you are looking at it. Press Cmd+D on a Mac, or Ctrl+D on Windows. You will use this address a lot.
Your first look around
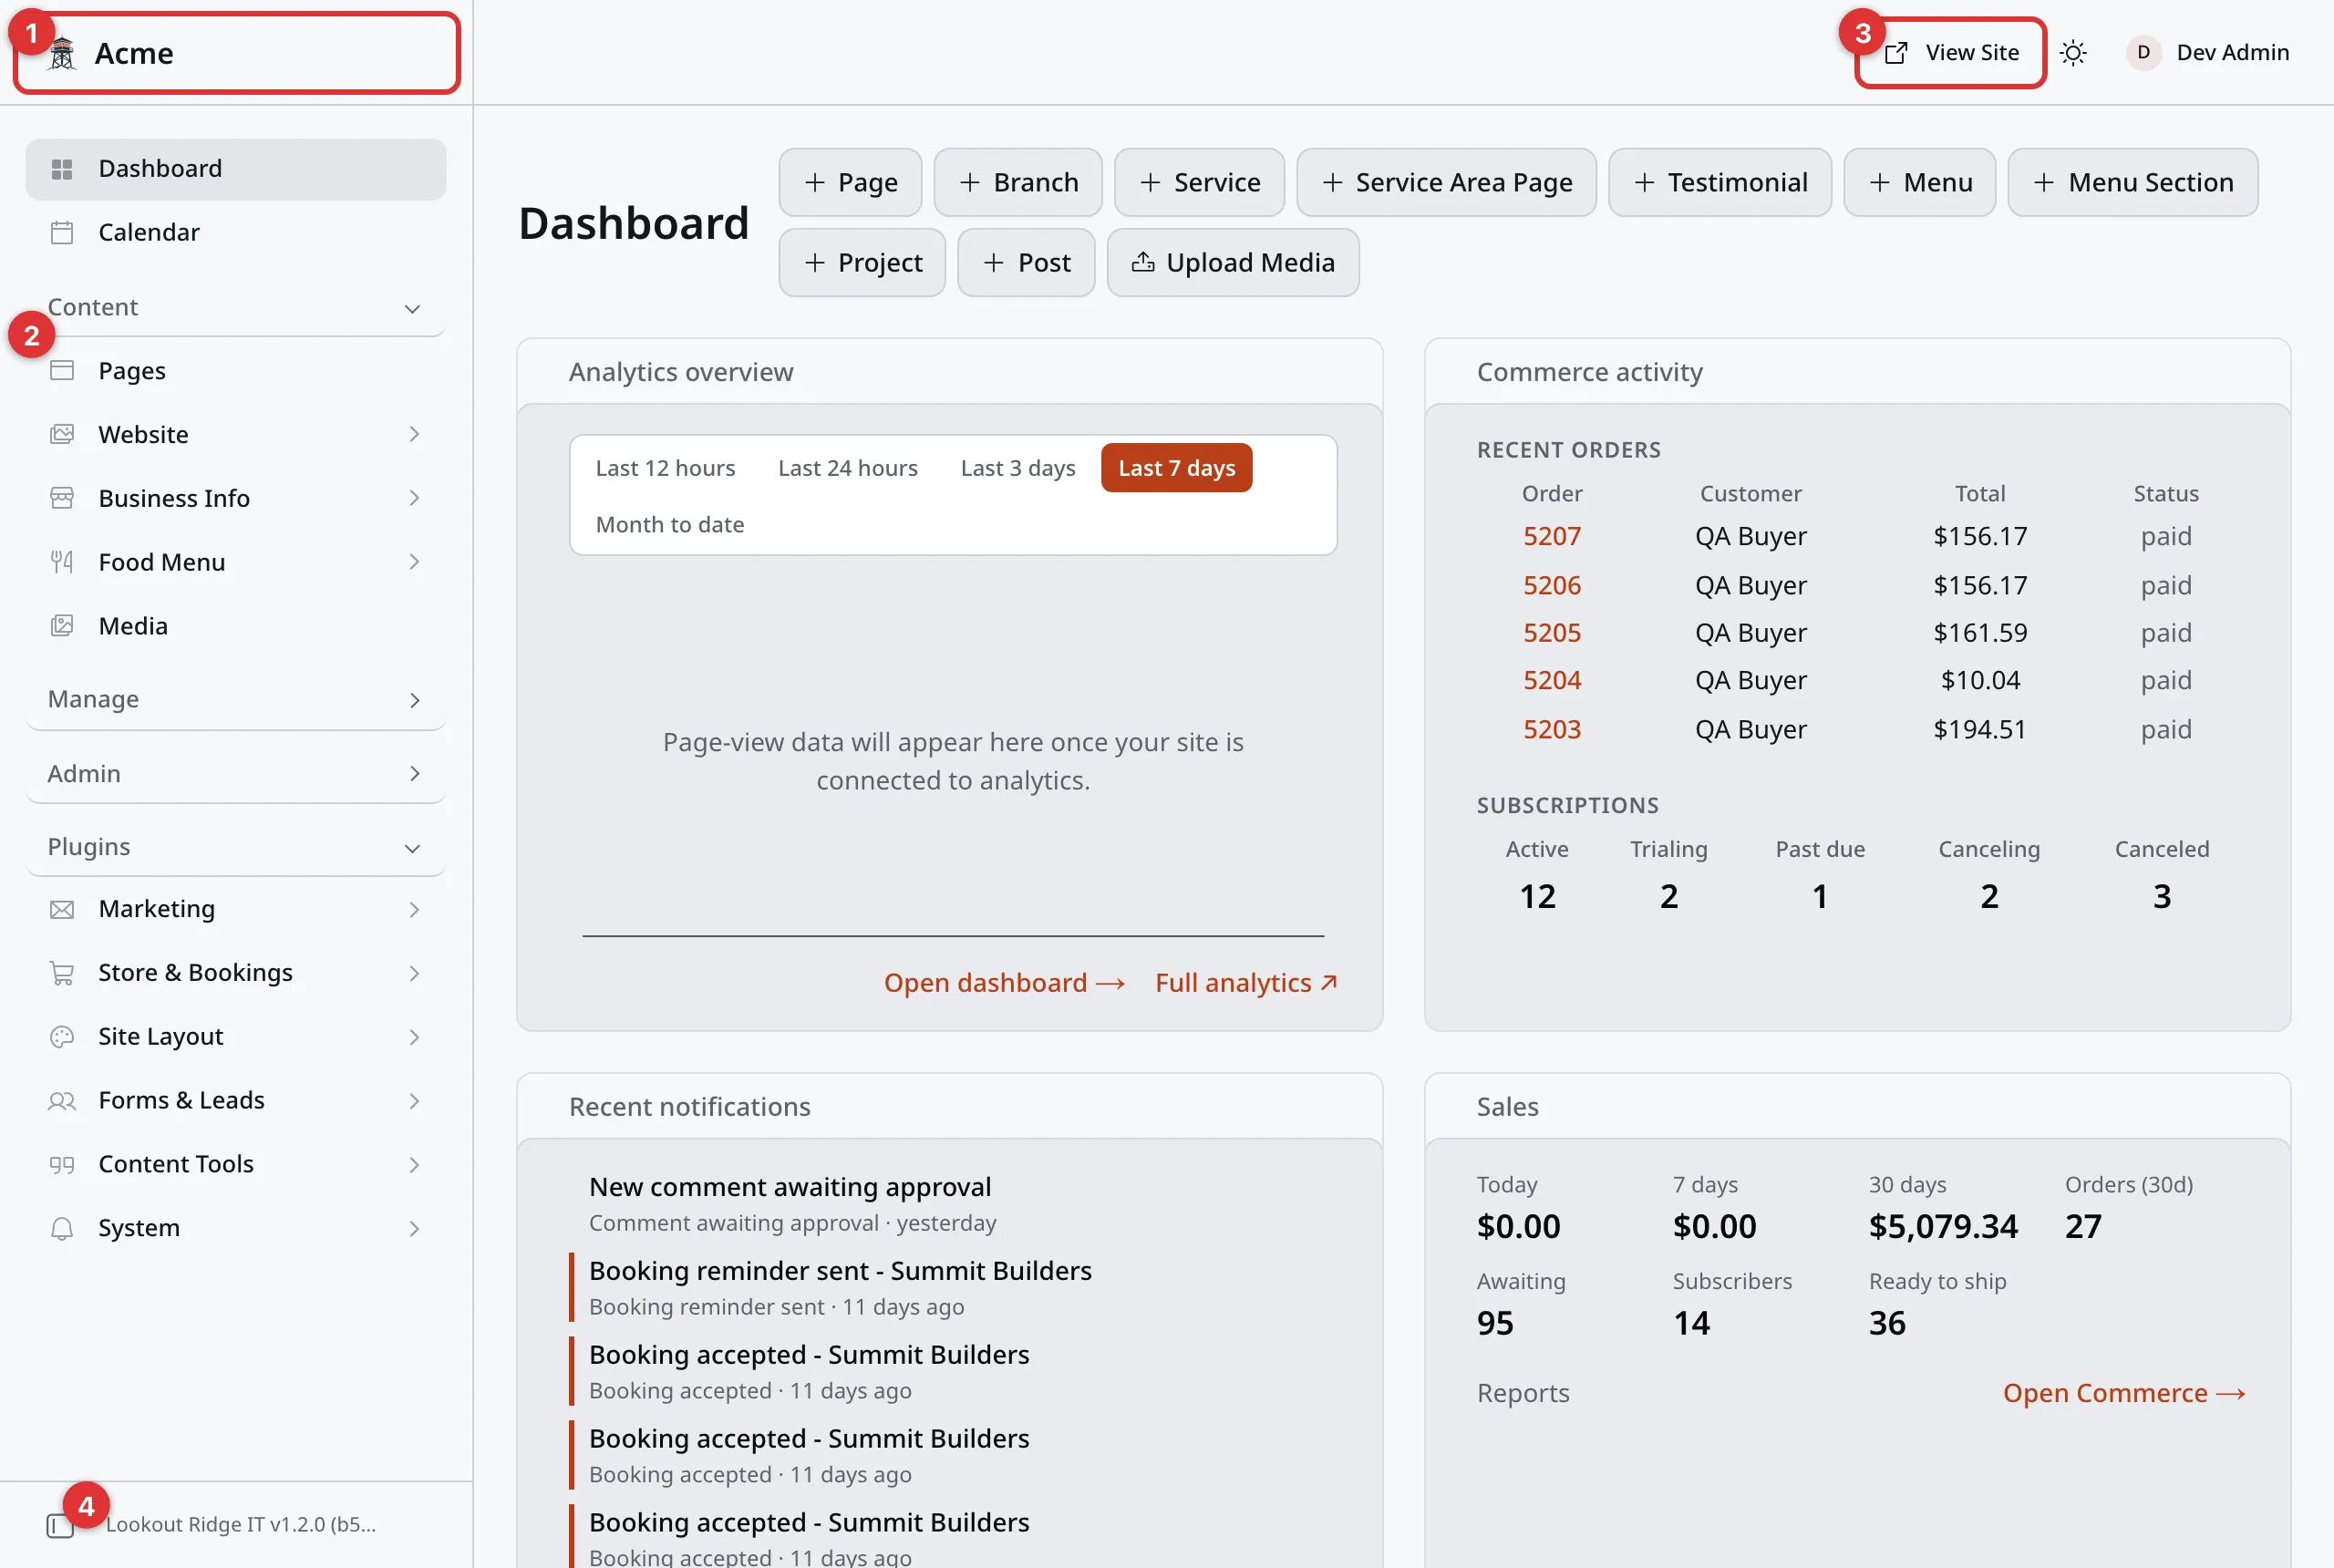
The Dashboard. The four numbered things stay put on every screen.
1. Your site name. Click it from anywhere to come back to the Dashboard. If you ever feel lost, this is the way home. The small mark beside it is the Lookout Ridge IT logo.
2. The menu. Every job starts with a click here. It is split into sections, and the sections hold folders. This manual uses the same big sections: Content, Manage, Admin and Plugins.
3. View Site. Opens your live website in a new tab, exactly as visitors see it. It is the fastest way to check your work after a change.
4. The version line. It reads Lookout Ridge IT, then a number such as v1.2.0. When you contact us for help, tell us this number. It saves time on both ends. A small button beside it shrinks the menu down to icons. Click it again to bring the words back.
Two more controls sit up top. The sun or moon icon next to View Site switches the panel between light and dark. It changes nothing on your website, only your view of the panel. Your name sits beside it. Click it to find Log out.
The Dashboard itself has a row of buttons for making something new, cards from your features, a few counters, and a list of recent changes. Dashboard walks through each part.
The menu, part by part
Dashboard and Calendar sit at the very top. Under them come four sections: Content, Manage, Admin and Plugins. Click a section’s name to fold it shut. Click it again to open it.
Manage and Admin start shut, since you will not need them often. The panel remembers what you open and shut. It only remembers in that one browser, so a new computer starts fresh.
Inside a section, items sit in folders. Click a folder’s name to open or shut it. The folder that holds the screen you are on opens on its own. A folder keeps its name over it even when it holds just one item.
Dashboard is home base, the screen you just met.
Calendar shows what went live and what is set to go live, by date. See the Calendar.
Content is everything people see on your website: your pages, photos, services and reviews. Price changes, new photos, and new text all happen here. You will spend most of your time in this section.
Pages sits at the top of it. The folders come next, in this order:
- Website: Gallery, Testimonials, Projects and Posts, then Categories and Tags.
- Business Info: Branches, Services, Service Area and Service Area Pages.
- Food Menu: Menus (Food) and Menu Sections (Food).
Media, your photos and files, sits at the bottom.
Categories and Tags sort your posts and projects. They sit in the Website folder when your site has both Posts and Projects. With only one of the two, they move down to Manage.
Important
Your business name, address, phone, hours and social links are not in Content. They live on the SEO page, on its Business info tab. Do not mix that up with the Business Info folder, which holds your branches and services. SEO shows you the tab.
Manage holds Comments, where comments from visitors wait for you. See Comments.
Admin is the deep settings: who can sign in, and which features are turned on. Only an Admin user sees it. Most businesses touch it about once a year, usually to add a new employee under Users.
Plugins holds the extra features built for your site, such as an inquiry inbox, a schedule, or photo folders. Its folders come in this order:
- Marketing: Lookout Send, Newsletter, Landing Pages, Analytics, Bio Page and QR Codes.
- Store & Bookings: Commerce, Accounts and Bookings.
- Site Layout: Appearance, Utility Bar, Footer, Article Sidebar, Navigation, Alert Banner, Popups, 404 Page and Showcase Heroes.
- Forms & Leads: Leads, Feedback and Form Designer.
- Content Tools: Testimonials, SEO, Schedule, Media Folders and Team.
- System: Notifications and Email Transport.
Every site gets its own set, so your list may be shorter. A folder sits where its first item falls. So on a site without Lookout Send, the Marketing folder moves down to sit just above System.
The links across the top of your website are under Site Layout, then Navigation. And Testimonials shows up twice on purpose. Under Content it is your list of quotes. Under Plugins it is where you ask customers for new ones.
Important
Some pages in this manual cover add-ons your site may not have. Each of those pages says so at the top. If you do not see it in your menu, nothing is wrong. See Add-ons to add one.
Lists and one-of-a-kind entries
Click anything under Content and you get a list of entries. There are two kinds of screens here, and telling them apart is the best habit you can build in the panel.
A list holds many entries: one per service, one per review, one per page. You add to it and remove from it freely.
A one-of-a-kind entry holds exactly one, because your business only has one. Service Area works this way: one entry holds every town you work in. You never add a second entry. You open the one that exists and edit it.
The list still shows an Add New button, the same as every other list. On a one-of-a-kind screen, leave it alone. The list shows a single entry sitting alone. That is the one to open. Click its title.
On a normal list, Add New is exactly the button you want. It opens a blank form for a new entry.
What a list screen looks like
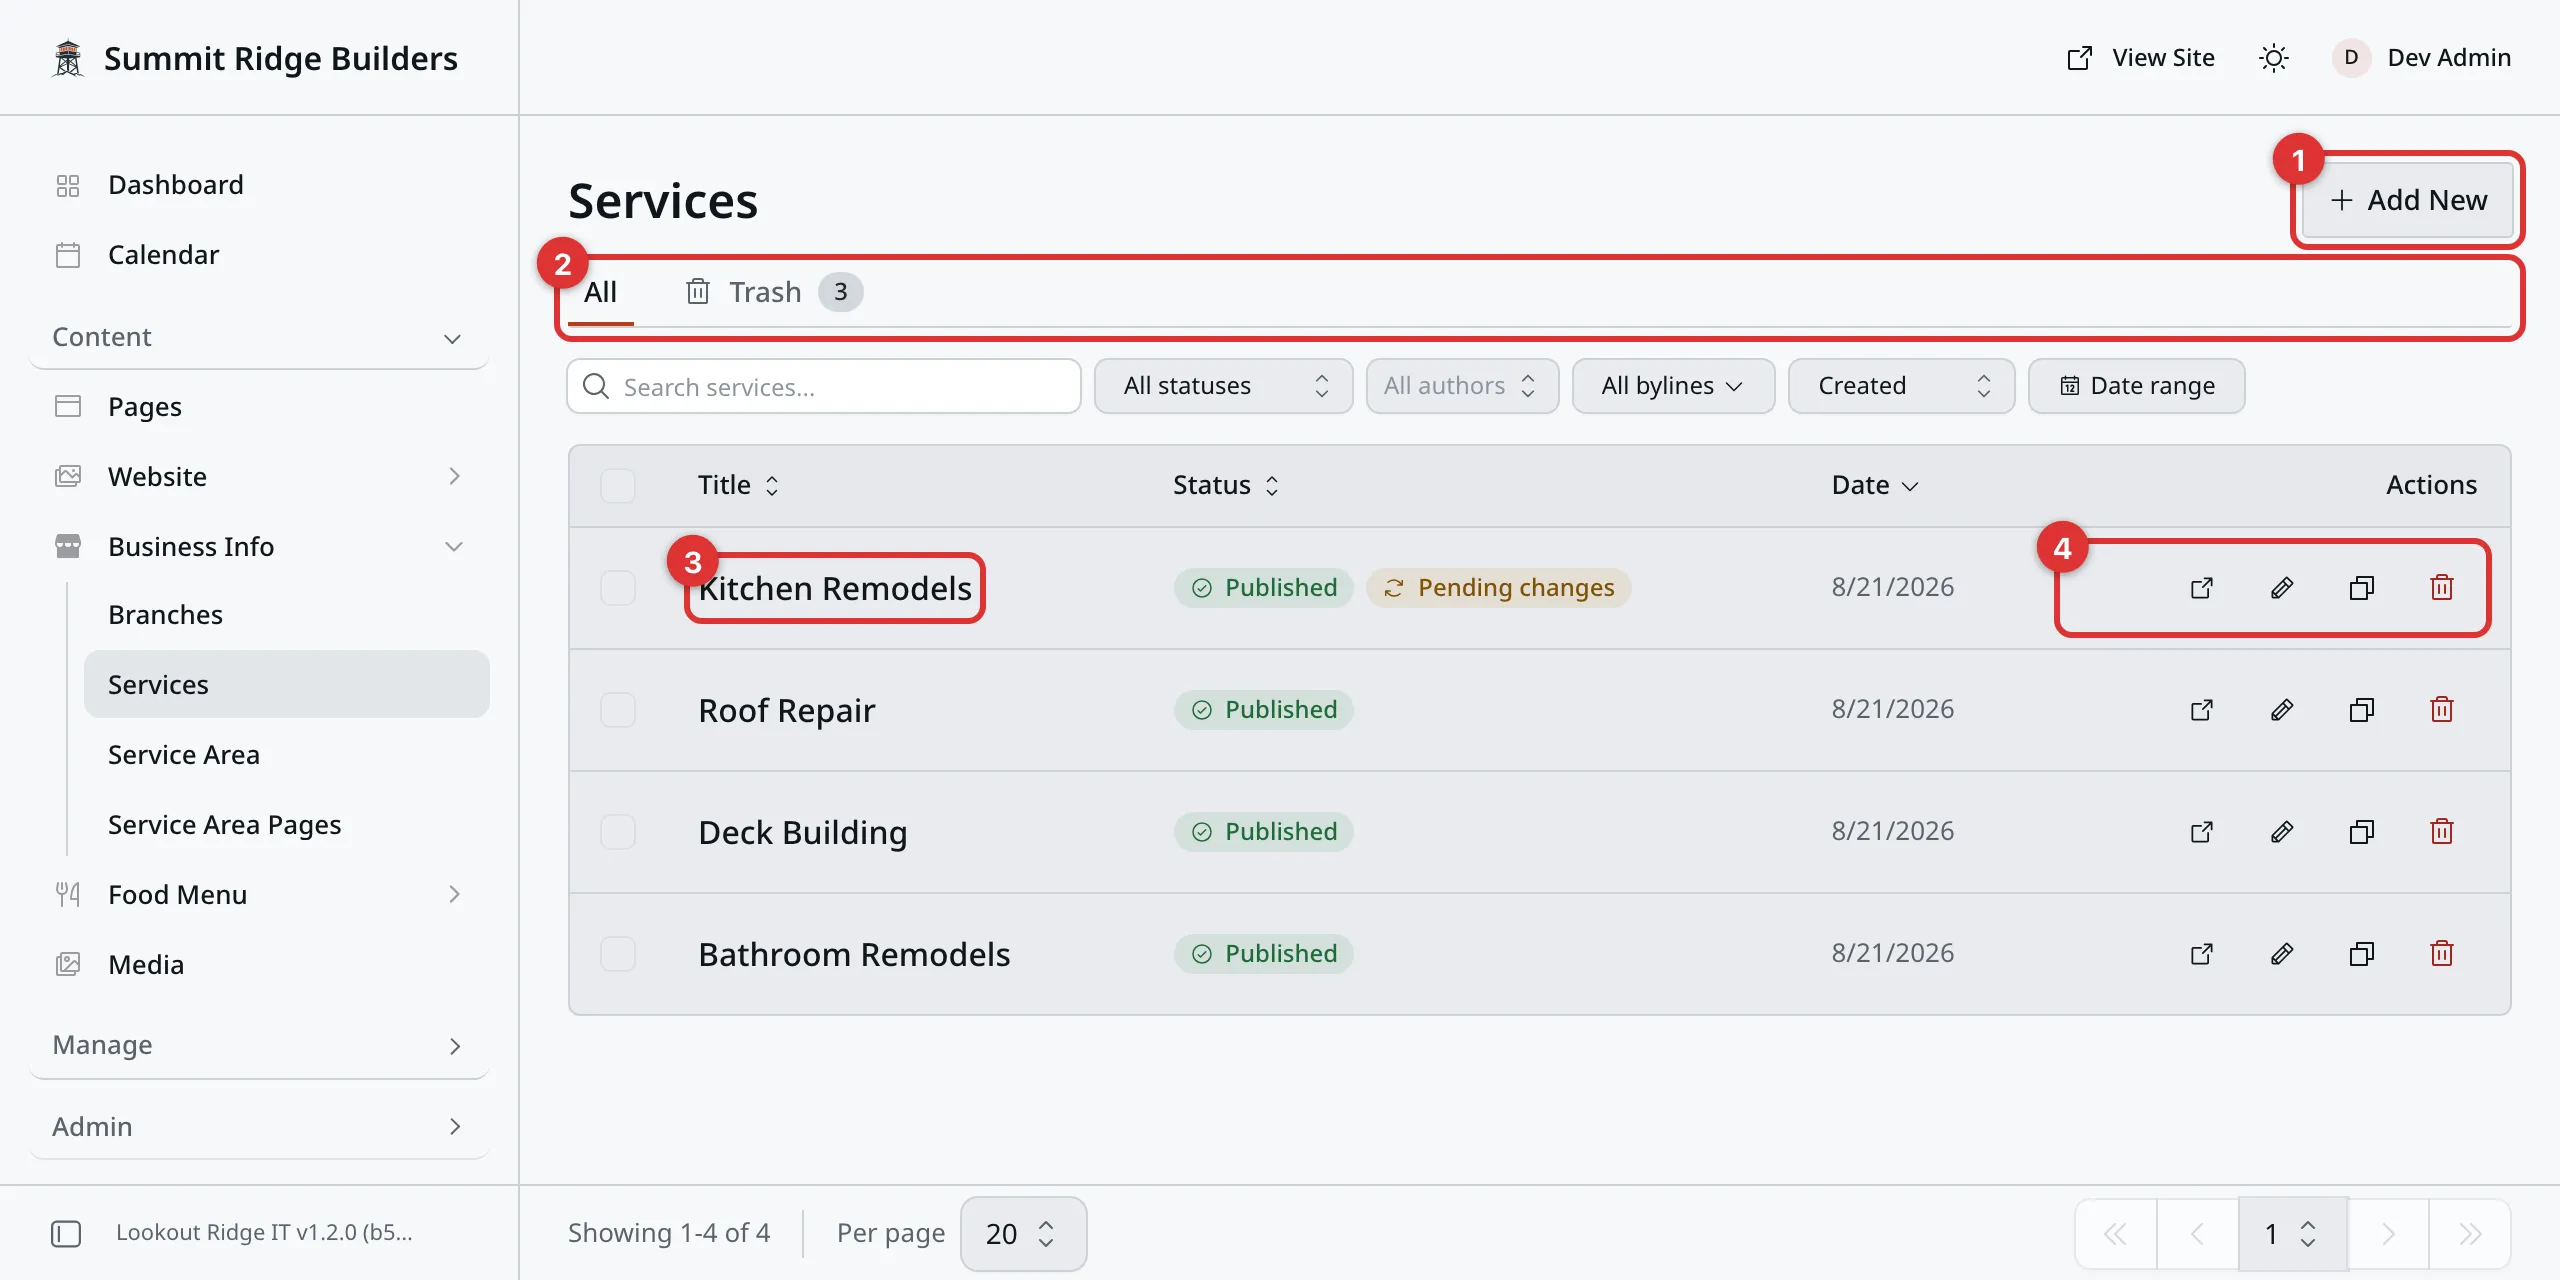
A list screen. Number 3, the title, is how you open an entry.
1. Add New. Starts a new entry.
2. The All and Trash tabs. All shows everything you have. Trash holds the entries you have moved there. Nothing in Trash is gone: think junk drawer, not shredder.
3. The title. Click it to open and edit the entry. Nine times out of ten, this is the click you want.
4. The action icons. Shortcuts, left to right: view the entry on your live site, edit it, make a copy, or move it to Trash.
The search box and the filters only change what you see on this screen. They never change your website, so you can use them freely.
A long list shows 20 entries at a time. Use the page numbers at the bottom to see the rest, or pick a bigger number under Per page.
Each row also has a checkbox at its left end. Check a few rows, and buttons show up to work on all of them at once. Publish puts every checked entry on your website right away.
The yellow Pending changes tag in the picture means someone edited that entry but did not publish the edit. Saving and publishing explains why that matters.
What an edit screen looks like
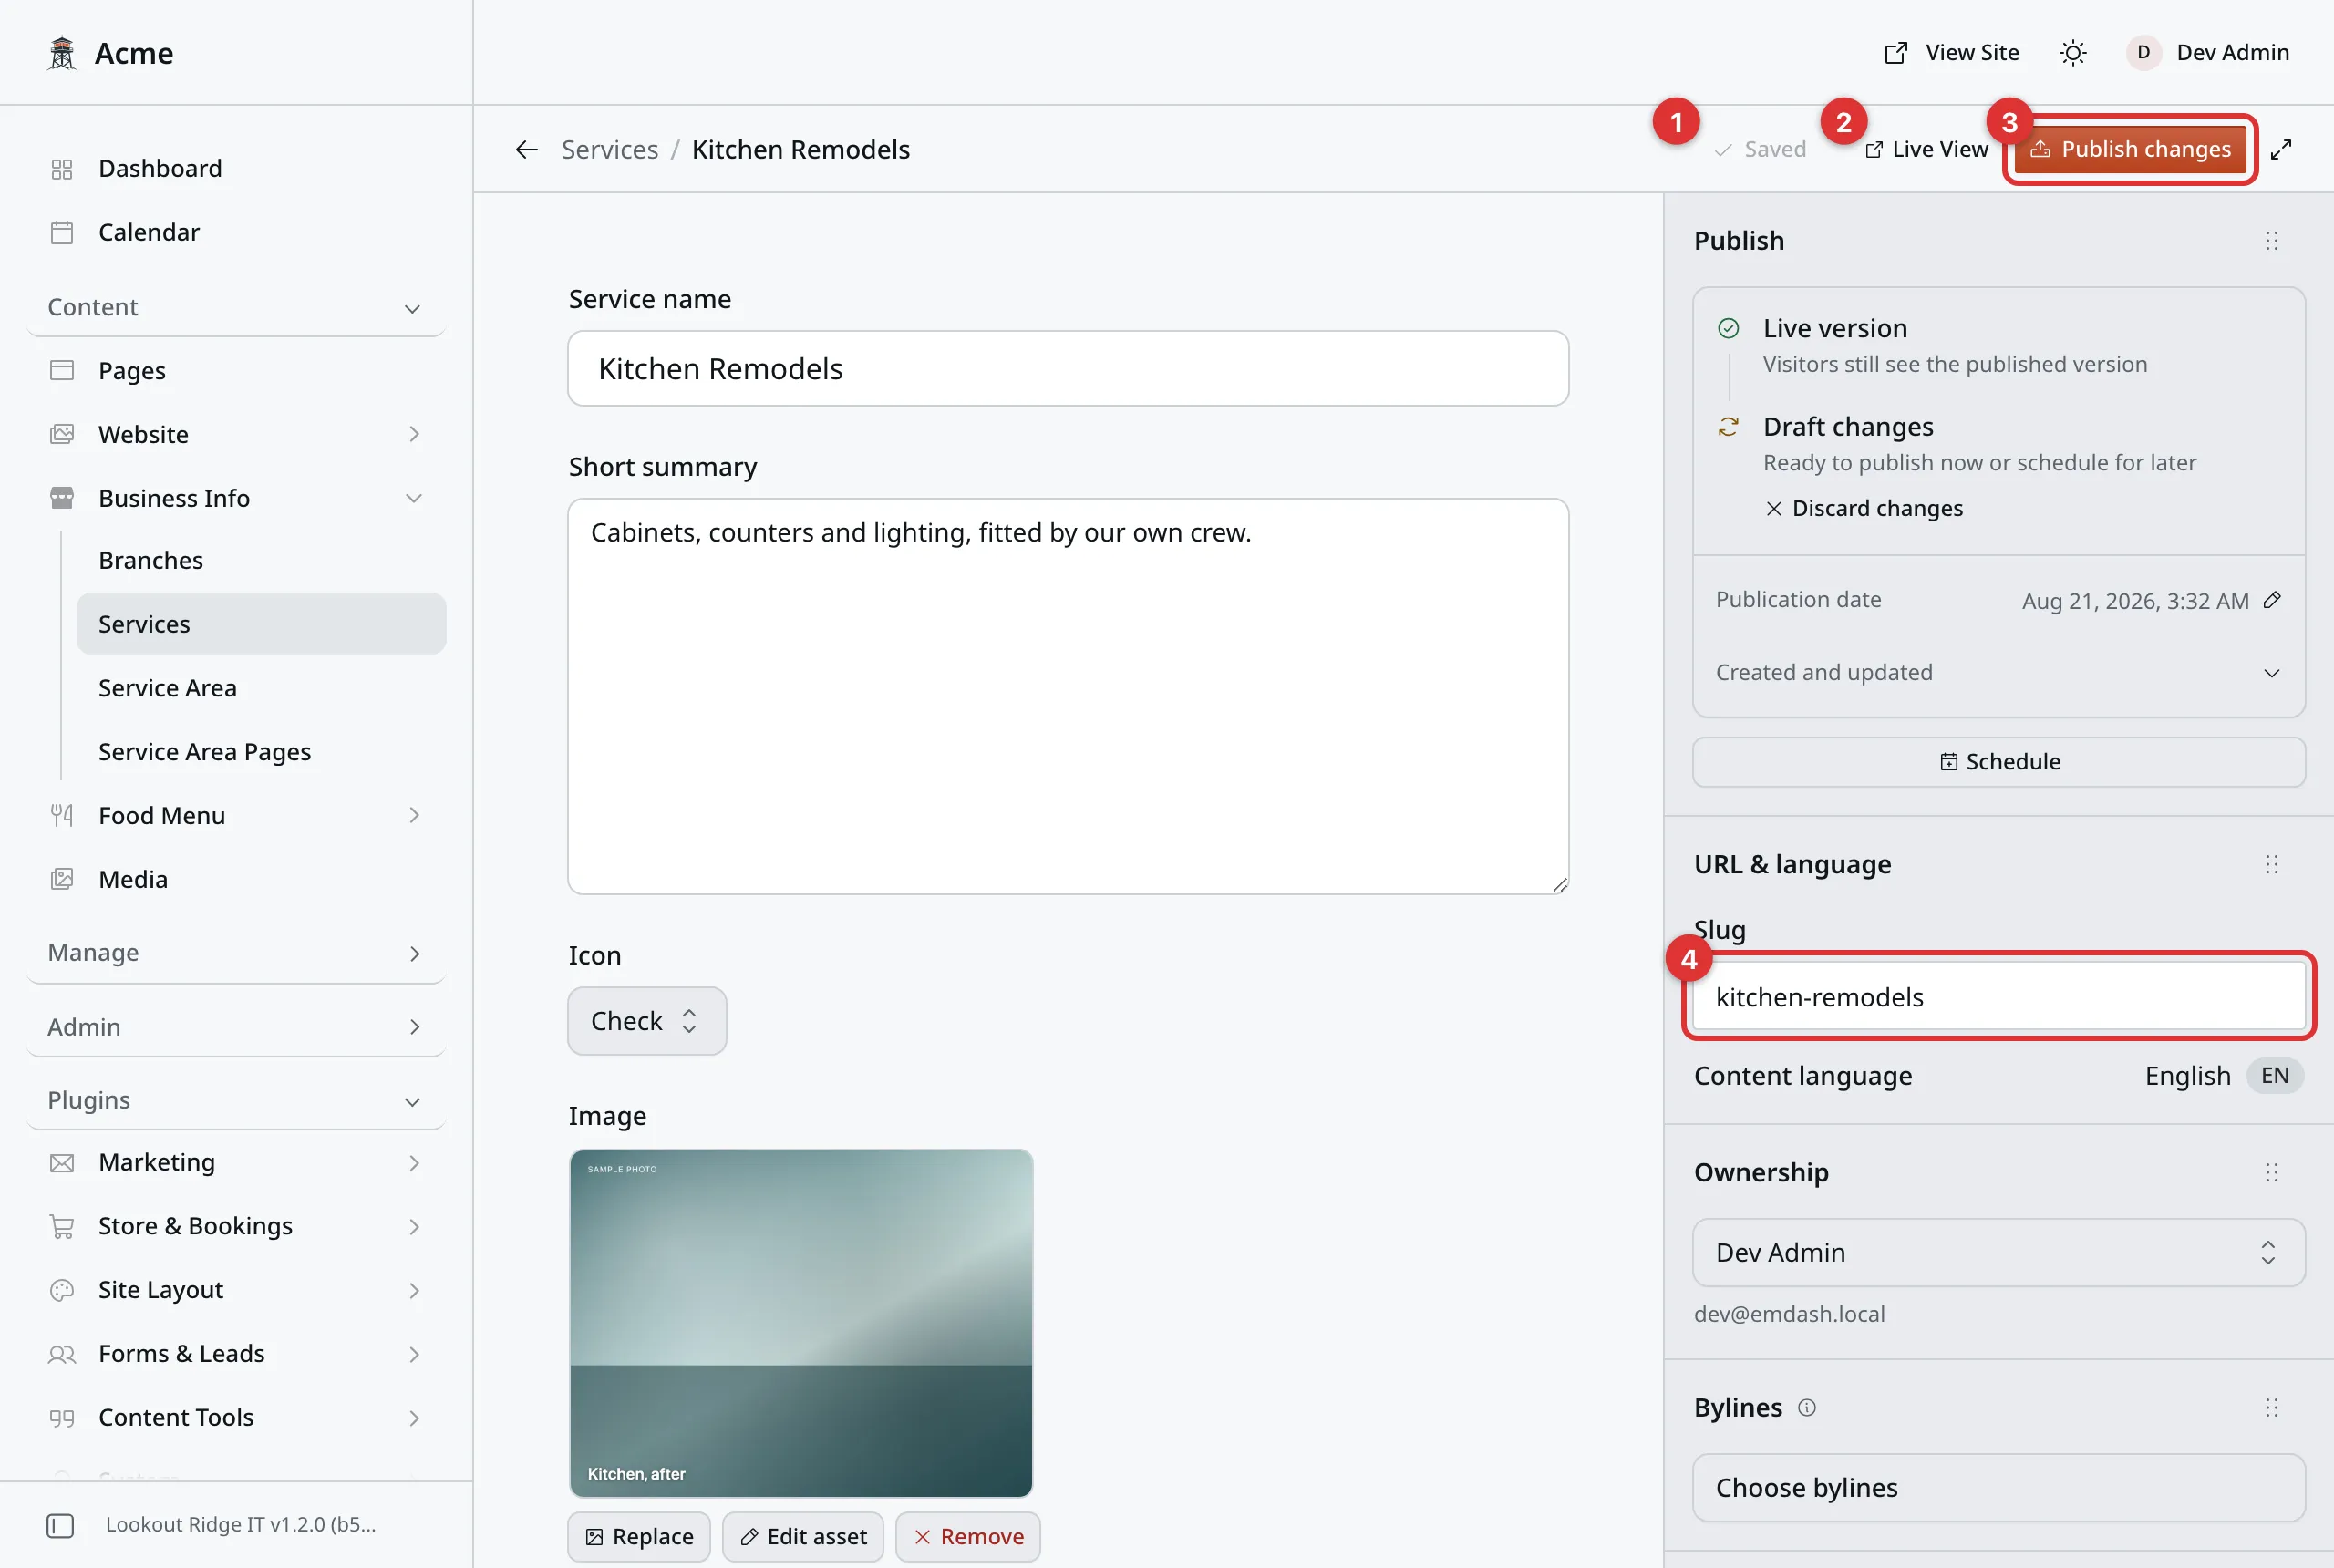
The edit screen. A bar on top, the form in the middle, settings on the right.
Open any entry and it fills the whole work area. A bar runs across the top. The form runs down the middle, with a big box for the title first. A panel of settings sits on the right.
1. Saved. Your work saves on its own. A couple of seconds after you stop typing, this button reads Saving…, then Saved. When it reads Saved, your work is stored. There is nothing to remember to click.
2. Live View. Opens this exact entry on your live website in a new tab. It shows up once the entry is published.
3. Publish changes. Puts your saved changes on the live site. A small box asks you to confirm first. On a draft the button reads Publish now. The last section on this page is about it.
4. Slug. The last part of this entry’s web address. Read the warning below before you ever change it.
The arrow at the left end of the top bar takes you back to the list. The icon at the right end hides everything but the form, so you can write with nothing in the way. Click it again to come back.
The panel on the right is split into parts, each with a heading. A few are worth knowing.
Publish, at the top, tells you where the entry stands. On a draft it reads Draft version, which only you can see. On a published entry it reads Live version, which the public can see. The Schedule button sits here too.
URL & language holds the Slug.
Revisions is your safety net, a time machine for the entry. It keeps the older versions, so you can always look up what something said before you changed it.
Move to Trash, at the very bottom, removes the entry. It goes to the Trash tab on the list screen, so you can still get it back.
You can drag the parts into a new order. If your panel looks different from the picture, that is why.
About the fields: a field marked (optional) can be left empty. Empty means “we do not have one”, and your website simply leaves that detail out. A blank field is always better than a made-up answer.
Warning
The Slug is the last piece of the entry’s web address. If the slug is
water-heater-repair, the page lives at
yoursite.com/services/water-heater-repair.
Change the slug on a published entry, and its address changes when you publish. Your website sends the old address on to the new one by itself, so old links still land on the page. But search results and links on other websites keep the old address for a long time. Each change makes that worse.
Set the slug once, when the entry is new. Then leave it alone.
Saving is not the same as publishing
These are two different steps, and the difference matters.
Saving stores your work. It happens on its own while you type. Nothing reaches the public.
Publishing puts your saved work on the live website. It happens only when you click Publish now, then click Publish now again in the box that asks you to confirm.
So when you edit a page that is already live, your changes wait. The public keeps seeing the old version until you publish. An orange Publish changes button sits in the top bar whenever changes are waiting, and the list screen marks the entry with a yellow Pending changes tag.
Important
Finished editing? Check the top bar. If an orange Publish now or Publish changes button is sitting there, your work is saved but the public cannot see it yet. Click it, then click the same words again in the box that opens. Then click Live View and read the page. That is how you know it worked.
That is the whole tour
Every screen from here on is a variation of what you just saw: a list, an edit form, a publish button. When a page in this manual says “open the entry, make the change, publish”, you will know exactly what that means.
Next, read Saving and publishing. It is the one page worth knowing by heart.
Last updated Oct 20, 2026